Reviews & Articles
Image of the day
About Astromart
My Account
New to Astromart?
Register an account...Need Help?
Ed's Guide to SCT Collimation
Ok, I have seen NUMEROUS posts and write-ups over the years regarding SCT collimation, and MOST of what I have read just doesn’t make the process clear and omits SPECIFIC instructions on Which Screws to loosen or tighten, and WHICH DIRECTION to turn them! SHOCKING NEWS, Yes? I don’t sleep well sometimes knowing that hapless SCT owners are moving mirrors at all hours of the night in search of optical nirvana.
I also hear people say that they only collimate when seeing is good, or when doing high resolution planetary observing because they feel that these are the only time that perfect collimation REALLY matters…. Well, to this, I would say …… I don’t THIIIIINK soooooo….
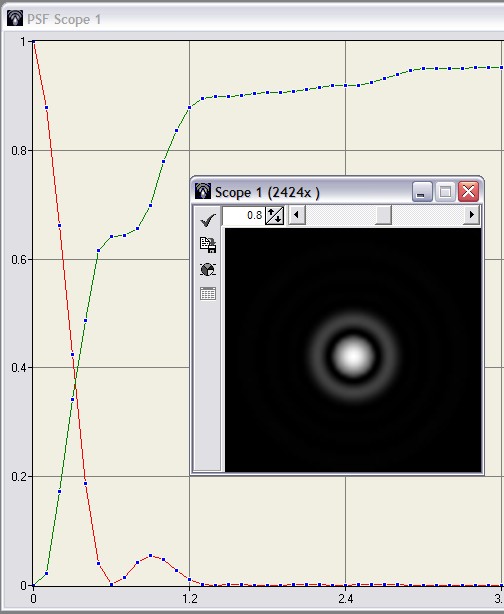
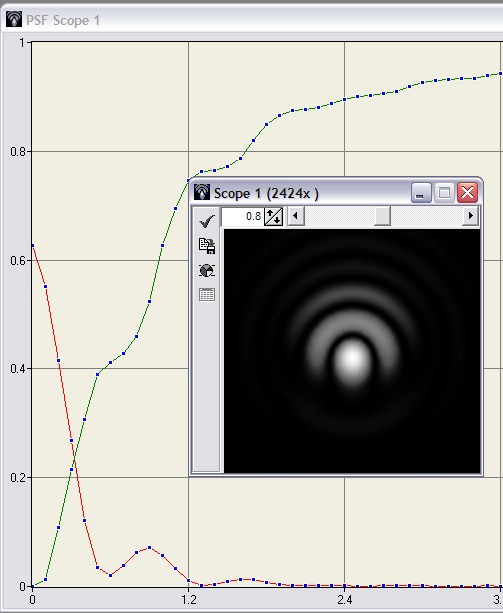
See, the Airy disk is NOT uniformly illuminated. If you were to create a graph that showed the energy (brightness) distribution for a perfect telescope in perfect alignment, MOST of the energy is concentrated in and very close to the PEAK of the spike that we see as the Airy disk. A PSF/EE graph function is available in Aberrator 3.0 if you want to validate what I am going to say here. PSF is “Point Spread Function” and “EE” is “Encircled Energy” You can use Aberrator 3.0 to do comparisons of how miss-alignment will affect your telescope by using the “Coma” function… .A Coma value of about “.3” is about what you would see if your collimation was off 3 arc minutes. As you move energy outside of this peak because of miss-alignment (or poor seeing), the peak gets relatively lower (as compared to a perfect spike). It is this softer, rounder spike that makes the star struggle to “PROTRUDE” through the foreground noise (Light pollution) or stand out from the background noise (Light from the Milky Way). Improper collimation can seriously blunt this spike, and the result is evident on limiting magnitude tests. For example, even with only about 3 arc minutes of miss-collimation, the peak of the spike is LOWERED by almost 10%... And 3 Arc Minutes is the MOST miss-collimation you should accept. Now when SEEING is poor, even MORE energy is being thrown from the spike of the PSF curve, so that even MORE faint stars are lost. As an aside, this is why moderately smaller but highly corrected refractors can often out-perform bigger reflecting instruments in limiting magnitude tests. The refractor concentrates MOST of the energy into the VERY sharp tip of the spike at the center of the Airy disk, and when seeing is not excellent, this extra-sharp spike simply punches through the sky conditions because more of the energy was preserved in the Airy disk in the refractor. Even a moderately obstructed reflector will already start with a peak that is shorter and blunter than a near perfect refractor of moderately smaller size….
Now I often read where big Dob users say that they don’t bother with fine collimation because they use their telescope only for low power viewing and because seeing is often not good for high power viewing, but the fact is that proper collimation aids in ALL viewing for ANY telescope. So while I am writing on how to collimate SCTs, reflectors will ALSO benefit from being kept in perfect collimation. In fact, I would say that at LOW powers, the benefit might be MOST pronounced. This is because as the exit pupil of the eyepiece gets BIGGER (low powers), the affects of light pollution become more pronounced, and the ability to pull out the faintest stars is noticeably impacted. If you dim that small star by 20% (maybe 5 arc minutes of miss-collimation) it might disappear from view, but be VISIBLE if you RAISE the magnification. But by making sure that the collimation is PERFECT, you MIGHT be able to actually SEE that star at lower powers!!! I think that again, this is why people enjoy using small fast refractors. The light pollution simply doesn’t affect them as much, so they get a relatively greater amount of star points in their wide-field, low power views. Yes… CONTRAST is the term, and THAT is ultimately what we are talking about. If you are not collimated wall, you loose contrast, and LOTS of it…. You loose it at low power just as much as you loose it at high power…
I have SEEN the difference at the eyepiece. As the debate today rages on the value of super-high transmission coatings, and people are willing to SPEND more for telescopes that have them, I am amused that many of those people will GIVE UP more energy than the XLT coatings will provide for them just by not bothering to keep their telescopes in excellent collimation!
Ok, ENOUGH on the rant about WHY you should keep your telescope in at LEAST very good collimation (3 arc minutes or better). Here go my FOOLPROOF SCT COLLIMATION INSTRUCTIONS….
First, let’s talk about determining if you NEED to collimate your SCT. This is actually a great place to start.
If you just really don’t CARE about top performance, and use low power only, and every thing looks OK to you NOW, then my advice is to simply leave everything alone!
But if you DO use powers much above say… “1x”, then I think you should at least CHECK your SCTs collimation.
Now the VERY BEST WAY to check optical collimation is with an artificial star. But in order to do this, you have to be pretty far away. The glint of a telephone pole ceramic insulator or the reflection off of a car bumper, either being a few hundred yards away, might work… But I don’t recommend this method. The REASON that I don’t recommend this method is because if you take your telescope out at night at a remote dark-sky observing site, THERE IS NO REFLECTION AVAILABLE… I am surprised at how many people OVERLOOK this simple reality.
So… To me, absolutely learn to do this outside at night under the stars. THAT is the time you will most likely have to do it if you transport your telescope, so that is what I am going to base my procedure on.
There are two different conditions that can present themselves, and the procedure to check collimation is dependent on which of these conditions you are working with.
We will start with the “Perfect” or “Near Perfect” seeing conditions. Of course this is really just a Fantasy, as these conditions are never REALLY present, but hey, it is my article, and I can pretend.
Focus on a star of around Mag 2 or Mag 3. I find that an eyepiece of 6mm to 8mm is all you need, but if you got higher powers, sure, use them.
If you see a PERFECT Airy Disk, you are in PERFECT collimation!
But don’t expect to see this. In most cases, the image will be blurred or distorted too much because of seeing to be able to see exact collimation.
In the case of normal seeing conditions where the first diffraction ring is not fully formed or is in constant motion, or even a smeared mess, which is VERY common, you will have to use a slightly defocused star. How much do you want to defocus? I recommend about 4 to 6 wavelengths. Many people collimate with a much larger amount of defocus (10 waves or more), and the problem is that you loose sensitivity when you defocus too much. Large amounts are good if your miss-alignment is gross, but when you get into the 3 arc minute realm, it becomes hard to see the miss-alignment if the pattern is too big. If you defocus so that a couple of bright rings are visible with a little spot at the center, and the little spot looks close to the center of the bright rings, your collimation is probably very good.

For really critical collimation in average seeing conditions, I recommend using 4 to 6 wavelengths of defocus, and rather than looking at the secondary shadow, I suggest that you use that TINY LITTLE SPOT in the center of the defocused pattern when doing final precision calibration (Unless seeing is perfect, in which case you should use a focused star). That spot is the Airy disk, and even in less than perfect seeing, it will usually be visible. And because it is distinct, when you use very little defocus, you can more accurately judge its position in relationship to the bright ring.
Now to be sure, some people report being able to get good results using larger patterns to collimate with, but using this method, you can get just able almost PERFECT collimation even in less than great seeing.
Ok… The FIRST time you do this, I want you to do it inside, and as a VISUALIZATION run-through. If you follow these instructions inside, and ensure that you fully understand them, repeating the steps under the stars is EASY.
Inside, put your OTA into a position near level. It doesn’t even have to be close to perfect; just roughly level the tube to the ground.
Go to the front of the OTA, and find the secondary adjustment screw that is CLOSEST to being at the 12 O’clock position relative to the ground. It does not MATTER if it is not TRULY at the 12’ O’clock position, but pick the highest of the three screws. For the alignment procedure to work, I will always refer to that screw as the 12 O’clock screw.
Put a piece of masking tape on the outside of the corrector cell on a line extending from the center of the secondary radial THROUGH the 12 O’clock screw to the edge of the corrector. It does not have to be perfect. Just pretty close.
Ok. Go back to the diagonal end of the telescope. Now, rotate the diagonal so that the eyepiece lens is lined up on the tape mark on the corrector cell at the front of the telescope. Once again, it only has to be pretty close.
Ok, now the eyepiece might not again be at the TRUE 12 O’clock position, but it is at the ALIGNMENT 12 O’clock, and that is what is important.
Again, we are doing this exercise inside, but I am going to TEACH you how to do the procedure here and later you will do it outside under the stars.
Now imagine that you look through the eyepiece. The 12 O’clock position in the eyepiece is the position that aligns to the tape mark on the corrector. The OPPOSITE side of the eyepiece view (what most people would call the “Bottom” of the view) is the 6 O’clock position. Draw an imaginary line between those to points.
Some further terminology is now called for. Imagine that there is a line that goes through the tape at on the outside of the corrector and extends back along the tube and bisects the view in the eyepiece to the 6 O’clock position, and that the telescope is cut in half by this line. As viewed from the BACK of the telescope, I will call the secondary screw that is on the RIGHT side of the line as the “Right” adjusting screw. Again, this is viewed from the REAR of the telescope. And obviously, the other screw now becomes the “Left” adjustment screw. Forgive me for being so specific, but I want to make these directions FOOLPROOF. If you understand my terminology, you can perfectly and EASILY collimate your telescope. Trust me…
Ok. Now we have a 12 O’clock screw, a Right screw, and a Left screw.
Now I want you to imagine that you are doing the alignment. You would begin by CENTERING your target star in the field of view. In violation of my previous recommendation, I want you to imagine that you collimation is bad, and that it shows clearly if you defocus to 10 waves. As you do, you will see the inner ring of the Fresnel pattern emerge from the shadow of the secondary so that 3 rings are visible… A bright inner and outer ring with a dimmer ring or two between them. Now the shadow itself will either look like it is to the RIGHT or to the LEFT of the 12/6 dividing line in the eyepiece or offset to the right or left side of the Fresnel pattern. Do NOT worry about whether it is high or low in the fresnel pattern, only if it is left or right. When doing critical collimation, you will be working with the little spot at the CENTER of the pattern (the Airy disk), but for purpose of explaining the procedure, it helps to think of it in terms of moving the secondary shadow…
Now here is where you would START adjusting. Let’s imaging that the shadow of the secondary is offset to the left in the Fresnel pattern. Again, do NOT concern yourself with whether it is high or low. Only concern yourself if it is offset to the left or right.
Now before you pretend to turn the adjusting screws, let’s talk a bit about terminology here as well. When I say to TIGHTEN a screw, it MIGHT mean that you have to LOOSEN the opposite screw. Not the opposite TWO screws, only the OPPOSITE screw. So for centering left to right (or vice versa), only work with the Left and Right adjustment screws. If you can’t TIGHTEN the correct screw, then you will have to loosen the opposite screw. I will NOT always SAY this. It should be understood that if I say to TIGHTEN the Right screw, you may have to LOOSEN the LEFT screw FIRST. I am ASSUMING that you are doing it this way. But in any case, when centering from left to right, try to ONLY use the left and right screws. GET your grubby little mitts off of that 12 O’clock screw for now!
Ok, Here goes. If the secondary shadow is offset to the left you should TIGHTEN the RIGHT SCREW! Use TINY movements on the order of 1/12 of a turn or so. After EACH tweak, you would re-center the target star before adjusting again. Continue to tighten the Right screw a bit at a time until the secondary shadow looks centered from left to right in the pattern. Again, do not worry if the shadow moves up or down.. Only concern yourself that it is moving left or right as necessary to center it on the pattern of concentric rings or on the 12/6 dividing line if the rest of the pattern is centered. Remember this simple rule… TIGHTENING the LEFT or RIGHT screw PULLS the secondary shadow towards the screw you are tightening. This is SOOO SIMPLE!
Ok.. Once you have the shadow of the secondary centered on the pattern from left to right, it is now time to adjust it up or down. HERE is where people get confused when doing SCT collimation with a diagonal… The action of the Left and Right screws is actually REVERSED because of the presence of the diagonal. But the 12 O’clock screw is unaffected by the presence of the diagonal (the image is not inverted top to bottom). Consequently, it will behave just the OPPOSITE of the Left and Right screw. In other words, if you TIGHENT the 12 O’Clock screw, it will PUSH the secondary shadow AWAY!!!! So in your example, lets imagine that the secondary shadow is low, and you need to move it UP on the 12/6 line. To do this, you LOOSEN the 12 O’clock screw. Tightening the 12 O’clock screw PUSHES the Shadow AWAY from the screw. But there is another factor here. When you work with the 12 O’clock screw, if you DO need to tighten it, NOW you will loosen BOTH the Left and Right screw an equal amount. How much?? A 20th of a turn for each AT THE MOST. A TINY movement is all that is necessary here. SO if the secondary shadow is low, as it is in our imaginary example, to raise it on the 12/6 line, you would very slightly loosen the 12 O’clock screw and equally tighten the Left and Right screws.
Now the instructions are MUCH longer than the actual process takes. And once you learn HOW the screws move the secondary shadow, it becomes EASY to consistently get the thing to move EXACTLY how you WANT it to move. SOO SIMPLE!
Ok.. Now when you do this outside, you might want to pick a DIFFERENT 12 O’clock screw. This is fine. Use the one that puts the diagonal in the best position for you to work with for your mount, eyepiece location, and your conditions. The 12 O’clock screw position is actually arbitrary, but once you DESIGNATE a screw as a 12 O’clock screw, the other screws have to take the relative Left and Right designation for that adjustment cycle.
Another point. For PERFECT collimation, when you are using only a few wavelengths of de-focus, look for the tiny point near the CENTER of the ring bright ring. In average seeing, you can get VERY close by defocusing so that ONLY the bright outer ring is visible along with the tiny point at near the middle. You can actually get superb results by applying these steps to that tiny point and getting it as perfectly centered as possible.
Now this process might seem confusing at first, but if you read through the directions and do an imaginary dry run, I am SURE that you will be successful with it comes to the real thing.
Remember, use VERY small turns of the screwdriver. Re-center after EVERY adjustment. If you do this procedure as described here ONCE, you will forever be able to repeat the result quickly and effortlessly.
Finally, the age old question… How tight is tight enough. Some people say that you will pinch your secondary if you tighten the adjustment screws too tight… Think again, Sherlock.. If you have ever SEEN an SCT Secondary mirror out of its cell, you will see that it is bonded to a THICK disk of steel. I would guess that this disk is at LEAST 3/16”. It would take a LOT of pressure to BEND this sucker, even a little bit. It is unlikely that you would put TOO much pressure on it with normal hand tools. But this is NOT a cylinder head for a Chevy 454, so DON’T use a breaker bar… LOL… But SNUG doesn’t do it here. TIGHT is better. If you only go with “Snug,” you collimation will change on you with normal handling and temperature changes. But when you tighten, use TINY movements. By this, I mean 1/30th of a turn or so, EQUALLY on each screw. Recheck collimation after all screws are tight, and if it is off in one direction or the other, LOOSEN the appropriate adjustment screw(s) to touch it up, and it might not even be necessary to tighten the opposite screw(s).
If you follow this procedure, you will learn to collimate in SECONDS with NO trial and error. You will move secondary EXACTLY where you want it with a minimum of hassle.
I hope that this procedure is useful to you. Improper collimation can affect the telescope across its COMPLETE range, and on nights of average seeing can make the difference between seeing 20 stars in a super-faint NCG cluster or maybe 25 stars in that same object. No kidding. Depending on your local sky conditions and your level of miss-collimation, it is one of the best things you can do to ensure that you see EVERYTHING that there IS to see in your field of view….
My regards.
I also hear people say that they only collimate when seeing is good, or when doing high resolution planetary observing because they feel that these are the only time that perfect collimation REALLY matters…. Well, to this, I would say …… I don’t THIIIIINK soooooo….
See, the Airy disk is NOT uniformly illuminated. If you were to create a graph that showed the energy (brightness) distribution for a perfect telescope in perfect alignment, MOST of the energy is concentrated in and very close to the PEAK of the spike that we see as the Airy disk. A PSF/EE graph function is available in Aberrator 3.0 if you want to validate what I am going to say here. PSF is “Point Spread Function” and “EE” is “Encircled Energy” You can use Aberrator 3.0 to do comparisons of how miss-alignment will affect your telescope by using the “Coma” function… .A Coma value of about “.3” is about what you would see if your collimation was off 3 arc minutes. As you move energy outside of this peak because of miss-alignment (or poor seeing), the peak gets relatively lower (as compared to a perfect spike). It is this softer, rounder spike that makes the star struggle to “PROTRUDE” through the foreground noise (Light pollution) or stand out from the background noise (Light from the Milky Way). Improper collimation can seriously blunt this spike, and the result is evident on limiting magnitude tests. For example, even with only about 3 arc minutes of miss-collimation, the peak of the spike is LOWERED by almost 10%... And 3 Arc Minutes is the MOST miss-collimation you should accept. Now when SEEING is poor, even MORE energy is being thrown from the spike of the PSF curve, so that even MORE faint stars are lost. As an aside, this is why moderately smaller but highly corrected refractors can often out-perform bigger reflecting instruments in limiting magnitude tests. The refractor concentrates MOST of the energy into the VERY sharp tip of the spike at the center of the Airy disk, and when seeing is not excellent, this extra-sharp spike simply punches through the sky conditions because more of the energy was preserved in the Airy disk in the refractor. Even a moderately obstructed reflector will already start with a peak that is shorter and blunter than a near perfect refractor of moderately smaller size….
Now I often read where big Dob users say that they don’t bother with fine collimation because they use their telescope only for low power viewing and because seeing is often not good for high power viewing, but the fact is that proper collimation aids in ALL viewing for ANY telescope. So while I am writing on how to collimate SCTs, reflectors will ALSO benefit from being kept in perfect collimation. In fact, I would say that at LOW powers, the benefit might be MOST pronounced. This is because as the exit pupil of the eyepiece gets BIGGER (low powers), the affects of light pollution become more pronounced, and the ability to pull out the faintest stars is noticeably impacted. If you dim that small star by 20% (maybe 5 arc minutes of miss-collimation) it might disappear from view, but be VISIBLE if you RAISE the magnification. But by making sure that the collimation is PERFECT, you MIGHT be able to actually SEE that star at lower powers!!! I think that again, this is why people enjoy using small fast refractors. The light pollution simply doesn’t affect them as much, so they get a relatively greater amount of star points in their wide-field, low power views. Yes… CONTRAST is the term, and THAT is ultimately what we are talking about. If you are not collimated wall, you loose contrast, and LOTS of it…. You loose it at low power just as much as you loose it at high power…
I have SEEN the difference at the eyepiece. As the debate today rages on the value of super-high transmission coatings, and people are willing to SPEND more for telescopes that have them, I am amused that many of those people will GIVE UP more energy than the XLT coatings will provide for them just by not bothering to keep their telescopes in excellent collimation!
Ok, ENOUGH on the rant about WHY you should keep your telescope in at LEAST very good collimation (3 arc minutes or better). Here go my FOOLPROOF SCT COLLIMATION INSTRUCTIONS….
First, let’s talk about determining if you NEED to collimate your SCT. This is actually a great place to start.
If you just really don’t CARE about top performance, and use low power only, and every thing looks OK to you NOW, then my advice is to simply leave everything alone!
But if you DO use powers much above say… “1x”, then I think you should at least CHECK your SCTs collimation.
Now the VERY BEST WAY to check optical collimation is with an artificial star. But in order to do this, you have to be pretty far away. The glint of a telephone pole ceramic insulator or the reflection off of a car bumper, either being a few hundred yards away, might work… But I don’t recommend this method. The REASON that I don’t recommend this method is because if you take your telescope out at night at a remote dark-sky observing site, THERE IS NO REFLECTION AVAILABLE… I am surprised at how many people OVERLOOK this simple reality.
So… To me, absolutely learn to do this outside at night under the stars. THAT is the time you will most likely have to do it if you transport your telescope, so that is what I am going to base my procedure on.
There are two different conditions that can present themselves, and the procedure to check collimation is dependent on which of these conditions you are working with.
We will start with the “Perfect” or “Near Perfect” seeing conditions. Of course this is really just a Fantasy, as these conditions are never REALLY present, but hey, it is my article, and I can pretend.
Focus on a star of around Mag 2 or Mag 3. I find that an eyepiece of 6mm to 8mm is all you need, but if you got higher powers, sure, use them.
If you see a PERFECT Airy Disk, you are in PERFECT collimation!
But don’t expect to see this. In most cases, the image will be blurred or distorted too much because of seeing to be able to see exact collimation.
In the case of normal seeing conditions where the first diffraction ring is not fully formed or is in constant motion, or even a smeared mess, which is VERY common, you will have to use a slightly defocused star. How much do you want to defocus? I recommend about 4 to 6 wavelengths. Many people collimate with a much larger amount of defocus (10 waves or more), and the problem is that you loose sensitivity when you defocus too much. Large amounts are good if your miss-alignment is gross, but when you get into the 3 arc minute realm, it becomes hard to see the miss-alignment if the pattern is too big. If you defocus so that a couple of bright rings are visible with a little spot at the center, and the little spot looks close to the center of the bright rings, your collimation is probably very good.
For really critical collimation in average seeing conditions, I recommend using 4 to 6 wavelengths of defocus, and rather than looking at the secondary shadow, I suggest that you use that TINY LITTLE SPOT in the center of the defocused pattern when doing final precision calibration (Unless seeing is perfect, in which case you should use a focused star). That spot is the Airy disk, and even in less than perfect seeing, it will usually be visible. And because it is distinct, when you use very little defocus, you can more accurately judge its position in relationship to the bright ring.
Now to be sure, some people report being able to get good results using larger patterns to collimate with, but using this method, you can get just able almost PERFECT collimation even in less than great seeing.
Ok… The FIRST time you do this, I want you to do it inside, and as a VISUALIZATION run-through. If you follow these instructions inside, and ensure that you fully understand them, repeating the steps under the stars is EASY.
Inside, put your OTA into a position near level. It doesn’t even have to be close to perfect; just roughly level the tube to the ground.
Go to the front of the OTA, and find the secondary adjustment screw that is CLOSEST to being at the 12 O’clock position relative to the ground. It does not MATTER if it is not TRULY at the 12’ O’clock position, but pick the highest of the three screws. For the alignment procedure to work, I will always refer to that screw as the 12 O’clock screw.
Put a piece of masking tape on the outside of the corrector cell on a line extending from the center of the secondary radial THROUGH the 12 O’clock screw to the edge of the corrector. It does not have to be perfect. Just pretty close.
Ok. Go back to the diagonal end of the telescope. Now, rotate the diagonal so that the eyepiece lens is lined up on the tape mark on the corrector cell at the front of the telescope. Once again, it only has to be pretty close.
Ok, now the eyepiece might not again be at the TRUE 12 O’clock position, but it is at the ALIGNMENT 12 O’clock, and that is what is important.
Again, we are doing this exercise inside, but I am going to TEACH you how to do the procedure here and later you will do it outside under the stars.
Now imagine that you look through the eyepiece. The 12 O’clock position in the eyepiece is the position that aligns to the tape mark on the corrector. The OPPOSITE side of the eyepiece view (what most people would call the “Bottom” of the view) is the 6 O’clock position. Draw an imaginary line between those to points.
Some further terminology is now called for. Imagine that there is a line that goes through the tape at on the outside of the corrector and extends back along the tube and bisects the view in the eyepiece to the 6 O’clock position, and that the telescope is cut in half by this line. As viewed from the BACK of the telescope, I will call the secondary screw that is on the RIGHT side of the line as the “Right” adjusting screw. Again, this is viewed from the REAR of the telescope. And obviously, the other screw now becomes the “Left” adjustment screw. Forgive me for being so specific, but I want to make these directions FOOLPROOF. If you understand my terminology, you can perfectly and EASILY collimate your telescope. Trust me…
Ok. Now we have a 12 O’clock screw, a Right screw, and a Left screw.
Now I want you to imagine that you are doing the alignment. You would begin by CENTERING your target star in the field of view. In violation of my previous recommendation, I want you to imagine that you collimation is bad, and that it shows clearly if you defocus to 10 waves. As you do, you will see the inner ring of the Fresnel pattern emerge from the shadow of the secondary so that 3 rings are visible… A bright inner and outer ring with a dimmer ring or two between them. Now the shadow itself will either look like it is to the RIGHT or to the LEFT of the 12/6 dividing line in the eyepiece or offset to the right or left side of the Fresnel pattern. Do NOT worry about whether it is high or low in the fresnel pattern, only if it is left or right. When doing critical collimation, you will be working with the little spot at the CENTER of the pattern (the Airy disk), but for purpose of explaining the procedure, it helps to think of it in terms of moving the secondary shadow…
Now here is where you would START adjusting. Let’s imaging that the shadow of the secondary is offset to the left in the Fresnel pattern. Again, do NOT concern yourself with whether it is high or low. Only concern yourself if it is offset to the left or right.
Now before you pretend to turn the adjusting screws, let’s talk a bit about terminology here as well. When I say to TIGHTEN a screw, it MIGHT mean that you have to LOOSEN the opposite screw. Not the opposite TWO screws, only the OPPOSITE screw. So for centering left to right (or vice versa), only work with the Left and Right adjustment screws. If you can’t TIGHTEN the correct screw, then you will have to loosen the opposite screw. I will NOT always SAY this. It should be understood that if I say to TIGHTEN the Right screw, you may have to LOOSEN the LEFT screw FIRST. I am ASSUMING that you are doing it this way. But in any case, when centering from left to right, try to ONLY use the left and right screws. GET your grubby little mitts off of that 12 O’clock screw for now!
Ok, Here goes. If the secondary shadow is offset to the left you should TIGHTEN the RIGHT SCREW! Use TINY movements on the order of 1/12 of a turn or so. After EACH tweak, you would re-center the target star before adjusting again. Continue to tighten the Right screw a bit at a time until the secondary shadow looks centered from left to right in the pattern. Again, do not worry if the shadow moves up or down.. Only concern yourself that it is moving left or right as necessary to center it on the pattern of concentric rings or on the 12/6 dividing line if the rest of the pattern is centered. Remember this simple rule… TIGHTENING the LEFT or RIGHT screw PULLS the secondary shadow towards the screw you are tightening. This is SOOO SIMPLE!
Ok.. Once you have the shadow of the secondary centered on the pattern from left to right, it is now time to adjust it up or down. HERE is where people get confused when doing SCT collimation with a diagonal… The action of the Left and Right screws is actually REVERSED because of the presence of the diagonal. But the 12 O’clock screw is unaffected by the presence of the diagonal (the image is not inverted top to bottom). Consequently, it will behave just the OPPOSITE of the Left and Right screw. In other words, if you TIGHENT the 12 O’Clock screw, it will PUSH the secondary shadow AWAY!!!! So in your example, lets imagine that the secondary shadow is low, and you need to move it UP on the 12/6 line. To do this, you LOOSEN the 12 O’clock screw. Tightening the 12 O’clock screw PUSHES the Shadow AWAY from the screw. But there is another factor here. When you work with the 12 O’clock screw, if you DO need to tighten it, NOW you will loosen BOTH the Left and Right screw an equal amount. How much?? A 20th of a turn for each AT THE MOST. A TINY movement is all that is necessary here. SO if the secondary shadow is low, as it is in our imaginary example, to raise it on the 12/6 line, you would very slightly loosen the 12 O’clock screw and equally tighten the Left and Right screws.
Now the instructions are MUCH longer than the actual process takes. And once you learn HOW the screws move the secondary shadow, it becomes EASY to consistently get the thing to move EXACTLY how you WANT it to move. SOO SIMPLE!
Ok.. Now when you do this outside, you might want to pick a DIFFERENT 12 O’clock screw. This is fine. Use the one that puts the diagonal in the best position for you to work with for your mount, eyepiece location, and your conditions. The 12 O’clock screw position is actually arbitrary, but once you DESIGNATE a screw as a 12 O’clock screw, the other screws have to take the relative Left and Right designation for that adjustment cycle.
Another point. For PERFECT collimation, when you are using only a few wavelengths of de-focus, look for the tiny point near the CENTER of the ring bright ring. In average seeing, you can get VERY close by defocusing so that ONLY the bright outer ring is visible along with the tiny point at near the middle. You can actually get superb results by applying these steps to that tiny point and getting it as perfectly centered as possible.
Now this process might seem confusing at first, but if you read through the directions and do an imaginary dry run, I am SURE that you will be successful with it comes to the real thing.
Remember, use VERY small turns of the screwdriver. Re-center after EVERY adjustment. If you do this procedure as described here ONCE, you will forever be able to repeat the result quickly and effortlessly.
Finally, the age old question… How tight is tight enough. Some people say that you will pinch your secondary if you tighten the adjustment screws too tight… Think again, Sherlock.. If you have ever SEEN an SCT Secondary mirror out of its cell, you will see that it is bonded to a THICK disk of steel. I would guess that this disk is at LEAST 3/16”. It would take a LOT of pressure to BEND this sucker, even a little bit. It is unlikely that you would put TOO much pressure on it with normal hand tools. But this is NOT a cylinder head for a Chevy 454, so DON’T use a breaker bar… LOL… But SNUG doesn’t do it here. TIGHT is better. If you only go with “Snug,” you collimation will change on you with normal handling and temperature changes. But when you tighten, use TINY movements. By this, I mean 1/30th of a turn or so, EQUALLY on each screw. Recheck collimation after all screws are tight, and if it is off in one direction or the other, LOOSEN the appropriate adjustment screw(s) to touch it up, and it might not even be necessary to tighten the opposite screw(s).
If you follow this procedure, you will learn to collimate in SECONDS with NO trial and error. You will move secondary EXACTLY where you want it with a minimum of hassle.
I hope that this procedure is useful to you. Improper collimation can affect the telescope across its COMPLETE range, and on nights of average seeing can make the difference between seeing 20 stars in a super-faint NCG cluster or maybe 25 stars in that same object. No kidding. Depending on your local sky conditions and your level of miss-collimation, it is one of the best things you can do to ensure that you see EVERYTHING that there IS to see in your field of view….
My regards.
Funding Member

