Auto-Guiding Software Review
Stark-Lab’s PHD
The last time I was astro-imaging, I went inside to get a cup of coffee. I sat down on the couch and proceeded to nod off and go to sleep. Over an hour later I awoke (somewhat in a panic). I ran outside thinking that I’d wasted an hour of clear skies (and in Louisiana clear, dark skies are hard to come by). The guide star was right where I left it.
Dr. Craig Stark (http://www.stark-labs.com/) had come to the rescue with PHD Guiding! “PHD” stands for “Push Here Dummy”. The program was initially developed for the SAC®4-2 and Orion StarShoot® DSCI cameras, but with the latest release, has grown to include the Meade line of DSI® cameras (including the Pro’s and DSI II’s) and long/short exposure web cams. PHD currently works with Microsoft Windows XP® and a Mac version is on the way.
Like many guiding programs available today, PHD will key in on the “Centroid” of the guide star. Because of this, you are able to guide and image with virtually any combination of guide/imaging scope. In addition, PHD Guiding takes this one step further with an automatic calibration routine, so there is no need calculate Field of Views, focal lengths, etc. as found in other auto-guiding programs. I have a 10” Newtonian and an ED80mm APO Refractor. I have successfully used both OTA’s in the guiding/imaging roll (guiding with one and imaging with the other and visa-versa). PHD is compatible with the ShoestringAstronomy GPINT-PT and GPUSB ST-4 style guide port interface adapters, and uses ASCOM’s Pulse Guide Commands for lag-free accurate commands.
The beauty of this program is its simplicity. Other auto-guiding programs require you to set several parameters prior to using the program (some of which can be rather daunting to people like me who wonder “What the heck is that”?), and then run through complicated calibration routines. PHD does have a little “brain” icon in the lower right corner allowing you to set guiding parameters, but in my opinion, those are there to simply tweak the guiding IF necessary. I personally have never changed anything in that window!
Auto guiding with PHD is this easy: Open the program. Click on the camera icon. Click on the “arrow” icon to start seeing stars. Once you have decided on a guide star, (basically if you can see it, you can use it to guide), Click on “Stop”. Click on the telescope icon and pick your mount/adapter type from the drop down. Click on the star (a little green box will be drawn around the star). Here comes the GOOD part. PHD will take over and run through the AUTOMATIC calibration routine! At the start of calibration a large yellow cross appears on the screen. After the program has run through the automatic calibration routine, the large yellow cross is replaced with a green cross and you are off and running.
Dimmer stars will take longer to calibrate, but you can change the capture time from .005 seconds to 5 seconds to increase the star brightness (I have successfully auto-guided with the .005 second update, and routinely use .5 second updates). In general, I recommend .5 to 2 second updates. This will give enough time for the star to blur so you won’t end up “chasing the seeing” which you’ll get at very short exposures.
To quote another satisfied user:
“Last night I tested a new guiding software program I found on the net. PHD Guiding, by Stark Labs, is the kind of software I've been hoping someone would write! The guiding test I did with it passed with flying colors!”
-Mike Broussard.
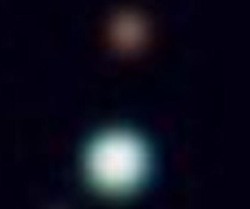
The image on the left is an actual crop from one of my images. NO star rounding or special filters/distortion correcting affects have been added! The crop is the last in a series of 5 from the original image – I have NO idea what the magnification factor is – I can tell you that I resized the image to 800 pixels wide after each of the crops to enlarge the picture enough to see the stars (these two stars are not visible in the original image).
All too often, bright stars in an image appear nice and round and the dim stars do not. Dim stars in an image will appear slightly elongated with even the smallest errors in guiding. I think the above image speaks for itself. Depending upon the target object brightness, I routinely take 2 to 5 minute sub frames for stacking. There have been a couple of reports that people have gone as long as a single 30 minute exposure!
I saved the best for last. This program is being provided to astro-photographers for FREE! Yes, that’s correct, FREE, and according to the web sight will remain so.
To learn more about PHD Guiding, please check out the Yahoo User Groups:
http://tech.groups.yahoo.com/group/autoguiding/
and
http://tech.groups.yahoo.com/group/stark-labs-astronomy-software/
It should be noted that Dr. Stark started neither of these two groups. He is a member of both so he can receive feedback for any possible Bugs, and has gladly implemented many suggestions for features and improvement. You will also be able to view the complete set of Test Images I took in the Photos Section of the Stark-labs user group.
You just can’t do any better than this. It’s free, easy to use, and does what it says it does. So - sit back, let PHD do the driving, and enjoy looking up at the night sky instead of peering through a small reticule eyepiece trying to center that small star in the cross hairs!
Lon K. Shelton
The last time I was astro-imaging, I went inside to get a cup of coffee. I sat down on the couch and proceeded to nod off and go to sleep. Over an hour later I awoke (somewhat in a panic). I ran outside thinking that I’d wasted an hour of clear skies (and in Louisiana clear, dark skies are hard to come by). The guide star was right where I left it.
Dr. Craig Stark (http://www.stark-labs.com/) had come to the rescue with PHD Guiding! “PHD” stands for “Push Here Dummy”. The program was initially developed for the SAC®4-2 and Orion StarShoot® DSCI cameras, but with the latest release, has grown to include the Meade line of DSI® cameras (including the Pro’s and DSI II’s) and long/short exposure web cams. PHD currently works with Microsoft Windows XP® and a Mac version is on the way.
Like many guiding programs available today, PHD will key in on the “Centroid” of the guide star. Because of this, you are able to guide and image with virtually any combination of guide/imaging scope. In addition, PHD Guiding takes this one step further with an automatic calibration routine, so there is no need calculate Field of Views, focal lengths, etc. as found in other auto-guiding programs. I have a 10” Newtonian and an ED80mm APO Refractor. I have successfully used both OTA’s in the guiding/imaging roll (guiding with one and imaging with the other and visa-versa). PHD is compatible with the ShoestringAstronomy GPINT-PT and GPUSB ST-4 style guide port interface adapters, and uses ASCOM’s Pulse Guide Commands for lag-free accurate commands.
The beauty of this program is its simplicity. Other auto-guiding programs require you to set several parameters prior to using the program (some of which can be rather daunting to people like me who wonder “What the heck is that”?), and then run through complicated calibration routines. PHD does have a little “brain” icon in the lower right corner allowing you to set guiding parameters, but in my opinion, those are there to simply tweak the guiding IF necessary. I personally have never changed anything in that window!
Auto guiding with PHD is this easy: Open the program. Click on the camera icon. Click on the “arrow” icon to start seeing stars. Once you have decided on a guide star, (basically if you can see it, you can use it to guide), Click on “Stop”. Click on the telescope icon and pick your mount/adapter type from the drop down. Click on the star (a little green box will be drawn around the star). Here comes the GOOD part. PHD will take over and run through the AUTOMATIC calibration routine! At the start of calibration a large yellow cross appears on the screen. After the program has run through the automatic calibration routine, the large yellow cross is replaced with a green cross and you are off and running.
Dimmer stars will take longer to calibrate, but you can change the capture time from .005 seconds to 5 seconds to increase the star brightness (I have successfully auto-guided with the .005 second update, and routinely use .5 second updates). In general, I recommend .5 to 2 second updates. This will give enough time for the star to blur so you won’t end up “chasing the seeing” which you’ll get at very short exposures.
To quote another satisfied user:
“Last night I tested a new guiding software program I found on the net. PHD Guiding, by Stark Labs, is the kind of software I've been hoping someone would write! The guiding test I did with it passed with flying colors!”
-Mike Broussard.
The image on the left is an actual crop from one of my images. NO star rounding or special filters/distortion correcting affects have been added! The crop is the last in a series of 5 from the original image – I have NO idea what the magnification factor is – I can tell you that I resized the image to 800 pixels wide after each of the crops to enlarge the picture enough to see the stars (these two stars are not visible in the original image).
All too often, bright stars in an image appear nice and round and the dim stars do not. Dim stars in an image will appear slightly elongated with even the smallest errors in guiding. I think the above image speaks for itself. Depending upon the target object brightness, I routinely take 2 to 5 minute sub frames for stacking. There have been a couple of reports that people have gone as long as a single 30 minute exposure!
I saved the best for last. This program is being provided to astro-photographers for FREE! Yes, that’s correct, FREE, and according to the web sight will remain so.
To learn more about PHD Guiding, please check out the Yahoo User Groups:
http://tech.groups.yahoo.com/group/autoguiding/
and
http://tech.groups.yahoo.com/group/stark-labs-astronomy-software/
It should be noted that Dr. Stark started neither of these two groups. He is a member of both so he can receive feedback for any possible Bugs, and has gladly implemented many suggestions for features and improvement. You will also be able to view the complete set of Test Images I took in the Photos Section of the Stark-labs user group.
You just can’t do any better than this. It’s free, easy to use, and does what it says it does. So - sit back, let PHD do the driving, and enjoy looking up at the night sky instead of peering through a small reticule eyepiece trying to center that small star in the cross hairs!
Lon K. Shelton
Funding Member
