Using the Canon 20Da for Astrophotography

Using the Canon 20Da for Astrophotography
Released in mid 2005, Canon caused a noticeable ripple in the world-wide amateur astronomy community with the 20Da. While cooled CCD cameras are still the main staple for serious imaging, this DSLR presents several attractive features that elevate it above the current crop of DSLRs. If you are interested in astrophotography, and yet do not want to invest in a full-blown CCD outfit, the 20Da might just be the ticket for you.
The Canon 20Da is essentially a modified Canon 20D. Sharing the similar DIGICII CMOS chip, there are three main important modifications that are consequential to the user. First, there is drastic reduction of noise levels compared to the 20D. There appears to be a modification to the imaging circuitry that presents a more thermally passive electronic state during the long exposure “B” mode. As a consequence, hot noise pixels are noticeably reduced. I have found this reduction to be especially drastic at temperatures below 40F and I occasionally get by without dark frame subtractions in my photos when I am feeling sloppy or pressed for time. In addition, the modification has also reduced the two famous partial “doughnut” noise signatures (one big on the bottom right, a smaller one on the top right) that are familiar to those using the 20D. These artifacts are smaller and less pink in the 20Da, thus rendering their subtractive removal via software more manageable and less invasive (see Figure 1). Interestingly, the noise reduction modification of the 20Da is not frequently trumpeted but is nonetheless a valuable feature because most experienced users do not activate the CF=2 function (where there is a corresponding dark frame taken and subtracted after every exposure). While the CF=2 feature is good, it halves the productivity when imaging, and most photographers produce a composite dark frame during the course of the night and subtract it from the images prior to combining. In this area, the reduced doughnut signatures and drastically reduced hot pixel noise of the 20Da make dark frame subtractions cleaner.

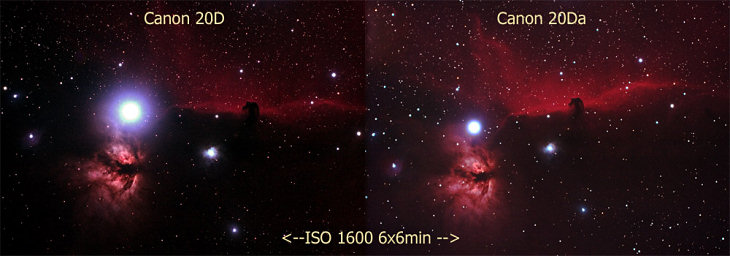
The second major modification lies in the increase in sensitivity in the red emission area. The original filter of the Canon 20D has been replaced with one that allows over 2 times greater pass to the all-important 656.3 nm wavelength (H-alpha line of hydrogen). This is a common emission wavelength in many nebulas (Rosette, Orion, California, North American Nebula, etc.). The benefit perceived from this modification is dramatic and not trivial. At my dark site along the North Carolina Blue Ridge Parkway near Doughton Park, the overhead skies are dark but there is spill over of light domes from nearby towns. I have to use an IDAS LPS filter with my DSLR to allow 6 to 8 min exposures without excessive sky fog. The trade off experienced from pairing the IDAS filter with my Canon 20D was a drastic loss of the reds. Switching to the 20Da, I was amazed by the richness of the reds (the IDAS does not block at 656nm) and the increase in harvestable data in my levels and curves. In Figure 2, the fine nebular features of the Rosette are recorded in their subtle glory, and there is almost no comparison to the Rosette taken by my Canon 20D. Figure 3 once again shows the differences achievable between a Canon 20Da and the Canon 20D in the Horse Head region of Orion. Note that the 20Da is starting to show the restless churning of the red nebulosity right of the Horse Head, and the red emission region above the horse head is much more drastically defined. Figure 4 is a similar comparison photo of the Christmas Tree Cluster/Cone Nebula region in Monoceros. Finally, unlike the ultra sensitive Hutech-modified cameras, the 20Da can be used for daylight photography with minimal color shifts while maintaining the auto focus capabilities of most EOS lenses.
The third significant modification lies in the addition of a live focus preview. Users can choose between two custom functions that allow 5x and 10x magnification of the center portion of the viewfinder (FC1 and FC2). I was initially skeptical of this feature, being a devotee of the perennially precise DSLR Focus program. However, I found that proper approach and use of the live focus preview gave good tight focus. The trick is to choose a 3-magnitude star and focus on it. If you choose Sirius at the ISO 1600 setting, you will get much slop due to over saturation of the live preview. Typically, I would center an appropriate star in the middle of the viewfinder, than use the 5x feature to re-center it in the middle, than switch to the 10x preview to precisely focus. The refresh rate of the preview is good enough to affect a precise focus. Many astronomers have rightly pointed out that it is hard to do this with a DSLR attached to a refractor as one is invariably squatting and looking up in the most uncomfortable position. A few enterprising ones have employed a small LCD screen hooked to the video feed of the camera to do focusing. This sounds like an excellent idea and something I’ll certainly want to try in the future. When using the live focusing preview, and also when reviewing photographs in the play mode, it is absolutely essential to allow at least 30 seconds after viewing before you take the next picture. Viewing the screen for long periods of time introduces random and noticeable noise artifacts that are impossible to remove properly via dark frame subtraction. It is important to bear this in mind, as this is frequently the biggest source of unexplained noise that defies software removal.

All in all, the Canon 20Da represents a definitive improvement over the 20D for astro-imaging. While more expensive than the Canon 20D, I am extremely satisfied with the increased imaging capabilities of my Canon 20Da and look forward to a productive summer and fall under dark skies.
Warning: Purchase this camera only from a reputable dealer like ATWB. Some Internet sites may advertise artificially low sales price for this particular camera- but you will be subjected to fraudulent hard sell and switch-and-bait practices.
Click here for more about this subject. -Ed.
Released in mid 2005, Canon caused a noticeable ripple in the world-wide amateur astronomy community with the 20Da. While cooled CCD cameras are still the main staple for serious imaging, this DSLR presents several attractive features that elevate it above the current crop of DSLRs. If you are interested in astrophotography, and yet do not want to invest in a full-blown CCD outfit, the 20Da might just be the ticket for you.
The Canon 20Da is essentially a modified Canon 20D. Sharing the similar DIGICII CMOS chip, there are three main important modifications that are consequential to the user. First, there is drastic reduction of noise levels compared to the 20D. There appears to be a modification to the imaging circuitry that presents a more thermally passive electronic state during the long exposure “B” mode. As a consequence, hot noise pixels are noticeably reduced. I have found this reduction to be especially drastic at temperatures below 40F and I occasionally get by without dark frame subtractions in my photos when I am feeling sloppy or pressed for time. In addition, the modification has also reduced the two famous partial “doughnut” noise signatures (one big on the bottom right, a smaller one on the top right) that are familiar to those using the 20D. These artifacts are smaller and less pink in the 20Da, thus rendering their subtractive removal via software more manageable and less invasive (see Figure 1). Interestingly, the noise reduction modification of the 20Da is not frequently trumpeted but is nonetheless a valuable feature because most experienced users do not activate the CF=2 function (where there is a corresponding dark frame taken and subtracted after every exposure). While the CF=2 feature is good, it halves the productivity when imaging, and most photographers produce a composite dark frame during the course of the night and subtract it from the images prior to combining. In this area, the reduced doughnut signatures and drastically reduced hot pixel noise of the 20Da make dark frame subtractions cleaner.
The second major modification lies in the increase in sensitivity in the red emission area. The original filter of the Canon 20D has been replaced with one that allows over 2 times greater pass to the all-important 656.3 nm wavelength (H-alpha line of hydrogen). This is a common emission wavelength in many nebulas (Rosette, Orion, California, North American Nebula, etc.). The benefit perceived from this modification is dramatic and not trivial. At my dark site along the North Carolina Blue Ridge Parkway near Doughton Park, the overhead skies are dark but there is spill over of light domes from nearby towns. I have to use an IDAS LPS filter with my DSLR to allow 6 to 8 min exposures without excessive sky fog. The trade off experienced from pairing the IDAS filter with my Canon 20D was a drastic loss of the reds. Switching to the 20Da, I was amazed by the richness of the reds (the IDAS does not block at 656nm) and the increase in harvestable data in my levels and curves. In Figure 2, the fine nebular features of the Rosette are recorded in their subtle glory, and there is almost no comparison to the Rosette taken by my Canon 20D. Figure 3 once again shows the differences achievable between a Canon 20Da and the Canon 20D in the Horse Head region of Orion. Note that the 20Da is starting to show the restless churning of the red nebulosity right of the Horse Head, and the red emission region above the horse head is much more drastically defined. Figure 4 is a similar comparison photo of the Christmas Tree Cluster/Cone Nebula region in Monoceros. Finally, unlike the ultra sensitive Hutech-modified cameras, the 20Da can be used for daylight photography with minimal color shifts while maintaining the auto focus capabilities of most EOS lenses.
The third significant modification lies in the addition of a live focus preview. Users can choose between two custom functions that allow 5x and 10x magnification of the center portion of the viewfinder (FC1 and FC2). I was initially skeptical of this feature, being a devotee of the perennially precise DSLR Focus program. However, I found that proper approach and use of the live focus preview gave good tight focus. The trick is to choose a 3-magnitude star and focus on it. If you choose Sirius at the ISO 1600 setting, you will get much slop due to over saturation of the live preview. Typically, I would center an appropriate star in the middle of the viewfinder, than use the 5x feature to re-center it in the middle, than switch to the 10x preview to precisely focus. The refresh rate of the preview is good enough to affect a precise focus. Many astronomers have rightly pointed out that it is hard to do this with a DSLR attached to a refractor as one is invariably squatting and looking up in the most uncomfortable position. A few enterprising ones have employed a small LCD screen hooked to the video feed of the camera to do focusing. This sounds like an excellent idea and something I’ll certainly want to try in the future. When using the live focusing preview, and also when reviewing photographs in the play mode, it is absolutely essential to allow at least 30 seconds after viewing before you take the next picture. Viewing the screen for long periods of time introduces random and noticeable noise artifacts that are impossible to remove properly via dark frame subtraction. It is important to bear this in mind, as this is frequently the biggest source of unexplained noise that defies software removal.
All in all, the Canon 20Da represents a definitive improvement over the 20D for astro-imaging. While more expensive than the Canon 20D, I am extremely satisfied with the increased imaging capabilities of my Canon 20Da and look forward to a productive summer and fall under dark skies.
Warning: Purchase this camera only from a reputable dealer like ATWB. Some Internet sites may advertise artificially low sales price for this particular camera- but you will be subjected to fraudulent hard sell and switch-and-bait practices.
Click here for more about this subject. -Ed.
Funding Member
