Astroart

Astroart is another Capturing and processing program available to astronomers. Astroart would be a similar program to Maxim Dl in terms of an all in one program with capturing, processing, plate solving, sky charts, guiding and focusing. The main differences is Cost, Control and options to use 3rd party guiding software.
Astroart is only $165.00 for the full version. Per Astroart, Depending on when you purchase your version, one could have 5 years of free new functions, processes and bug fixes or just slightly more than 1 year depending when a new Version is released.
Once a new version does arrive the upgrade fee is only $105.00. This is again one of those programs that’s worth getting just to have in your toolbox. You can purchase Astroart on their website or get a free trial ASTROART.
Another benefit to Astroart is they support past and current versions of their program with their camera plugin releases. So if you own Astroart 5 and Astroart comes out with a new plugin for a certain camera All versions have access to it not just the current release. I find this commendable as to not force owners to have to pay to upgrade just to support a new piece of hardware you purchased.
This tutorial/review will be a 2 part series. We will discuss in this series the capturing process from start to finish and then part 2 will delve into the processing of your acquired subs.
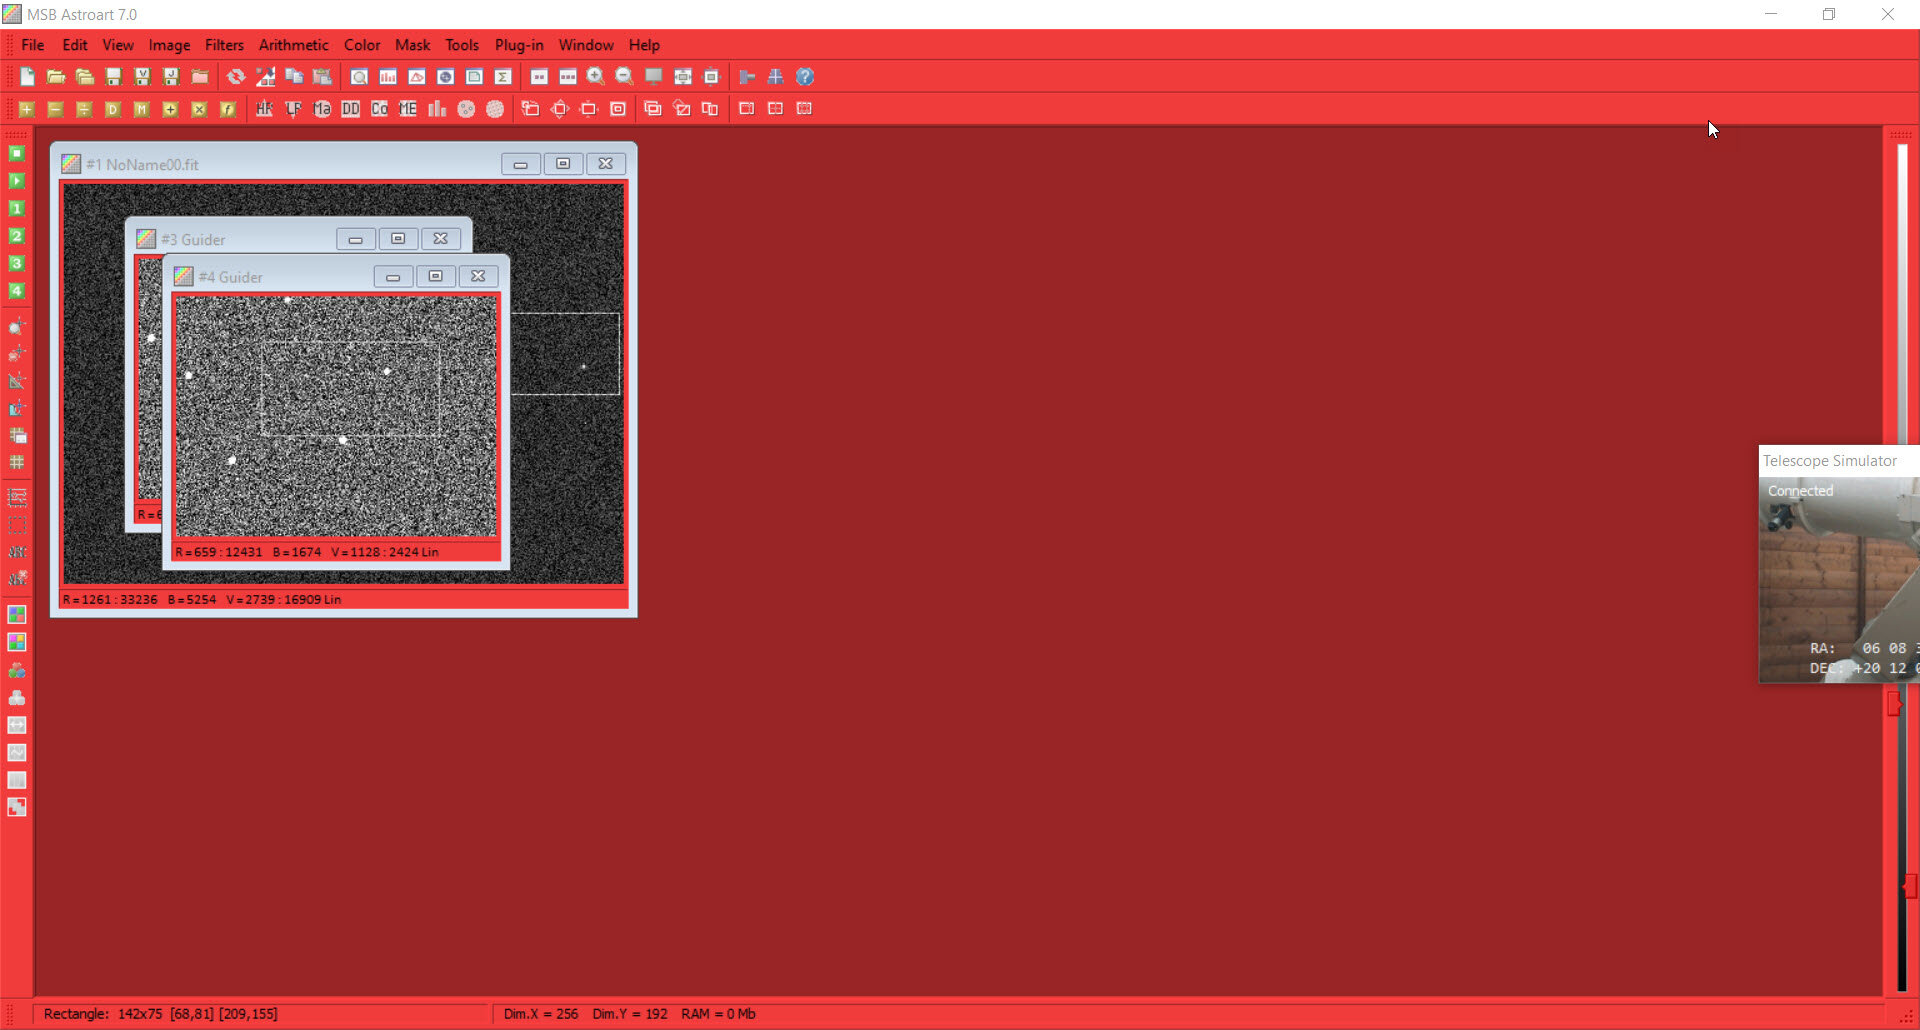
My first impressions of Astroart is that its interface is much different than any other astronomy program I have used in the past. Upon loading most of the icons and file menus are greyed out except a few on the left and right of the window. At first this may seem confusing but in reality the only icons accessible are the ones you need to start with which makes it a little less overwhelming as to what to do on startup. The way to start entering your setup information is by clicking on the camera control icon in the menu bar that’s next to the Star Atlas, which looks like a Windows OS logo and the blue help ? icon. You can also go under plug-ins and select the camera control software you want to use. For me the default Camera control 7.0 worked just fine. If you have any problems you can always try connecting with 6.0.

You might need to visit the Astroart .dll page to get .dll packages for your setup to apply in the Astroart installation folder: Astroart dll page
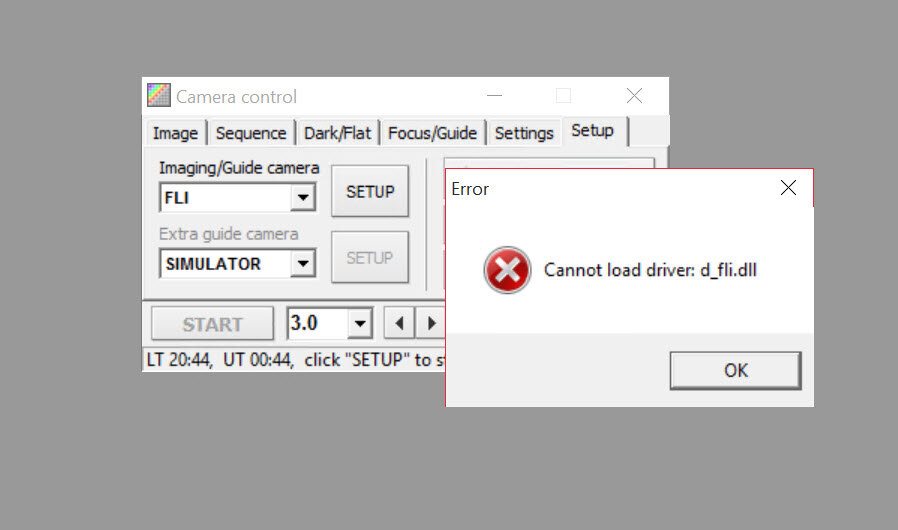
If you have an FLI camera confirm you have the LIBFLI.dll file. If its not in your Astroart install folder you can download it here and place it in your Astroart program files folder and you should connect without issue: FLI LIB FILE. Below is the error you may receive if you dont have the correct DLL.
There are also plug-ins you can install created by Astroart or its users. You can find and download any plugins you find useful at: Astroart Plugins
Astroart also has the familiar night mode, which turns your screen red. This can be found under the view tab.
Once you open the camera control window you will have all the familiar connection options you are used to. Here you will connect to your Equipment’s ASCOM drivers, setup your sequence, etc.
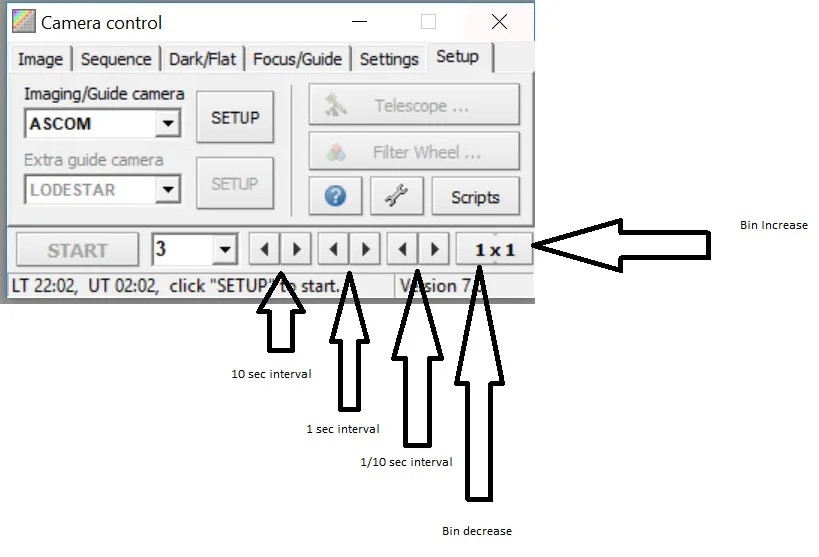
The main window you start at has you select your camera, guide camera, telescope mount and filter wheel. You cannot connect to your mount unless you connect to a camera first. At the bottom of the window is a camera exposure control bar. This can be used to take a quick exposure with the camera. The arrows change the time of exposure and you can change the bin as well.
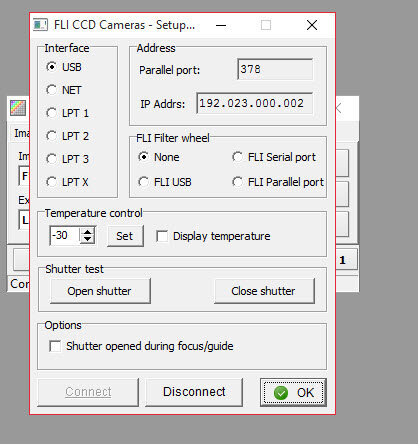
The first setup is the camera. Select your main camera from the drop down menu and select setup. When you open the setup area you will be able to select your camera interface, turn on and set your cooler, test your shutter, etc. Once you have it all filled out click connect and then OK.
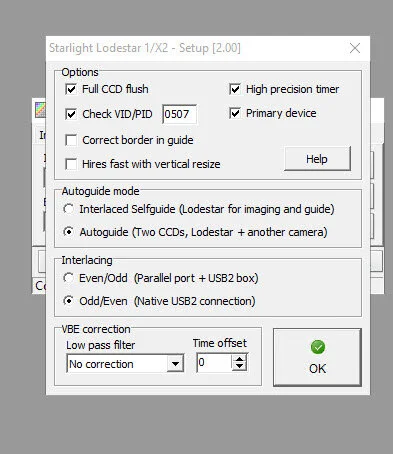
The next window is the guide window. Here most settings can remain default. You will need to select your Autoguide mode and interlacing.
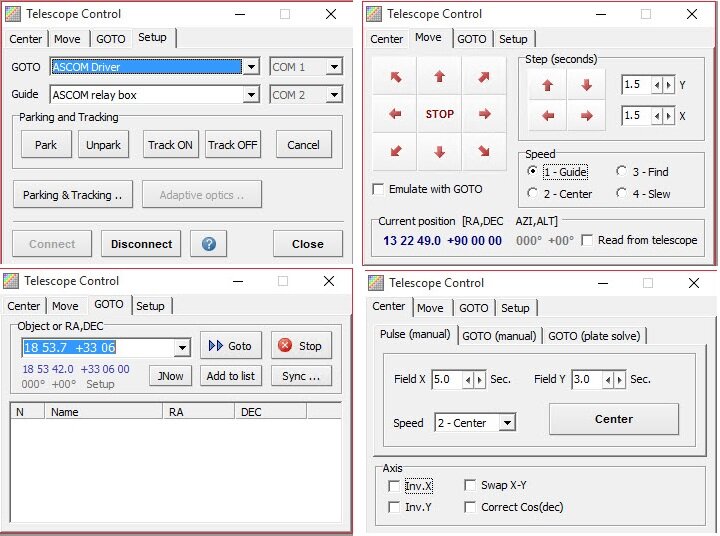
The next button is the telescope button. First select the goto of your mount and select the correct com port. Then select the guider communication type and if its a serial select the port. I’m using pulse guide so my connection is through the ASCOM relay but you can select the guide cable you use or other options.
As you can see in the telescope control setup you can also park and turn on your mount tracking.
The Move telescope allows you to manually move your mount. You can still use an external program such as Eqmod to move your scope but you have one built in.
You have the GOTO tab where you can type in your object by catalog name. Once you do that it will convert the name into RA and DEC coordinates and you can goto. You also have the sync button for a manual sync.
Lastly is the centering option and plate solve tab.
Once you have everything set click connect and ok.
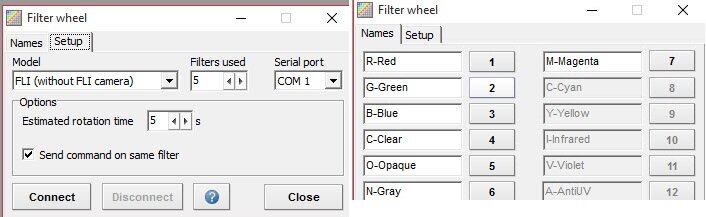
The next option is the filter wheel Tab. Here you select your filter wheel driver, number of filters used and the com port setting, if using one. Under the names tab you can enter the order of your filters and turn on/off the filters you are using. Once you enter all that again click connect and ok
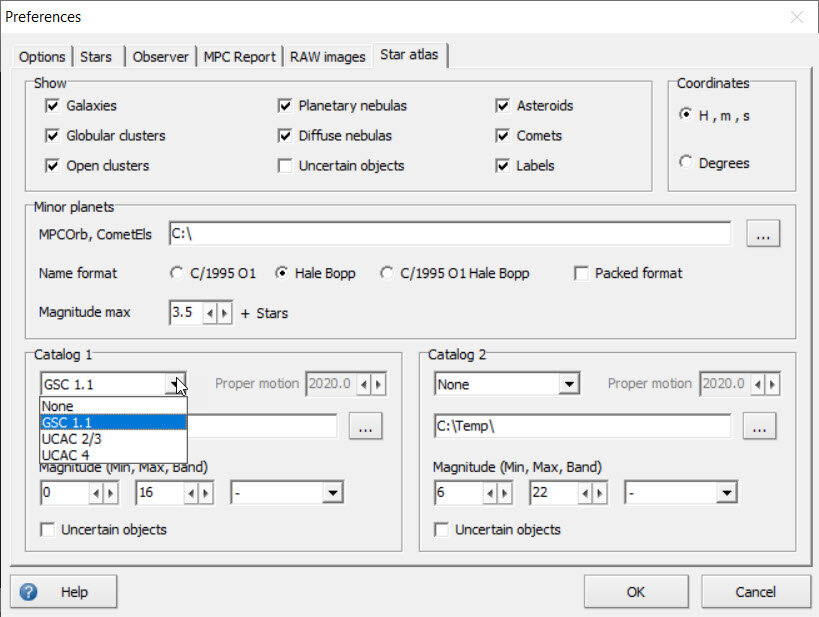
Next we need to setup the plate solving. To do this you need to open the Star Atlas and click on the wrench. Here under the catalog you select the one you want to use. Originally I used GSC and was having some problems. Astroart recommended to use the UCAC 4 and after that change I no longer has issues. The GSC is not the same GSC file you would use for MAXIM. The GSC is a compressed catalog and you need that one specific one which can be downloaded after you purchase Astroart. Once you select the catalog you choose you need to select the folder the catalog is in and click ok.

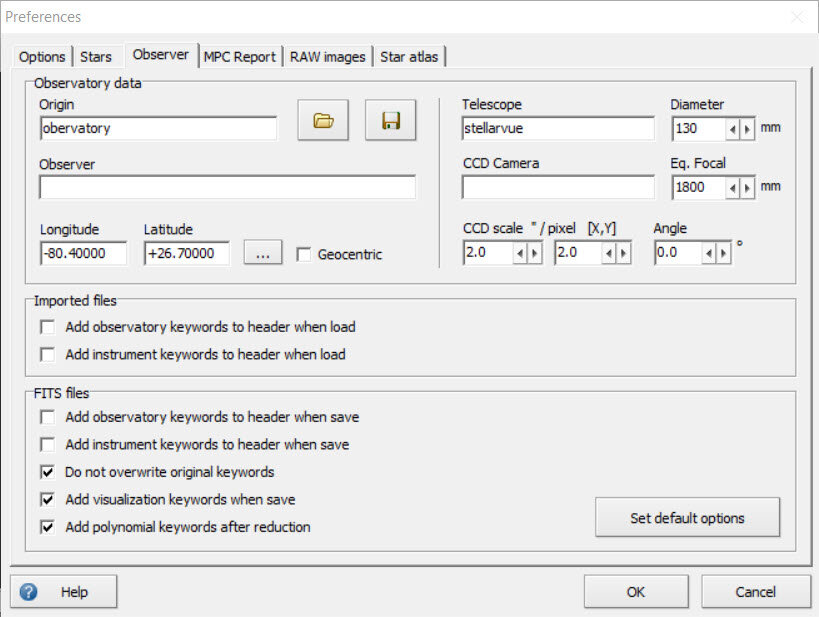
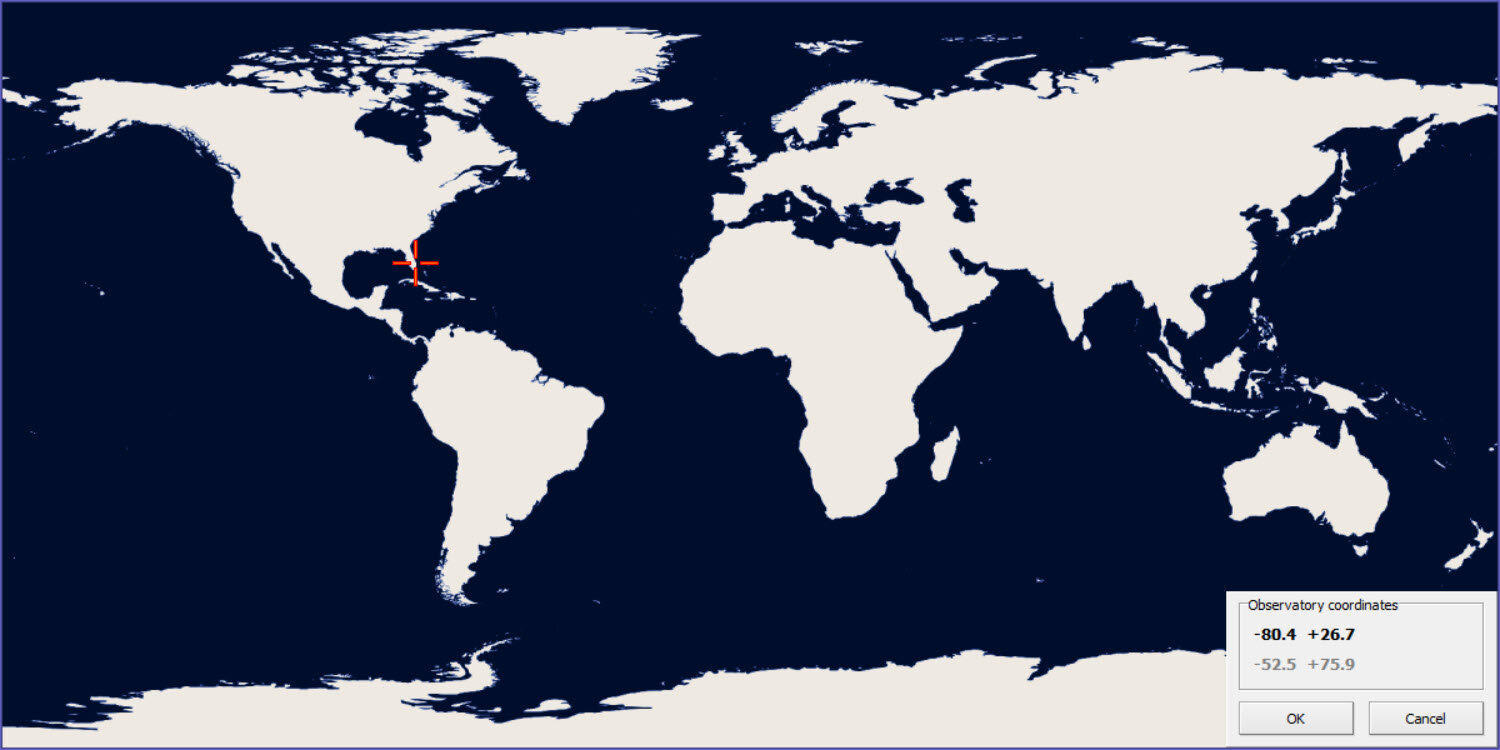
Also under the wrench menu click on the observe tab and there you will enter your scope data, camera data as well as your observing location. You will either need your coordinates or if you click on the … box it will open up a world map and you can pinpoint your location, click it and it will save the coordinates.
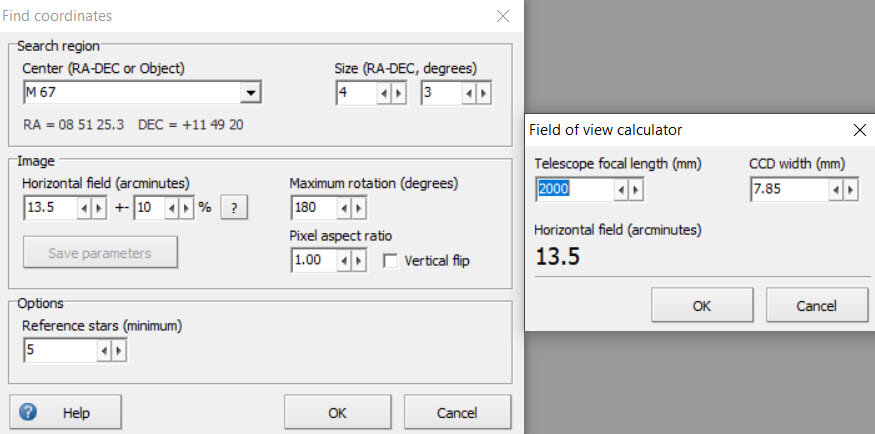
The next area to setup the plate solver is in the site find coordinates under the menu option tools. Here you will see a ? in the image area. Click on that and you want to select the focal length of your scope and enter the ccd width of your chip in MM. Here is a chart for some of the common ccd sizes. The other default settings are ok. Astroart uses an internal database (the file "astroar5.dat" of 61 Mb) which is always included for plate solving.
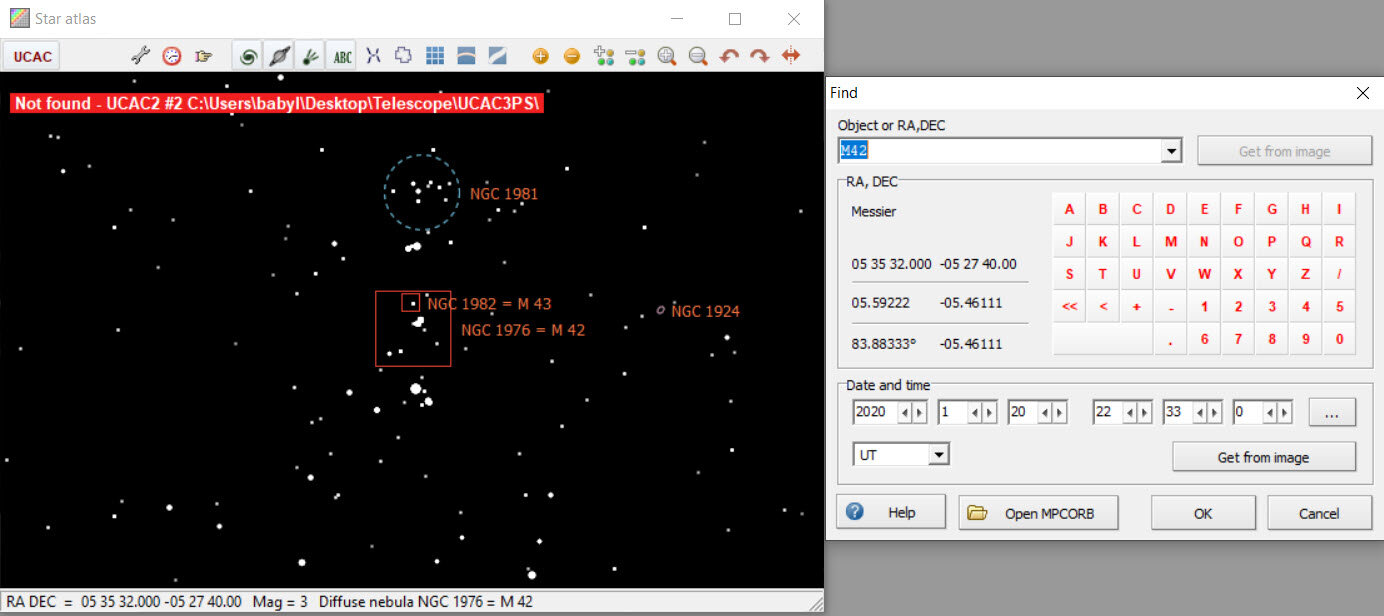
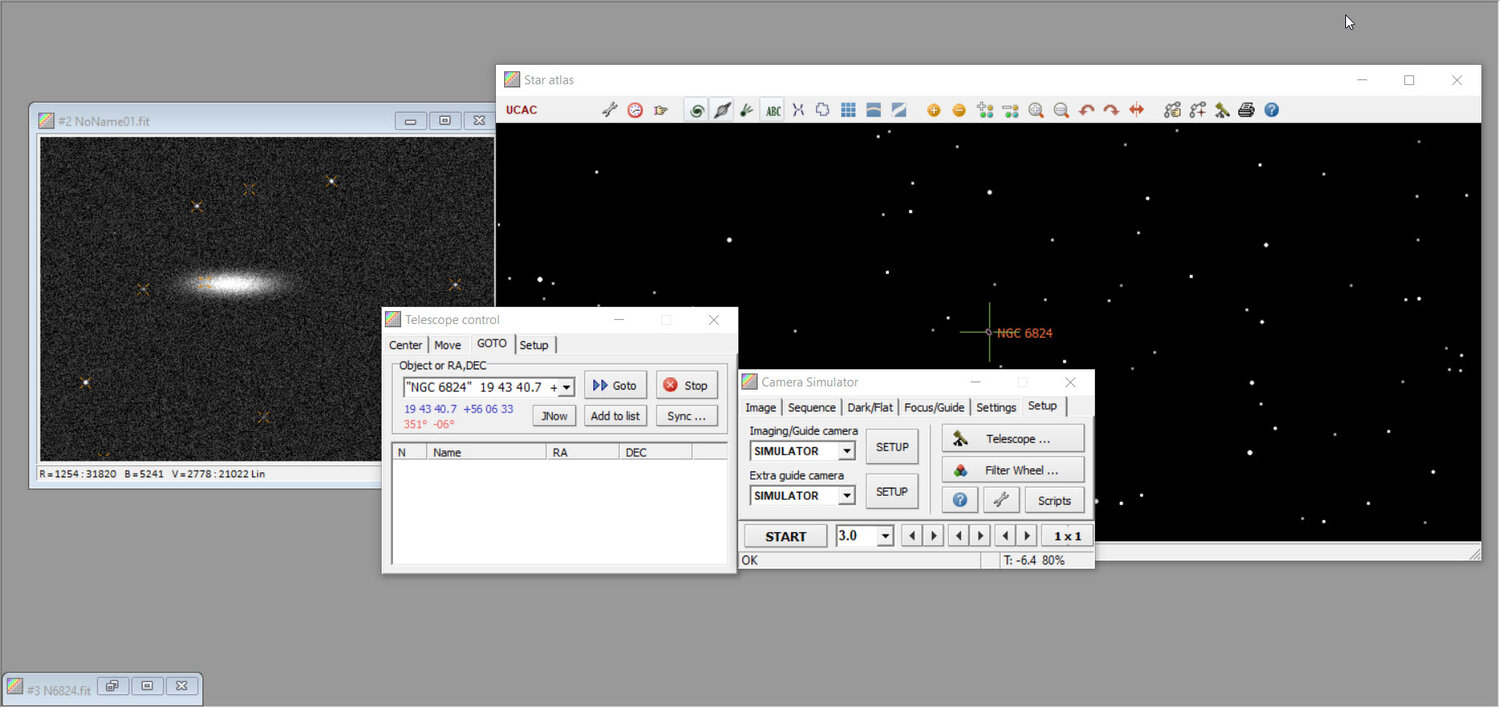
Ok now that we have all that setup work completed and its time to start working on getting on target. First bring up the star atlas and click the hand icon (Find). This will open up the find window. Type your object and hit enter. After that your target should be in the center of your star atlas. Right click on your object and select the GOTO option. This will open up your telescope control window and again click GOTO and you will see a green arrow moving to your object.
Now once your here we have several options. 1) We can take an image to see if the object is in view, we can plate solve or we can focus. I recommend focusing first as you need a good focus to plate solve.
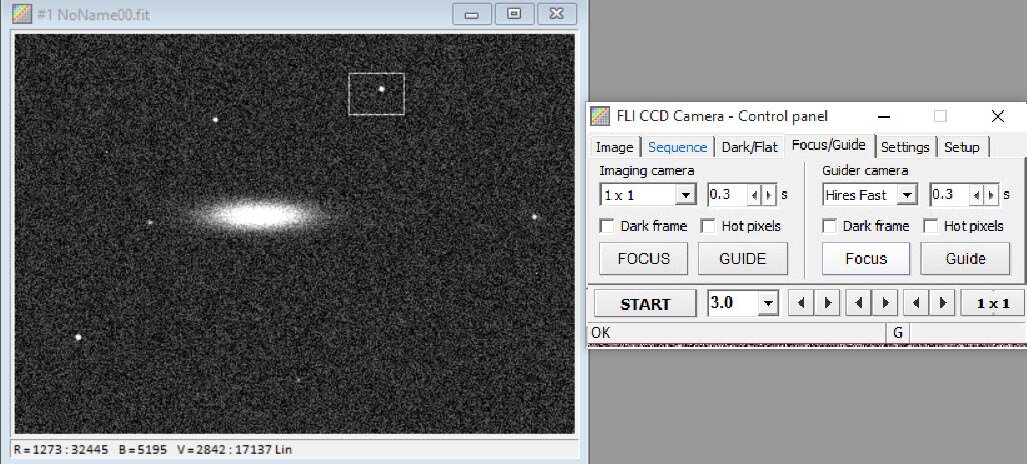
To start to focus you open up the camera control icon and click the focus/guide tab. Then you need to set your exposure time and click start to take an image. If you haven’t already selected a filter you can go under the image tab and select your filter before exposing. Once the image downloads you want to draw a rectangle around a star and click the focus button under the main imaging camera.
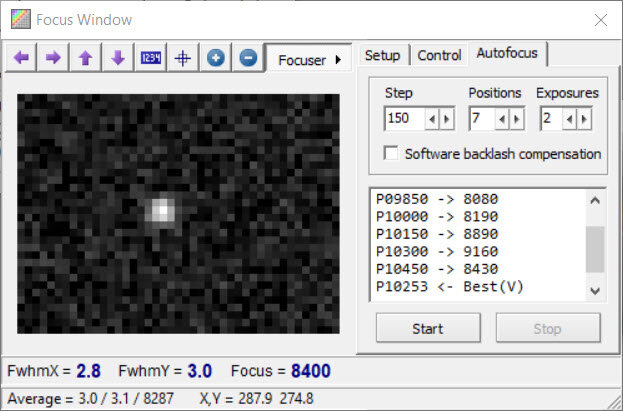
Once you click the focus button a new window will open. Here you setup your focuser in the first tab. The next tab you can manually control your focuser steps and you can see the position of your focuser. You have 3 settings you can do for the control tab. The settings are small steps, mid steps and large steps and you can set the number of steps for each. The last tab is the autofocus tab. Here you will set how many steps you want your focuser to move in and out during the routine. You will then click how many positions you want it to move for the focuser to use and lastly how long each exposure should be. After you set all that click start and you will see the positions moving in and out and at the end it will pick the best focus. You can see your final FWHM at the bottom of the screen.
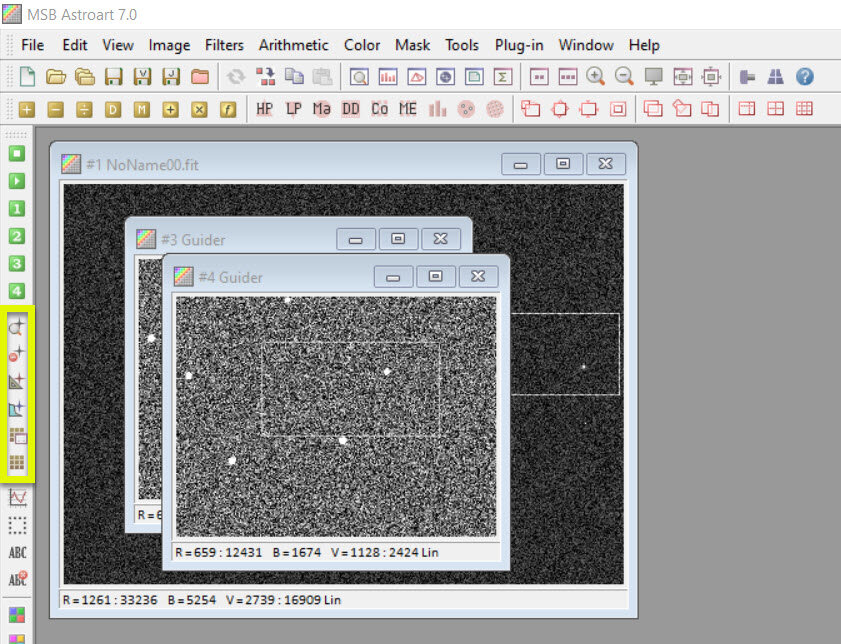
Now that you are in focus we can plate solve. The first thing to do is again take a new image. Once you’ve taken an image open the star atlas and click on the reference stars: Automatic button seen in yellow below. This will automatically pick reference stars in your image. After you see the stars with cross hairs on them click on the tools menu and select find coordinate. If you have the find coordinates setup you can click find coordinates: immediate to save time. Also if you cant solve you can adjust increase the RA/DEC Size area or increase the percentage of the field. If everything goes right the process will run without an error and the process screen will close. Once the plate solve is complete reopen the telescope tab in the setup tab of the camera control window and click sync. Then go back to the star atlas and reslew to your target and you should be on your target.
Once you get familiar with the icons you will see on the left side in the yellow box are the icons used for plate solving so you can quickly Solve rather than going through the menu system unless you need to change any settings.
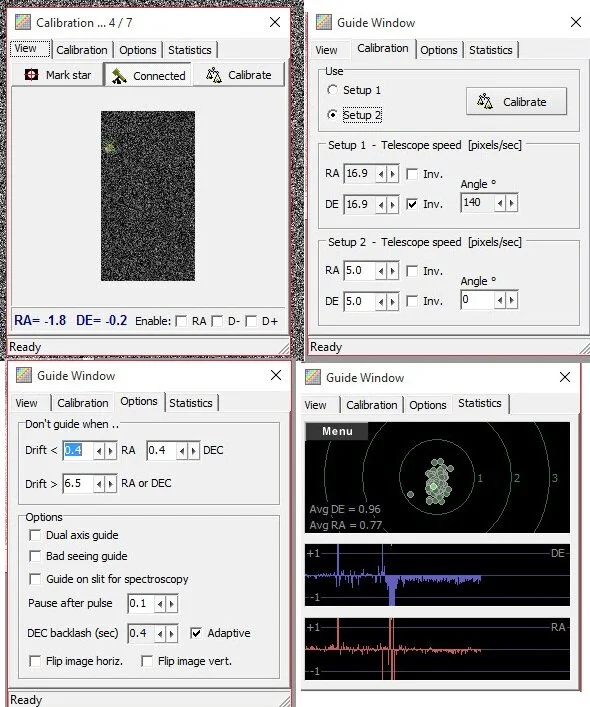
Now that we are on target the next step will be to start guiding. To guide again we take an image. Then place a rectangle around an area and click guide on the guide camera side of the focus/guide window. This will open up a subscreen with your guiding options. In the view window you can mark the star with a cross hair and click calibrate. You will see the star moving along side the cross hair until the calibration is complete. The calibration takes 7 steps. Once the calibration is complete you can go to the statistics tab and watch the guiding and corrections. Once your guiding if you go back to the view window and click mark star you will see a big arrow showing you the directions of the corrections.
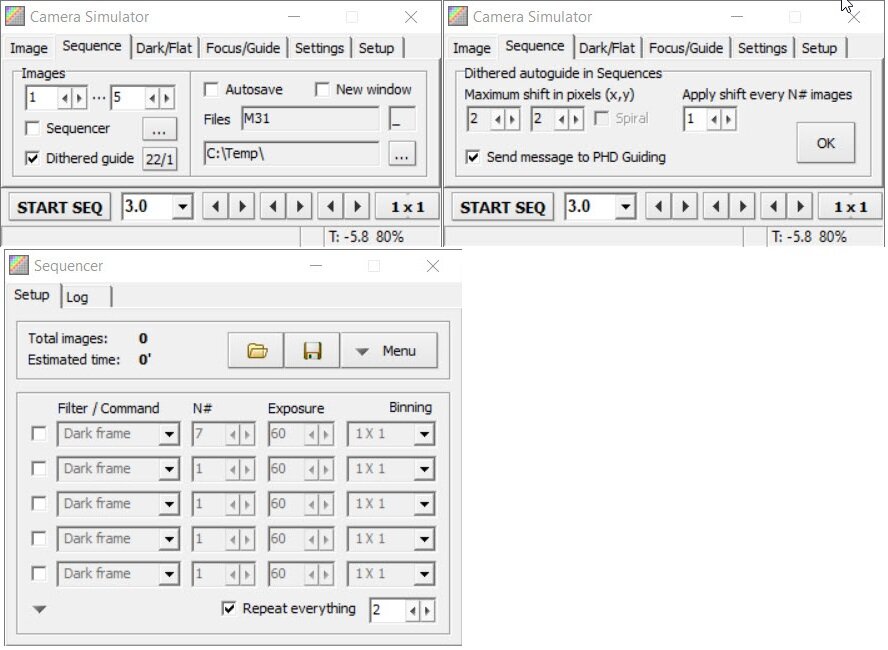
Now that we are on target, guiding and in focus its time to start our sequence. If you choose to use PHD2 and skipped the above you will see a dither guide tab. If you want to dither check off the box and then click the tab next to dither guide. This will open up a new window where you can control your dither and make sure to check the Send message to PHD2 guiding for Astroart to communicate with PHD2. Then you can start your PHD2 guider.
If you have a one shot color and you want to just start your sequence you can select how many images you want, check off autosave, select your save directory, select your exposure time and click start SEQ.
If you have a mono camera you want to check Sequencer and click on the … button. This will open the advance sequencer. Here you can select your filters, binning, Number of exposures, exposure time, etc, You can select to do your darks, biases (Use 0 as your exposure length) , and lights as well. Again once thats setup with your directory you just click start SEQ and you are off and running.
Pros:
1) The program does capturing and post processing. Its a well rounded program for someone who wants an all in one program. It is a little more challenging to learn a first than some others but based on my usage and understanding there are many additional controls and processing options then most programs out there. Plus through my research people do use Astroart as their main imaging software in their remote observatories with much success.
2) The program is being maintained as with the release of the current V2 upgrade. Also incorporating the use of external guider programs such as PHD2 shows the company is open to giving its users options over forcing you to use their dedicated software like other capturing programs.
3) SUPPORT! Its important to note as stated below I had some problems first connecting my camera due to the DLL’s mentioned in the begging for my FLI. Response time was incredible and Fabio answered me directly. He was very patient and obviously very knowledgeable. This means you dont have to go to forums and wait on someone whose not a company man answering you or wait 24-48 hrs for a ticket to be answered. Plus if you have other issues you can send in files, pictures, etc and Astroart will try to solve the problem for you frustration free.
4) Again as mentioned Price. Its a full package program at a very reasonable cost.
Cons:
1) Setup can be a bit challenging from what you may be used to but once you are all setup its easy to get going.
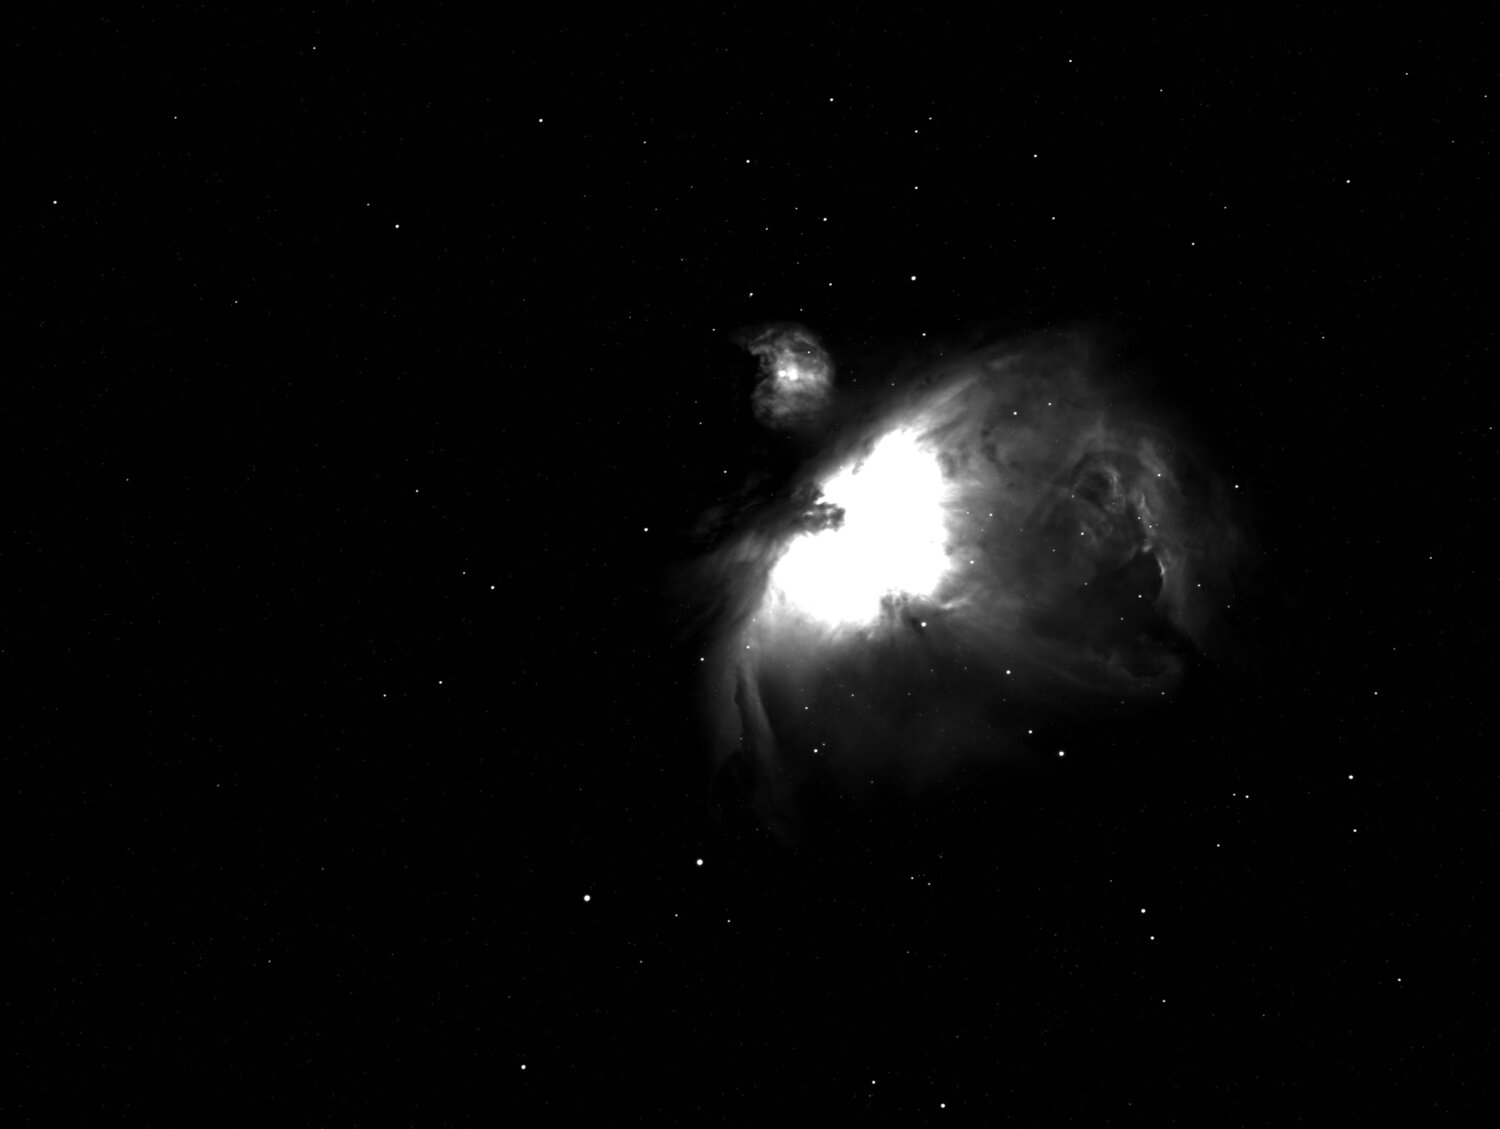
2) I did have some hit or miss with the internal guiding. There were times it was just amazing and others where I had issues calibrating. This could be due to user error but it was an issue. This was easily resolved for me with the option of PHD2. I currently use PHD2 and I have that dialed in with consistent results and Astroart spoke to PHD2 to provide a great imaging experience. Here is a 900 sec image guided with PHD2 and acquired in Astroart.
Funding Member


Sponsors
- FocusKnobs
- BW
- RemoteSkies.net
- astronomy-shoppe
- BBLABS LLC
- Bob's Knobs
- AstroMart LLC
- SellTelescopes.com
- Astromart Customer Service
- Rouz Astro
- APM-Telescopes
- ASTROPHOTOGRAPHY BY MARTIN PUGH
- Desert Sky Astro Products
- Anacortes Telescope
- Matsumoto Company
- Waite Research
- OMI OPTICS USA LLC
View all sponsors