

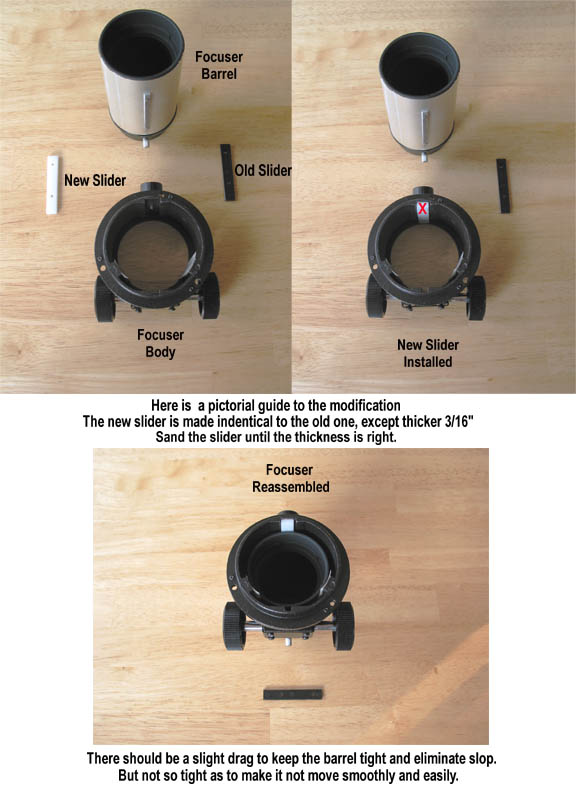
Ok, there were a few inquiries as to how I modified the Orion finder to eliminate the slop in the barrel. So I made a pictorial guide to the modification.
This requires that you get a piece of 3/16" thick Teflon, available at RV and Trailer shops as a 5th wheel hitch slick pad in a 10" disk for about $11. Or another good slick material that is 3/16" thick.
Next you disassemble the focuser and remove the old tension slider. Make a duplicate of this from the new material and drill the two holes as in the old slider, but drill them completely through. You can use the old one on top of the new one as a guide and drill trough both pieces. Then sand the thickness as required to have a nice fit, not too loose or it will allow the barrel to wiggle. But not so tight that it is hard to slide in and out. Sand a little and test fit it until it is just right.
This will make the focuser much more usable and less shift in the image when focusing.
The other mod, I did not take pictures, but I will explain it.
When you remove the focuser knobs and shaft, you have to remove 4 screws and a plate. Under that plate you will find a spring plate with two bent tabs that rub against the shaft to hold the pinion gear to the rack. These are too tight and should be bent to lessen the tension on the shaft. Making movement easier and smoother. You should also remove the old glue grease from the rack and pinion so you can lube it with good grease.
The rack is held to the focuser barrel by two small screws. Remove them and remove the rack from the barrel. Now cut a plastic strip to place under it as a shim. I used one of the many phoney credit cards that arrive in the mail all the time, you know the ones, they look like credit cards but are not. This seemed to be just the right thickeness. But you will have to test fit the rack to know. Now drill holes in the plastic strip so the screws will go through and reinstall the rack to the barrel. Re assemble the focuser and check the play in the rack and pinion. This shim should remove all the play between the rack and pinion gears. There is far to much as it comes from the factory. This will give you a nice accurate focus when racking in and out. There should be no free motion in the rotation of the focuser knob now. If there still is, shim it more until the play is gone. Now relube the rack and pinon and assemble for the final time.
The focuser should now feel much better and work a lot better. It will hold the collimation of the laser better too!
Have fun!
This requires that you get a piece of 3/16" thick Teflon, available at RV and Trailer shops as a 5th wheel hitch slick pad in a 10" disk for about $11. Or another good slick material that is 3/16" thick.
Next you disassemble the focuser and remove the old tension slider. Make a duplicate of this from the new material and drill the two holes as in the old slider, but drill them completely through. You can use the old one on top of the new one as a guide and drill trough both pieces. Then sand the thickness as required to have a nice fit, not too loose or it will allow the barrel to wiggle. But not so tight that it is hard to slide in and out. Sand a little and test fit it until it is just right.
This will make the focuser much more usable and less shift in the image when focusing.
The other mod, I did not take pictures, but I will explain it.
When you remove the focuser knobs and shaft, you have to remove 4 screws and a plate. Under that plate you will find a spring plate with two bent tabs that rub against the shaft to hold the pinion gear to the rack. These are too tight and should be bent to lessen the tension on the shaft. Making movement easier and smoother. You should also remove the old glue grease from the rack and pinion so you can lube it with good grease.
The rack is held to the focuser barrel by two small screws. Remove them and remove the rack from the barrel. Now cut a plastic strip to place under it as a shim. I used one of the many phoney credit cards that arrive in the mail all the time, you know the ones, they look like credit cards but are not. This seemed to be just the right thickeness. But you will have to test fit the rack to know. Now drill holes in the plastic strip so the screws will go through and reinstall the rack to the barrel. Re assemble the focuser and check the play in the rack and pinion. This shim should remove all the play between the rack and pinion gears. There is far to much as it comes from the factory. This will give you a nice accurate focus when racking in and out. There should be no free motion in the rotation of the focuser knob now. If there still is, shim it more until the play is gone. Now relube the rack and pinon and assemble for the final time.
The focuser should now feel much better and work a lot better. It will hold the collimation of the laser better too!
Have fun!
Attached Image:
[SIZE="Large"][/SIZE][COLOR="Blue"][/COLOR] Floyd Blue

Amateur Imager