Hi all:
Hopefully you can share some experiences solving what I have found to be a very frustrating part of astro-imaging; namely, preparing an image for web display.
First let me set the stage:
I gather data as FIT files, calibrate and combine the various subs in Maxim. Then I save separate LRGB images as uncompressed 16 bit TIFF files with Maxim. I then stretch and combine these into a LRGB image (or Ha/OIII etc.) using Photoshop CS2. My monitor at home is regularly calibrated using an Eye-One calibration device. I primarily use the stretching and processing techniques shown in Ron Wodaski’s books. After processing in Photoshop I'll have a final TIFF image that I like: the colors are right, the black point is not clipped and the range of contrast is good to my eye.
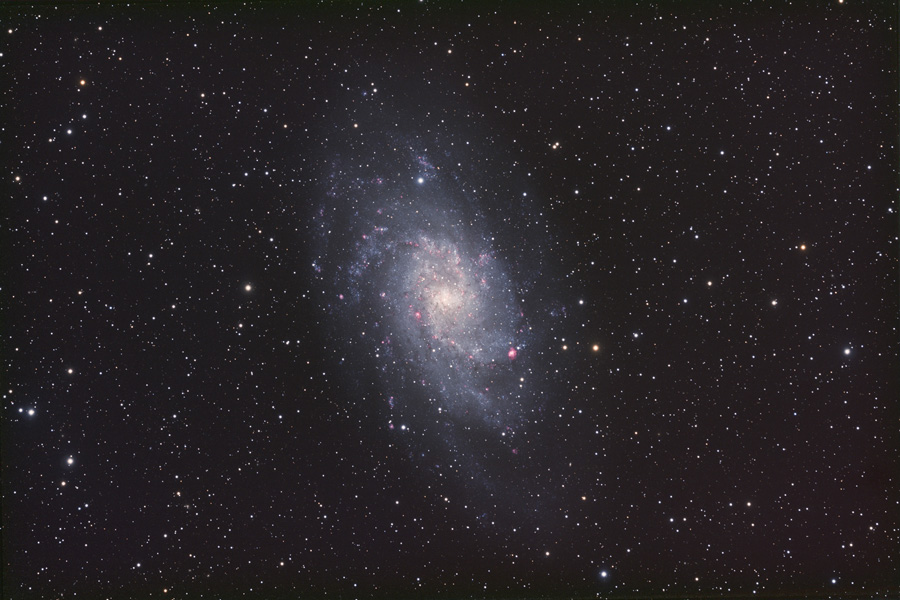
For example, I have been working on an M33 image for a while, and I now have it as a final TIFF on my computer at home that I think is just spectacular. In particular the subtle and nearly perfect oval of very faint outer stars beyond the spiral arms shows well. You don’t always see this extended portion of M33 in web images. The blue arms and HII regions are really snappy. There are dozens of tiny background galaxies in the full scale version etc.
Now comes the problem part.
To post on Astromart, or I think other web pages, I need to create an 8 bit jpeg. It is easy enough in Photoshop to convert the data to 8 bit from 16 bit and save as a jpeg. When I do that, the image still looks fine in Photoshop. Then when I save it and open it with Windows Picture and Fax viewer or Internet Explorer, the image looks terrible! The colors are all wrong and the dark regions are severely clipped.
I can go back to Photoshop and use the “proof image” function set to “Windows RGB” to see how the image is going to look on my computer with a Windows viewer. When I do that the image initially looks too bright. But if I make adjustments to the jpeg image to make it look just like the TIFF, that ultimately makes the image look even worse on other monitors, like my un-calibrated monitor at work!
Here is a link to a ½ sized M33 that I post-processed in Photoshop using the “Proof Image – Windows” function. This image looks way black-point clipped on my monitors at work. All subtlety in the dim regions are lost:
http://home.comcast.net/~jameslbrown/pwpimages/LR%2BHaGB%208bit%20medium.jpg
Here is a link to the same image that I merely converted to an 8bit jpeg and saved. This one looks way too bright on my calibrated monitor at home, but it is still black-clipped at work! This image also does not show the subtlety of my original TIFF. It’s not even close.
http://home.comcast.net/~jameslbrown/pwpimages/M33%20half.jpg
Here are some possibilities I’ve been considering:
1. My monitors at work are seriously out of whack.
2. With a low-brightness extended object like M33 one is simply hosed when going from 16 bit to 8 bit.
3. I am missing a key conversion or processing step that would solve this problem. For example should I be identifying a particular color space in Photoshop at the beginning?
Any input from you all about similar experiences would be great. Also, let me know how the two M33 images look on your screen. Are the outer regions of the galaxy at all visible in either image? Are the colors OK or garish? Your input into this problem will be very much appreciated!
Jim
Hopefully you can share some experiences solving what I have found to be a very frustrating part of astro-imaging; namely, preparing an image for web display.
First let me set the stage:
I gather data as FIT files, calibrate and combine the various subs in Maxim. Then I save separate LRGB images as uncompressed 16 bit TIFF files with Maxim. I then stretch and combine these into a LRGB image (or Ha/OIII etc.) using Photoshop CS2. My monitor at home is regularly calibrated using an Eye-One calibration device. I primarily use the stretching and processing techniques shown in Ron Wodaski’s books. After processing in Photoshop I'll have a final TIFF image that I like: the colors are right, the black point is not clipped and the range of contrast is good to my eye.
For example, I have been working on an M33 image for a while, and I now have it as a final TIFF on my computer at home that I think is just spectacular. In particular the subtle and nearly perfect oval of very faint outer stars beyond the spiral arms shows well. You don’t always see this extended portion of M33 in web images. The blue arms and HII regions are really snappy. There are dozens of tiny background galaxies in the full scale version etc.
Now comes the problem part.
To post on Astromart, or I think other web pages, I need to create an 8 bit jpeg. It is easy enough in Photoshop to convert the data to 8 bit from 16 bit and save as a jpeg. When I do that, the image still looks fine in Photoshop. Then when I save it and open it with Windows Picture and Fax viewer or Internet Explorer, the image looks terrible! The colors are all wrong and the dark regions are severely clipped.
I can go back to Photoshop and use the “proof image” function set to “Windows RGB” to see how the image is going to look on my computer with a Windows viewer. When I do that the image initially looks too bright. But if I make adjustments to the jpeg image to make it look just like the TIFF, that ultimately makes the image look even worse on other monitors, like my un-calibrated monitor at work!
Here is a link to a ½ sized M33 that I post-processed in Photoshop using the “Proof Image – Windows” function. This image looks way black-point clipped on my monitors at work. All subtlety in the dim regions are lost:
http://home.comcast.net/~jameslbrown/pwpimages/LR%2BHaGB%208bit%20medium.jpg
Here is a link to the same image that I merely converted to an 8bit jpeg and saved. This one looks way too bright on my calibrated monitor at home, but it is still black-clipped at work! This image also does not show the subtlety of my original TIFF. It’s not even close.
http://home.comcast.net/~jameslbrown/pwpimages/M33%20half.jpg
Here are some possibilities I’ve been considering:
1. My monitors at work are seriously out of whack.
2. With a low-brightness extended object like M33 one is simply hosed when going from 16 bit to 8 bit.
3. I am missing a key conversion or processing step that would solve this problem. For example should I be identifying a particular color space in Photoshop at the beginning?
Any input from you all about similar experiences would be great. Also, let me know how the two M33 images look on your screen. Are the outer regions of the galaxy at all visible in either image? Are the colors OK or garish? Your input into this problem will be very much appreciated!
Jim