Image of the day

Captured by
Ralph Ford

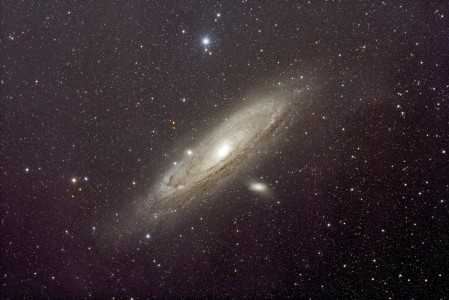
M31 with Redcat 51

My Account

New to Astromart?

Register an account...

Need Help?

Posts Made By: Barry Simon

December 20, 2004 03:11 PM Forum: Refractors

4 Inch APO Refractor Shootout

Posted By Barry Simon

Some in the group may be interested in this APO Refractor Shootout that took place Saturday night in New Orleans, the "2nd Battle of New Orleans", if you will.

The Great APO Refractor Shootout is now history and I believe everyone is pretty happy with how it went. No telescopes were barking dogs and there were no telescopes that were overwhelmingly superior either.

I had evaluation sheets but with 6 telescopes we kept it more informal than what I had originally envisioned this test to be. Double stars proved to be the best test.

In my mind the Tak FC 100 N, the TeleVue NP 101, the TeleVue 102 and the Orion 100 ED were all very close in performance. The Tak FC 100 N (this one came before the FS102 and is not discontinued) seemed to render the stars as smaller tighter pinpoints. All 4 of these scopes had excellent color correction but the TeleVue NP 101, in my opinion, had the best color correction of the 4. This was quite remarkable considering that the TV NP 101 is a fast f/5.4 vs the f/8.8 to f/10 focal ratios of the other 3. Keeping in mind that all 4 were excellent and the large, large majority of observers would say that all 4 were color free. All were quite sharp at about 200x with 0.5 mm exit pupils.

The TeleVue 102 and the Orion 100 ED were extremely close in performance. This affirmed for me that at less than 1/2 the price, the Orion 100 ED is a very good choice for someone looking to save some money. Additionally I think no one evaluating the scopes on Saturday night would argue that the FeatherTouch focuser that I added to the Orion 100 ED was in a whole different league beyond the focusers that come with the other scopes. It made critical focus quite easy.

The 5th and 6th scopes in the evaluation were the relatively fast f/6.5 Orion Vixen 102 ED and the f/6.8 (advertised as f/7 but really f/6.8)Brandon 94 could not quite compete with the top 4. They were very, very good, equivalent in many ways, but the difference did show on high magnification double star testing both in terms of resolution and the slight amount of color fringing they introduced to the image, whether it be a bright double star or the bright limb of the Moon. The Brandon 94 is a long discontinued telescope and is available only used (becoming collectable) and the Orion Vixen is now only available via TeleVue, the Vixen distributer in the USA. It's true value is as a wide field instrument relatively free of color, not as a high power lunar, planetary and double star scope. I believe too that this scope's performance would have been helped somewhat with better eyepieces. In my opinion the Brandon yielded slightly better images than the short tube Vixen, but this may be attributable to the higher quality eyepieces used with the Brandon.

Note - Objects evaluated included the bright limb of the Moon, the lunar Alpine Valley, Iota Cas, Theta Aur, Zeta Ori, M-42 and the Trapezium and Saturn.

Barry Simon

January 27, 2005 05:43 AM Forum: Refractors

Re: collimating a refractor

Posted By Barry Simon

Collimating depends in part upon what type of objective cell your refractor has and if the optical axis of the objective can be tilted from the objective end. (Some objective cells screw onto the tube and there is no way to collimate the cell.

If collimation is needed (a Cheshire "collimating" eyepiece is a good way to check) little can be done if the objective cell or objective within cannot be adjusted. Adjusting the focuser cell (tilt) only really helps if it is not square to the optical axis, not if the optical axis is out as a tilt can only pull it into parallel with the optical axis unless it can be off-centered the necessary amount.

Another factor to consider is a misaligned star diagonal, the basic telescope optics may be fine.

I have an article that explains more and I have digital photos if you are interested.

Barry Simon

March 2, 2005 03:39 PM Forum: Telescope Making

Aluminum Telescope Tube Repair

Posted By Barry Simon

A thread about a telescope I had never heard of before on the AstroMart forums awhile back had me quite interested in the particular scope. The scope was a MILO refractor. Milo? What exactly was that, I had never heard of these? Anyway the new owner was kind enough to post a number of photos of the 3" Milo equatorial refractor. What an interesting scope! The most immediate thing that got my attention was the focal length, it is 1400 mm! This focal length equates to an f-ratio of f/18.4 given the 76 mm objective size. What a potentially great scope for lunar observing!

Anyway back in early February the owner contacts me and says he is ready to sell this telescope. I was interested and said I would purchase it.

Now the bad news - I am told that somehow the telescope at some point was placed incorrectly in it's wooden felt lined cradle in it's case and closed. When closure did not seem quite right, whoever shut the case forced it shut. This pinched and dented in the aluminum tube right where the tube sits in the wooden cradle (two significant dents per location). The paint is intact, but the dents are fairly nasty. More than a nick. Furthermore I suspect that these dents may be responsible for the collimation not being spot on when checked with a Cheshire collimating tool.

So what to do? I checked with 2 of those "paintless" hail damage auto repair places, but they say they cannot work aluminum like they can work automotive sheet metal.

Another thought would be to have a solid metal plug machined (maybe a counterweight turned down on a lathe) that will fit snuggly in the tube and then tapping it thru may go a long way in pushing the dents back out. The light baffles will have to be removed and then replaced exactly and the tube interior will have to be repainted. That may prove to be a problem as the total tube length is 43 inches and this tube has an ID of 3"

Another possibilty would be to fabricate a spreader with a small turnbuckle pushing against arcs of aluminum from the inside. This may work well for one pair of dents which is just about 4 to 5 inches from the tube end. However the other pair of dents is about 18 inches from the end of the tube.

I am thinking that if the dents can be pushed out, then the
collimation will be improved. Once done the whole tube exterior will be stripped, have small imperfections filled, sanded, primed and repainted in a pure white enamel.

I am open to other suggestions. Any comments?

Barry Simon

March 9, 2005 03:15 AM Forum: Telescope Making

Still Another Telescope Project

Posted By Barry Simon

About 2 months ago I could not pass up a really good deal on an older black tubed Vixen C102 f/9.8 refractor as made for Celestron in the late 80's. These scopes on a Super Polaris mount sold for about $1200 in the late 80's. The one I bought was about 1/2 that on eBay. The mount is in great shape, but the tube had some cosmetic damage (focuser and objective cell were fine). The damage did mandate repainting, but as replacement decals are no longer available from Celestron, I decided to go in a completely different direction in respect to refinishing this telescope.

The tube damage consisted of some ugly marks from a previous owner going thru the cradle rings and contacting the tube with the bolts. Several other marks down to the bare metal were on the tube side. While slightly dented in a few places, there was no major damage and these marks are barely felt on the inside. Collimation is fine. I decided to repaint. I kept changing my mind over the past few weeks - would it be a nice ivory, or perhaps black again, maybe a nice dark blue (no too "Meade-like"). I finally settled on purple after I saw this new series of paint which is supposed to mimic an anodized finish. It does look anodized if painted on a properly prepared bare surface. However with the tube repair (JB Weld), I had to use the recommended base coat, which is a special metal flake silver. When the paint goes on at the proper thickness it looks like a solid purple enamel, but as it cures the metal flake characteristics come out. It should look spectacular in bright sunlight. I will probably use it mainly as a public education telescope. I am going to call it the "Purple Planet Eater". There is a flat space on top of the focuser where I can mount a little plastic figurine of Marvin the Martian if I can find one. Can anyone help here?

See the photo of the dew shield that I have attached.

I baked the dew shield and the finder tube in the oven (140 degrees for 1 hour) after about 18 hours of air drying. This really speeds the curing process up. All parts are suspended on hooks and no support contacts a painted surface. This stuff does not cure as fast as an automotive lacquer or even some other enamels which are good to go once baked in the oven. The tube is too large to treat in the oven, so I have it where it can catch some direct sunlight. I probably will not feel good about reassembling the scope and mounting it in the tube rings for at least 2 weeks if not longer due to the slow curing process. The oven baking also really brings out the gloss in the paint.

Barry Simon

March 25, 2005 02:40 PM Forum: Equipment Talk

Forum Missing?

Posted By Barry Simon

What happened to the Burgess Optics Forum? I rarely if ever contributed to it, but I did enjoy reading it. Sorry if this has been answered elsewhere, but I did not see that either.

The image shows me testing a waterproof prototype pair of 7x50 binoculars for Bill Burgess in my swimming pool.

Barry Simon

April 13, 2005 11:24 PM Forum: Refractors

The Purple Planet Eater, aka "UltraViolet Refracto

Posted By Barry Simon

Not "UltraViolet" in the usual sense.....

About 6 weeks or so ago I described my plans for refurbishing a Celestron SP C102 refractor that I had purchased on eBay. The only real problem with this scope was some light cosmetic damage to the tube (small dents, paint scratches, scuffs, etc.) I decided to rebuild this scope with some minor tube repair, a repaint and some other add-ons. The tube was repaired using JB Weld after complete stripping. The tube color was changed to an anodizied purple metal flake courtesy of the Dupli-Color MetalCast series of paint. I also added a Vixen 50 mm finder bracket (repainted as close as I could get to Celestron brown/black hammered, but still not quite right) with a Vixen 7x50 finder, additionally I added a Lumicon laser bracket (with a base that I grinded to match the curve of the 115 mm diameter tube), plus a green laser that I already had. Additionally I had Ken Dauzat (Ken's Ring's and Things) make me a counterbalance to offset the weight of the finder. The finder is mounted in the 10 o'clock position, the counterbalance in the 2 o'clock position and the laser bracket in the 12 o'clock position as viewed from the rear. Adding the heavier finder and the counterbalance also helps in respect to the front heavy tube assembly due to the big objective cell. Now the tube balances in the cradle with more tube showing on the objective side than on the focuser side.

The final little touch is "Marvin the Martian". He sits on the flat plate on top of the focuser via velcro. I plan to use this scope mostly with kids, for Astronomy Day and things like that. I like the purple color personally, but I think it will really appeal to kids. So will the green laser and so will "Marvin the Martian".

Check out the photos and let me know what you think.

Barry Simon


June 22, 2005 11:31 PM Forum: Coronado-Lunt-DayStar Solar Filters

Barlow Use

Posted By Barry Simon

Haven't tried this so I don't know if I can do this without damaging my barlow. Comments appreciated.

Can I use an Antares 1.6x barlow between the blocking filter and etalon or should a barlow only be used behind the blocking filter? Note, the blocking filter would then be attached to the barlow.

I have a SolarMax 60 with tuner and BF15.

Thanks for the feedback!

Barry Simon

August 19, 2002 08:02 PM Forum: Equipment Talk

Megrez 80mm f/6 Refractor

Posted By Barry Simon

I am a little unclear about whether you want to guide with the Megrez and photograph thru the 8" or guide with the 8" and photograph thru the Megrez.

Assuming that you will be using the Megrez in lieu of the radial guider, your photographic "power" is approx. 40 at prime focus, so an appropriate guiding power would have to be at least 6 times that or 240x. To get 240x out of a Megrez (focal length 480mm) you need a 2 mm guiding eyepiece. I don't think such an animal exists. Takahashi has a very nice 5mm guiding eyepiece, but even this high power guiding eyepiece will only give you 96x in the Megrez, so your guiding ratio (guiding power to photographic power) would only be little more than 2 to 1 with this setup instead of the minimum recommended 6 to 1. A standard 12mm guiding eyepiece would only give you a 1 to 1 ratio, totally unacceptable and a 9mm guider would be little better at 1.33 to 1.

Now if your plan is to photograph using the Megrez as the camera lens and the 8" Schmidt-Cass as the guide scope, a standard 12mm guiding eyepiece would give you a nice 17 to 1 ratio and a 9mm guiding eyepiece would give you an even better 22.5 to 1 ratio.

Other problems you may face is the potential image shift with the Schmidt-Cass and the achromatic color error you will see with the Megrez (not too bad according to some).

Due to the image shift potential, an off-axis or radial guider was always considered the best choice, because it takes the image shift issue out of the equation. Additionally your guiding ratio becomes 5.5 to 1 with a 9mm guiding eyepiece which is just getting to the acceptable range. You can guide off-axis with a 12mm but your allignment has to be "spot on" and you have to be very dilligent as your guiding ratio is reduced to about 4 to 1.

Barry Simon

November 26, 2002 01:47 PM Forum: Coronado-Lunt-DayStar Solar Filters

Etalon Tuner

Posted By Barry Simon

David,

In my limited experience (about 5 or 6 sessions so far), I find thet the T-max tuner attached to the SolarMax produces far more noticeable results then does the tuner attached to the blocking filter/diagonal. I have the SolarMax 60 and BF15. Both do affect the image. The chief reason I went with the BF15 with build in tuner as opposed to the BF10 was the size of the blocking filter itself, not the fact that it had adjustment capability.

Barry Simon

December 9, 2002 02:32 PM Forum: Equipment Talk

Celestron Erfles

Posted By Barry Simon

In addition to the 4 eyepieces you listed, Celestron also had a 32 mm Erfle. If memory serves me correctly, the 20 mm was the first available followed by the 16 mm and the 32 mm in the early 80's and then the 24 and 28 mm eyepieces. These eyepieces are "fully coated" not "fully multi-coated". They were eventually replaced by the silver top Plossls. (Mid 80's or a little after.)

Celestron was generally fairly conservative in respect to balancing the eyepieces with field stops to preserve reasonable edge definition. Accordingly if you compare the Celestron 16 mm and the 20 mm to Meade's "Research Grade Erfles" in 15.5 mm and 20 mm the Meade's will have a larger field size, but the Celestron's will have better edge definition.

I always felt the 24 mm and the 28 mm were particularly nice as the eye lenses were well recessed. This helps with eye placement and minimizes the chance of getting gunk on the optics.

If you like these erfles it may be rewarding if you can find the short lived Celestron Ultima Wide Angles (not the regular Ultima series). These included a 15 mm, 19 mm and 23 mm. I have the 19 mm and it's field lense is a large 23 mm in clear aperture. In comparison to a TeleVue 19 mm Panoptic, the w.a. Ultima has a larger field of view. By field stop/radian/focal length/magnification calculations the apparent field of the 19 mm is a little over 70 degrees. Additionally this series is fully multi-coated.

Barry Simon