Reviews & Articles
Image of the day
About Astromart
My Account
New to Astromart?
Register an account...Need Help?
Barlowed Laser Collimation Made Easy
For many amateur astronomers, veterans and newbies alike, collimating a telescope can sometimes be a daunting and frustrating task. Over my many years in this hobby, I can’t begin to tell you how many hours have been consumed in the quest for sharper, better-looking images in the eyepiece. But now, for those of us who own Newts, be they F/2.5 or F/8.0, be they EQ-mounted or dobs, I’ve got just the fix for what ails ya…
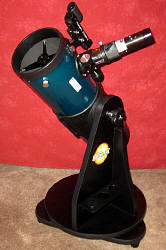
In this description of Barlowed Laser Collimation, we will assume that your secondary mirror is already aligned or has been aligned by you, using a Cheshire alignment tube, and that it’s perfectly centered below the focuser tube assembly. For the purposes of this demonstration, I used an Orion StarBlast 4.5 (F/4.0, 113mm Dia./450mm FL), but this technique can be used on any Newtonian reflector telescope. Note that I have placed the OTA at about a 45° angle and the focuser is extended about half-way out. This is done to simulate the angle the telescope will be in during most of my observing sessions. Since most mass-produced telescopes have a certain amount of play in the focuser tube assembly, having the telescope in this position will stress the focuser much the same way your heavier eyepieces will during a observing session.
This technique works best if your primary mirror has been center-spotted. Since a large number of manufacturer’s are already doing this, only those who own much older telescopes will likely need to center-spot their primary mirrors.
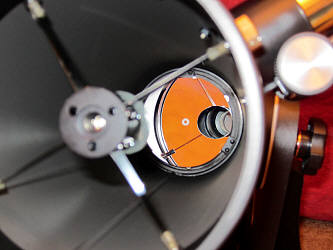
You will need a laser collimator that has a side viewing port, which is why I use an Orion LaserMate. The viewing port is necessary for the final step of the collimation process. Insert the laser into the focuser and turn it on. Adjust the secondary mirror until the laser beam hits the exact center of your center-spotted primary. If you see the returning laser beam in the laser’s viewing port, then your alignment is already close, but do not be concerned if the returning laser beam is not centered in the viewing port. Adjustments to the secondary mirror usually require the use of a hex key, but some telescopes are equipped with Bob’s Knobs, or even machined Philips-head screws.
**CAUTION: When adjusting the secondary mirror, with the OTA in this position, dropped hex keys, screw drivers, etc., will fall to the back of the OTA and can scratch and/or damage the coatings on your primary mirror.

Once this step is completed, turn off your laser collimator and remove it from the focuser tube assembly. The next step will involve adjusting the primary mirror.
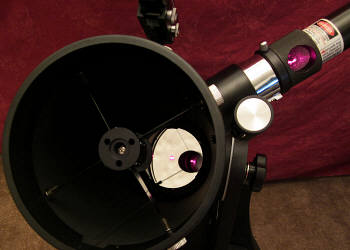
Secure your 2x barlow, insert it into the focuser tube, and then insert your laser collimator into your barlow. Rotate the laser collimator until you can easily see the viewing port when you’re at the back of the OTA.
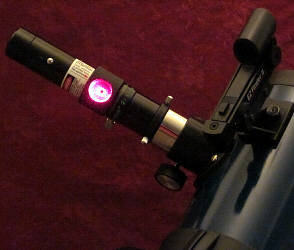
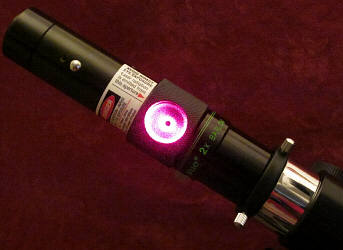
When the laser is turned on, the barlow will cause the laser beam to diffuse, and this diffused beam should cover most, if not all, of the center-spotted portion of your primary mirror. The diffused beam will return to the viewing port with a magnified image of your primary’s center spot. Because my center-spot is donut-shaped, only the light from inside and outside of the donut returns, while the area covered by the paper donut is not reflected back. In the viewing port, this appears as a dark ring or “Black Donut“. Loosen the primary mirror locks and slowly turn the adjustment screws. When done correctly, the hole, in the center of your viewing port, should be perfectly centered inside of the “Black Donut”. As you start to re-tighten your primary mirror locks, you will notice that the donut moves, so you will need to go from lock-to-lock, tightening each, a little bit at a time, to re-center the donut. Once that’s done, YOU’RE COLLIMATED!
For slower telescopes, this level of collimation should be sufficient for most viewing purposes, but for faster telescopes, F/5 and below, you may need to do a little bit of star collimation just to tighten things up the rest of the way. Either way, getting to this point, from start to finish, can generally be achieved in about 5 minutes.
Is Barlowed Laser Collimation the end-all, be-all on the subject of Newtonian optical alignment? Maybe; maybe not, but for now, it’s one step closer in that ultimate quest for sharper, better-looking images in the eyepiece. Clear skies.
In this description of Barlowed Laser Collimation, we will assume that your secondary mirror is already aligned or has been aligned by you, using a Cheshire alignment tube, and that it’s perfectly centered below the focuser tube assembly. For the purposes of this demonstration, I used an Orion StarBlast 4.5 (F/4.0, 113mm Dia./450mm FL), but this technique can be used on any Newtonian reflector telescope. Note that I have placed the OTA at about a 45° angle and the focuser is extended about half-way out. This is done to simulate the angle the telescope will be in during most of my observing sessions. Since most mass-produced telescopes have a certain amount of play in the focuser tube assembly, having the telescope in this position will stress the focuser much the same way your heavier eyepieces will during a observing session.
This technique works best if your primary mirror has been center-spotted. Since a large number of manufacturer’s are already doing this, only those who own much older telescopes will likely need to center-spot their primary mirrors.
You will need a laser collimator that has a side viewing port, which is why I use an Orion LaserMate. The viewing port is necessary for the final step of the collimation process. Insert the laser into the focuser and turn it on. Adjust the secondary mirror until the laser beam hits the exact center of your center-spotted primary. If you see the returning laser beam in the laser’s viewing port, then your alignment is already close, but do not be concerned if the returning laser beam is not centered in the viewing port. Adjustments to the secondary mirror usually require the use of a hex key, but some telescopes are equipped with Bob’s Knobs, or even machined Philips-head screws.
**CAUTION: When adjusting the secondary mirror, with the OTA in this position, dropped hex keys, screw drivers, etc., will fall to the back of the OTA and can scratch and/or damage the coatings on your primary mirror.
Once this step is completed, turn off your laser collimator and remove it from the focuser tube assembly. The next step will involve adjusting the primary mirror.
Secure your 2x barlow, insert it into the focuser tube, and then insert your laser collimator into your barlow. Rotate the laser collimator until you can easily see the viewing port when you’re at the back of the OTA.
When the laser is turned on, the barlow will cause the laser beam to diffuse, and this diffused beam should cover most, if not all, of the center-spotted portion of your primary mirror. The diffused beam will return to the viewing port with a magnified image of your primary’s center spot. Because my center-spot is donut-shaped, only the light from inside and outside of the donut returns, while the area covered by the paper donut is not reflected back. In the viewing port, this appears as a dark ring or “Black Donut“. Loosen the primary mirror locks and slowly turn the adjustment screws. When done correctly, the hole, in the center of your viewing port, should be perfectly centered inside of the “Black Donut”. As you start to re-tighten your primary mirror locks, you will notice that the donut moves, so you will need to go from lock-to-lock, tightening each, a little bit at a time, to re-center the donut. Once that’s done, YOU’RE COLLIMATED!
For slower telescopes, this level of collimation should be sufficient for most viewing purposes, but for faster telescopes, F/5 and below, you may need to do a little bit of star collimation just to tighten things up the rest of the way. Either way, getting to this point, from start to finish, can generally be achieved in about 5 minutes.
Is Barlowed Laser Collimation the end-all, be-all on the subject of Newtonian optical alignment? Maybe; maybe not, but for now, it’s one step closer in that ultimate quest for sharper, better-looking images in the eyepiece. Clear skies.
Funding Member

