Reviews & Articles
Image of the day

About Astromart
My Account
New to Astromart?
Register an account...Need Help?
A poor man's Vixen dovetail clamp
A poor mans Vixen dovetail clamp
I had a heart stopping moment the other night with my 8SE mount. For its Vixen dovetail mount, it uses a clamp plate on one side of the clamp assembly operated by a captive bolt. It is a loose/sloppy fit until tightened, but there is no feel as to whether the rail is actually fully in the slot or not, and the 15* dovetail angles can give the feel of a positive clamp even thought the rail may not be correctly positioned in the slot…..ie: it can come loose, which mine did. After my 6SE OTA popped out and I did the fumble/ grab/fumble across the deck – ultimately dropping the OTA (it was fine - I wasn’t), I determined not to emulate the Celestron system for a small AZ mount I was making.
Vixen type dovetail mounting rails are nearly universal on most of the current consumer telescopes. These rails are light, rigid, compact and strong, and if your scope didn’t come with one, there are any number of aftermarket vendors that can sell you a piece for a reasonable price.
But what if your equipment doesn’t have the matching dovetail clamp? In its simplest form, it is nothing more than a deep mating dovetail slot cut in a (typically) circular casting with a clamp screw which bears directly on the rail. This assembly typically attaches to the end of your Declination or Alt shaft.
As simple as this system may sound, unless you have access to a milling machine, cutting the appropriately angled slot in a piece of solid aluminum is beyond the abilities of the typical home workshop. All of my OTA’s have Vixen dovetails, but I was building a simple AZ mount that I needed a clamp for, and not having a milling machine, I devised a way to get the clamp functionality without the milling, and using just a flat plate.
Vixen dovetails have sides angled at 15* from vertical, so, the clamp must have matching angles. In its simplest form, a clamp bolt simply pushes the dovetail hard against the opposite side of the slot. So only one side of the dovetail slot actually bears the pressure and aligns the rail. Microscopic as they may be, only the two highest points of this side bear the clamp pressure, so I thought, “why not just use these two high points and do away with the rest of it……’
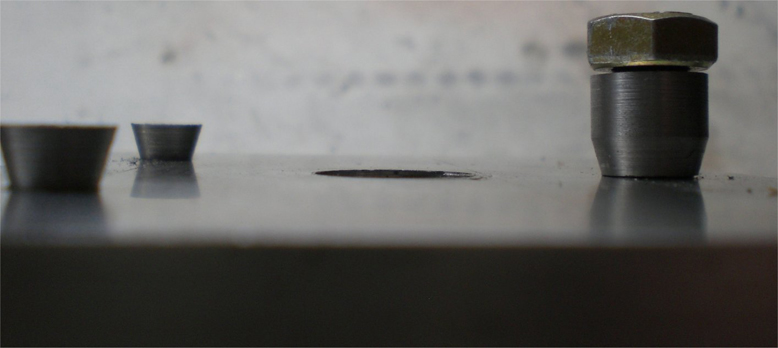
My idea was to use to bolts with shoulders that had been chamfered to 15* drilled and tapped into a flat plate 2” apart. I then used another bolt in the middle on the opposite side with a collar chamfered at 15* to do the clamping. The benefit of this is that the Vixen rail not only gets pushed hard across onto the 2 chamfered bolts, but also gets pushed down hard and flat against the plate by the chamfered collar. Voila – a 3 point Vixen dovetail clamp. The other benefit is that the rail slides into position loosely, but is still captive – meaning it can only come out by sliding forward or backward. After my experience with the Celestron clamp – this feature held some inexplicable merit….

I am fortunate enough to have a metal lathe, so the chamfers were easy to make, but in a pinch, the bolt head could be chamfered using a file, or chucked up in a drill and a file used – sort of a poor man’s lathe. (15* does not require a lot of material removal)
The side to side spacing (ie: width of rail) of the holes is fairly critical as a 15* taper does not allow for much error. I first made mine a bit too wide and had to compensate with a wider collar. If you drill and tap your plate so the outside of your threads fall right on the width of the rail, you will be okay.

I also drilled and tapped one of the faces of the hex bolt so a threaded rod could be inserted. This allows the bolt to be turned without a wrench even when an OTA is mounted fairly close to the bolt head. You only have to turn the bolt through approx 120* (2 faces) to get good clamp pressure. I used a 5/16-18unc for the clamp bolt and two ¼-20unc cap screws for the opposite sides because I had these available.
This system is quick and easy to make and so far, has proven to provide predictable and strong clamping, and unlike the end of a bolt bearing directly on the rail, this system will not mark your rail either.
I had a heart stopping moment the other night with my 8SE mount. For its Vixen dovetail mount, it uses a clamp plate on one side of the clamp assembly operated by a captive bolt. It is a loose/sloppy fit until tightened, but there is no feel as to whether the rail is actually fully in the slot or not, and the 15* dovetail angles can give the feel of a positive clamp even thought the rail may not be correctly positioned in the slot…..ie: it can come loose, which mine did. After my 6SE OTA popped out and I did the fumble/ grab/fumble across the deck – ultimately dropping the OTA (it was fine - I wasn’t), I determined not to emulate the Celestron system for a small AZ mount I was making.
Vixen type dovetail mounting rails are nearly universal on most of the current consumer telescopes. These rails are light, rigid, compact and strong, and if your scope didn’t come with one, there are any number of aftermarket vendors that can sell you a piece for a reasonable price.
But what if your equipment doesn’t have the matching dovetail clamp? In its simplest form, it is nothing more than a deep mating dovetail slot cut in a (typically) circular casting with a clamp screw which bears directly on the rail. This assembly typically attaches to the end of your Declination or Alt shaft.
As simple as this system may sound, unless you have access to a milling machine, cutting the appropriately angled slot in a piece of solid aluminum is beyond the abilities of the typical home workshop. All of my OTA’s have Vixen dovetails, but I was building a simple AZ mount that I needed a clamp for, and not having a milling machine, I devised a way to get the clamp functionality without the milling, and using just a flat plate.
Vixen dovetails have sides angled at 15* from vertical, so, the clamp must have matching angles. In its simplest form, a clamp bolt simply pushes the dovetail hard against the opposite side of the slot. So only one side of the dovetail slot actually bears the pressure and aligns the rail. Microscopic as they may be, only the two highest points of this side bear the clamp pressure, so I thought, “why not just use these two high points and do away with the rest of it……’
My idea was to use to bolts with shoulders that had been chamfered to 15* drilled and tapped into a flat plate 2” apart. I then used another bolt in the middle on the opposite side with a collar chamfered at 15* to do the clamping. The benefit of this is that the Vixen rail not only gets pushed hard across onto the 2 chamfered bolts, but also gets pushed down hard and flat against the plate by the chamfered collar. Voila – a 3 point Vixen dovetail clamp. The other benefit is that the rail slides into position loosely, but is still captive – meaning it can only come out by sliding forward or backward. After my experience with the Celestron clamp – this feature held some inexplicable merit….
I am fortunate enough to have a metal lathe, so the chamfers were easy to make, but in a pinch, the bolt head could be chamfered using a file, or chucked up in a drill and a file used – sort of a poor man’s lathe. (15* does not require a lot of material removal)
The side to side spacing (ie: width of rail) of the holes is fairly critical as a 15* taper does not allow for much error. I first made mine a bit too wide and had to compensate with a wider collar. If you drill and tap your plate so the outside of your threads fall right on the width of the rail, you will be okay.
I also drilled and tapped one of the faces of the hex bolt so a threaded rod could be inserted. This allows the bolt to be turned without a wrench even when an OTA is mounted fairly close to the bolt head. You only have to turn the bolt through approx 120* (2 faces) to get good clamp pressure. I used a 5/16-18unc for the clamp bolt and two ¼-20unc cap screws for the opposite sides because I had these available.
This system is quick and easy to make and so far, has proven to provide predictable and strong clamping, and unlike the end of a bolt bearing directly on the rail, this system will not mark your rail either.
Funding Member
