Reviews & Articles
Image of the day
About Astromart
My Account
New to Astromart?
Register an account...Need Help?
Webster Telescopes D18

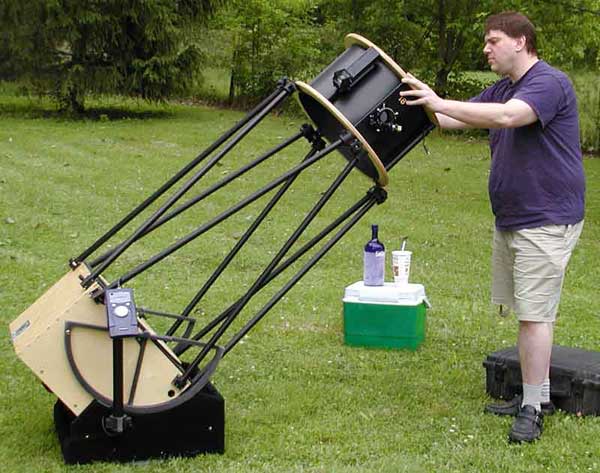
For those of you who don't know me, I build large Dobsonian telescopes as a hobby. My definition of large is 24" and up. I teach telescope building classes that emphasize the reasoning behind doing something a certain way, rather than just following a set of plans. I consider myself a more than competent woodworker. I am an AstroMart Moderator, and I currently use a 30" f/5.3 Dobsonian telescope that I designed and built myself. The largest telescope I have built is a 36". I have owned or used almost every brand of Dob in the world, and then some.
Framework of My Reviews (or why I don’t do more reviews)
You will be temped to skip this section and continue on to the “meat” of the review, but please read this as it gives an important framework to my reviewing process:
You would think that any telescope manufacturer wanting to sell some product would go out of their way to get one of their telescopes reviewed. Whether the review is positive or negative, any publicity is good publicity as far as I can tell. Apparently, this idea is not shared by anyone but me, because getting a scope to review nowadays is near impossible.
I get emails all the time asking “Dave, why have you not reviewed the SexyScope 16 inch??? You are missing out on one of the best deals in astronomy today!!!!” Or “Are you ever going to review the EuroBox 12? I guess there is no one in the USA who owns one.”, or something along those lines.
First, someone would have to send me one. I’m certainly not going to buy every scope I review (in fact, the least biased reviews are done by reviewers who DO NOT own the scope. Obviously, an owner has a vested interest in giving a good review, as he would not want to ruin its resale value, or have his wife read that all that money went into a flawed “toy”).
Second, an honest review is best done when the scope is chosen at random. If a company knows they are sending me a scope for review, they would be fools to not have cherry picked the very best optic. I like getting a random scope in a sealed box, just like the reader would.
The local Sky-Watcher dealer would not give me one of the new 12” Dobs to review because “I might not give it a good review”. That seemed odd to me. What if I gave it a great review? Certainly that would be good for business. Maybe I’m the only one who can see that?
Yes, I have been called “nitpicky”, and yes, I acknowledge that my reviews are long and detailed. These telescopes are not inexpensive; so I certainly will point out every flaw I see. I am not constrained by the 1000 word reviews seen in the glossy magazines, so I try to cover everything in great detail.
I call Webster Telescopes every now and then to ask for a scope to review. They always say “We don’t have any to lend out. Every scope we have is custom ordered and already sold”. I had heard that they were starting to produce a few extra scopes in each size so that they have a few scopes in stock. I called for one of the “In stock” 18 inch scopes to review and they said I could not take one, no reason given.
Online, I had offered to examine anyone’s Webster scope before they take delivery (any except the C28, as I had reviewed that scope a few years back). I got an email from David Smith, asking if I would check out his D18 before it was shipped. I said that I would thoroughly run it through the wringer and report back. This is that report.
First Impressions
The first thing you notice about the D18 is how small it is. It looks to be about the size of a 15” telescope. The eyepiece height is lower than many 15” scopes. It still looks like a Webster, with light wood and black hardware, but everything is on a much smaller scale. The scope has a simpler, more streamlined, look to it than the larger Webster scopes do.
The other thing you notice right away is that the scope weighs very little. When I first lifted the wheel barrel handles, I asked “Is the mirror already in here?” Indeed it was.
A concern when a telescope gets too lightweight is stability; as many owners of ultra light telescopes have learned. I made a mental note to pay particular attention to this as I rolled it up into my van.
Rolling It Out

The scope rolls out on two 10” pneumatic tires. The handles are 60” long, but the scope is so light, they could even be shorter and I’m sure nobody would complain. The last time I reviewed the C28, the handles were black. Now they are gloss white, supposedly to keep people from tripping over them in the dark (seems logical). No matter what color your handles are, you should put them far and away where no one can trip on them.
A nice feature I noticed right away was that the knobs (really just eye-bolts) to secure the handles to the Rocker Box, were made of metal. Too many times on other scopes, I see plastic knobs that have shattered leaving just the metal insert and no way to remove them (If this happens to you, lock down some “Vise-Grips” and crank CCW. Replace with an all metal eye-bolt). If you have never owned a large Dob before, the knobs are the first things that get knocked into doorframes or the sides of vehicles.
Webster offers an option where the wheels stay on the Rocker Box all the time and just the handles come off. A member of our local club bought one of these telescopes. He had liked this feature at first, but latter found that the wheels were often in the way; especially the GOTO clearance radius or engaging/disengaging of the motor drive. With this in mind, I’d recommend a telescope where the wheels come off and can be stored out of the way, no matter what brand you buy.
The scope is actually light enough that any Michigan raised (and fed) man could just lift and carry the Rocker Box and Mirror Box separately and not even use the wheels. I guess this fact could come in handy should you ever get a flat tire.
Besides the times I took the scope out to a dark site for viewing, I left the scope fully assembled and just rolled it in and out of my garage.
Setting It Up

To set up the scope you:
1. Remove the wheels.
2. Place the four truss pairs into their sockets.
3. Drop on the UTA.
4. Snug down the knobs (no need to tighten them too much, said the manual).
Including collimation, this took exactly 2 minutes and 55 seconds. It helped that the collimation was almost dead on, but if this was my everyday scope, I’m sure I could assemble and collimate it in less that two minutes.
Collimation of this scope at f/4 was not any harder or different than my own 18” f/5 telescope. If I read one more online “expert” claiming that fast telescopes are difficult to collimate, I will drive to their house and show them how it is done – then put their public humiliation on YouTube. Folks, if you have never owned a sub f/4 Dob, DO NOT make a knee-jerk post about how hard it is. You are doing a disservice to our astronomy community, and flaunting your ignorance on the matter.
I used a Glatter laser BLUG to get everything aligned. Then I used a Catseye autocollimator to double check. The mirror comes already center spotted with a Catseye triangle, a nice touch.
There are no springs on either the Primary or Secondary mirror mounts, so collimation was solid.
No tools of any kind were required to set up the scope.
Mirror Box
The mirror box is the “center of the universe” on a truss Dobsonian telescope.
Here it was made of EuroPly with amazingly precise Dovetail Joints. As with other Webster scopes, these are clearly machine made, as no hand cut dovetails could ever be so tightly matched. Dovetails are the strongest wood joint there is, and it is nice to see them on a commercial product other than high end kitchen drawers and English furniture.
The box was finished with satin epoxy. The Webster owner’s manual says to wax the entire telescope with Turtle Wax paste every year. The mirror box was already waxed and felt smooth to the touch.
The inside of the box was painted flat black and had gussets running the full length of the corners.
The light baffle at the front of the Mirror box was finished in black. Black is definitely the proper color for a light baffle. I agree with the Webster web site; I've seen too many telescopes where the light baffle is glossy, light colored wood, or even painted with glossy white paint. Put those scope designs in the "What the hell were they thinking?" file. You never want stray, scattered light reflecting back into the eyepiece.
The mirror box cover was secured with Velcro. Unlike the last time I tried one (on the C28), this one had just the right amount of material and was easy to remove in nightly use (I guess they took my advice that the old ones had too strong of a grip). One good thing about round mirror covers is they can’t fall in and scratch the mirror like square ones can. Kreige used to joke that that’s why manhole covers were round. The knob in the middle is the same knob used on the UTA clamps and the mirror cell. If you ever lost or damaged a knob, you could use it as an emergency spare.
One thing I felt was missing was a rear light baffle. Not all of us are lucky enough to do all of our observing under dark skies. Sometimes light reflects off the ground and up into the scope, especially if you are forced to set up on concrete (heaven forbid!). Webster claims that they did use them for a short time, but they slowed down the cooling more than they liked. I suggest they make one that is removable; maybe with magnets to hold it to the back of the cell?

Control Stalk
One thing I had never seen before on any Webster Telescope was a control stalk. On all the scopes from them I had seen, the ArgoNavis was up on the UTA. I guess that they thought that there was not enough room to keep it up on top of this scope.
The Stalk had nice integration and did not look like a Frankenstein bolt on. All of the cables ran up the inside of the stalk, rather than being wrapped along the outside. This gave it a clean look.
The stalk is made of anodized aluminum, 1.5” in diameter. It can be removed if one wanted with a knob on the clamp, but I can’t see any reason to ever take it off (unless you were adding more wires or shipping the scope).

Altitude Bearings and Encoders
The Altitude bearings were made of lightweight cast aluminum that had been anodized flat black. Casting them out of aluminum probably shaves 15 pounds off of the weight of the scope compared to the plywood Altitude Bearings used by most other brands. They were covered with black Formica as a bearing surface.
The Altitude Encoder for the ArgoNavis actually has its shaft embedded inside the bearing itself at the true center of the bearing, so it will never need to be re-centered or adjusted. A small hex setscrew holds it in place.
The encoder is mounted on the non-focuser side, opposite the conventional placement seen on other brands. This keeps it away from ladders and observers. More sound advice for you ATMs (Amateur Telescope Makers) out there, keep encoder hardware away from the busy side of the scope.
The encoder arm is slot mounted, so you don’t have to remember to loosen a knob before you transport the scope. On most truss Dobs, the arm is pinned and will break the encoder if you hit a hard bump in transport without releasing it.
The encoders were Webster’s new Heavy Duty 10,000 step encoders. The encoder body is beefed up and the connector pins are enclosed (thus protected from bending or breaking off). These appear to be a real step forward as far as durability goes. I will certainly buy these for my own scope next time I break a pin off an encoder.
Mirror Cell

One of the main features that Webster is famous for is its Mirror Cell. They came out with the first commercially available Cable Sling, Spherical Bearing Mirror Cell. It is both very compact and very low profile, which in turn, allows for such a small Mirror box. I found the cell to be very open to air flow. The main frame of the cell is tubular steel. The welded joints look clean, with no splatter evident.
The D18 was using an 18 point cell. Each triangle is 1/3" thick aluminum with a stainless bearing bolted to each corner, giving 3/8" of clearance for air to travel beneath the triangle and across the rear mirror surface. This is much more clearance than most Dobs that only give you 1/16” of clearance by using furniture floor protector pads stuck to the triangles. A stainless steel stud runs through each triangle and into a spherical bearing that is pressed into a 3/8" thick steel bar. (A spherical bearing is a type of joint that allows free movement in any direction. The bearing is lined with Teflon to keep things moving smoothly.) This bar in turn, has a larger spherical bearing set in its center that receives the collimation knob, used to adjust the aiming of the primary mirror. Every single moving part of the Mirror cell floats around on these bearings. The joints move so smoothly that it takes maybe 10g of force to move them. I do not exaggerate when I state that you can blow on these parts and get them to smoothly move!
The collimation adjustment of the primary mirror takes place using 2 large knobs that spin on some finely threaded stainless rods. The cutting of the threads was well done, as the knobs had a very precise feel. These large knobs would be easy to use with gloves on, a tip other manufacturers should note. The traditional third knob is not installed and is not needed. By not using the third knob, the telescope will never become so far out of adjustment that some eyepieces will not come to focus. This is a great idea, because every seasoned Dob owner knows the situation where one night, some of his eyepieces no longer come to focus, and then all three knobs have to be spun in or out an equal number of turns to get back into the focus range “sweet spot”. This is one of those “Why did no one else ever think of this?” moments.
The support triangles are kept in alignment with a thin stainless steel wire. I usually see this alignment done with a wide plastic ring. The wire allows much more airflow, another nice touch; as some cell designs are so restrictive to airflow that the mirror never reaches equilibrium the entire night.
The cell is bolted to the Mirror Box with 10 stainless steel, flush head bolts. I like to see stainless steel, because many manufacturers use zinc plated bolts that rust over time and stain the scope. These stainless steel bolts probably add all of ten dollars to the cost of the scope. I can’t see why every manufacturer does not use them.
The cell is designed to always leave the mirror installed, both for transport and washing. This removes the risk of damaging the optic by needlessly handling it at the beginning and end of each night (especially at the end of the night when you are tired).
The cell really seems like the most secure place to store the mirror. There is a sad picture on the Webster Telescopes forums of a C28 scope that flipped upside-down during a storm while the owner was at work. Some wires got yanked out, but the 28” mirror was unharmed! I might have soiled myself had that been my scope.

Fan
On the back of the mirror cell hangs a single beefy fan. At 5” it was larger than a standard computer “muffin” fan, and was made by Rotron. It was good up to about 350X magnification, at which point I could start seeing vibrations in the image and shut it off. Cool down took about an hour with such a thin mirror and large fan running, but your mileage will vary depending on the speed that your nighttime temperature drops.
The fan came fully wired and plugged into the electrical control panel with a switch to turn it on. Many people are surprised that the fans that came with their scope (like Obsession) arrive with just bare wires hanging from them. No plugs or switches or anyway to hook them up. The same control panel had switches for the ArgoNavis/ServoCat and the Dew Heater system.
No fan guard was supplied to protect your fingers from the blades.
Rocker Box
The most notable feature of the Rocker Box was that it is covered in black road case covering. You have seen this material on professional speakers and monitors at concerts. The covering is scratch and rip proof. This is a great idea, because if there is any part of a Dob that gets beat up in a hurry, it’s the Rocker Box. In the dark, people always kick the Rocker Box or bang it with a chair or ladder. Not that many people are going to be using a ladder with this scope, but children will need a stepstool at zenith.
The Rocker Box had already been routed out and wired for all of the ServoCat GOTO system motors, but the system had not been delivered yet, so it was full of empty holes.
Speaking of wires, the floor of the Rocker Box had so many wires bundled and stapled down that it looks like the inside of one of those old mainframe computers. By removing all those wires you are used to seeing hanging all over the outside of a Dobsonian telescope, and concentrating them all on the floor of the Rocker Box, it just looks insane. Because the D18’s Rocker Box is so small to begin with, it makes it look even more insane.
All of the moving wires are incased in plastic loom, to keep them from abrading as they travel up and down with the Mirror Box, another nice touch.
The bottom of the Rocker Box is completely covered with Glassboard.
Ground Board
The Ground Board was made of plywood and had a XLR connector (like you see on pro microphones) for the power connection on one of the feet. This connection went to a cable with a “cigarette lighter” plug on the other end. The plug held a 10 amp fuse and had a red LED light to indicate power. I ran this to my usual Marine Deep Cycle battery.
Remember that lead batteries (yes, even "sealed" or gel cell batteries) can discharge corrosive gasses while being used or charged. Never keep a battery mounted in your Mirror box or Rocker box, unless you are in a hurry to get your mirror recoated. I have a home alarm control box that was destroyed when the gel cell battery decided to release corrosive stuff all over it. Don’t think that it can’t happen to you.
Webster had made a point in the past to say that they only make round Ground Boards. It is surprising how many triangular Ground Boards are out there. It may save a little weight, but if you ever want to add a GOTO system, you have to buy and install a whole new Ground Board.
The central pivot the scope turns on is a 3 /4” thick shaft of machined stainless steel; pretty beefy for an 18” telescope. The pivot turned within a bronze bushing. It was well matched with no perceivable play at all.
Trusses
The aluminum trusses were anodized flat black, and had a very nice finished appearance compared to the bare aluminum with the blue printing running down the sides you see on most truss Dobs. The Trusses were all capped to keep out mud wasps and to further the finished look.
The trusses slide into the aluminum clamps very smoothly. The clamps open just enough to accept the truss ends, without them flopping around. The trusses live their lives as pairs, so you have four units to carry around rather than eight individual poles. Each pair folds flat for transport; rather than being a permanently welded triangle.
Each truss pair locks positively into a V-Slot receiver on the UTA (Upper Tube Assembly). There is no slippage at lower elevations like you see on some other friction only clamp designs. In fact, the scope held collimation from zenith to 0 degrees using an autocollimator to verify.
Webster does not supply any truss bag; they suggest you get one from Astrosystems if you feel you want one. I’ve never bagged my own anodized trusses on my 30” scope and they still look pretty good (anodizing is tough stuff), but I think I had forgotten than my trusses used to look THIS good. I’d suggest you get the bag.
UTA

The first thing you notice on the UTA is the FeatherTouch, two speed focuser. If you have never tried a FeatherTouch focuser, there is almost no way to describe just how smooth it moves. One knob turns at the normal “speed” and the other at a super fine 10:1 ratio. The FeatherTouch is a standard feature on all Webster Telescopes.
The inside of the UTA is a rare sight in the Big Dob world, as it is totally flat black (Most truss scopes use shiny, crinkle finish Kydex or ABS plastic that scatters light in all directions). This certainly added to the contrast I saw at the eyepiece. The paint finish is so rough and flat that it actually seems to collect dust and debris. I saw the same dust collecting phenomenon inside the mirror box too.
The scope was equipped with a secondary dew heater. I could see the ambient temperature probe and red indicator LED light sticking out of the secondary holder. The probe compares the night air temperature to the secondary mirror temperature and keeps the mirror temperature one degree above the ambient temperature - thus preventing dew from forming on the optics. That way, the heater is only heating when necessary. This preserves good views by keeping the heat usage to a minimum. I moved the red LED to the other side of the spider, so it would not shine red light towards the focuser. This should have already been done at the factory.
The secondary mirror spider was a four vane type. The vanes had anti-vibration pads installed on them.
Looking through the empty focuser I could just barely see over the top of the UTA and into the night sky. A lightweight baffle should be placed opposite the focuser to block this source of stray light.
A Telrad finderscope is another standard feature. It was installed and reasonably calibrated. It was running on its own set of batteries and was not connected to the telescope’s power supply. In reality, a set of Telrad batteries lasts for years before needing replacement, but it would be nice if Webster could just run off of the 12V power supply like everything else.
Light Shroud
The light shroud was another rarity in the world of Truss Dobs, because it actually fits the scope. The shroud was made of Rip-Stop Nylon, and hugged the scope body using a drawstring at the top and Velcro straps at the bottom. The Velcro runs through the Altitude Bearings, keeping even this difficult to secure section free from stray light.
The shroud repelled dew rather than absorbing it and becoming heavy. You see many “stretchy” materials used in shroud manufacture that absorb water and cause the scope to become out of balance.
Optics
The supplied primary optic was made by Carl Zambuto. If your astronomy club tests optics, then you already know the reputation that precedes the Zambuto name. Our club has tested plenty of poorly made mirrors by the big names, but we have never seen a Zambuto that was anything less than excellent. Generally, the larger the optic, the more likely it has TDE (Turned Down Edge) or astigmatism, or both. Probably 60% of the commercial optics larger than 16” that we have tested, have TDE.
What interested me was that this 18” f/4 mirror was the fastest (lowest focal ratio) Zambuto mirror I had ever heard of. The faster the mirror, the more difficult it becomes to manufacture accurately. I was anxious to get this mirror both out into the night sky and onto the test bench.
The back of the mirror was completely polished, so you could look through the rear of the mirror and see the aluminum coating on the front side. Most mirrors I have ever seen have the rear surface ground down to 200 grit, so they have a frosted look. This clear polish gave the mirror a surreal, gemlike appearance.
On the test bench, the primary had a polish to die for; textbook smooth (smooth polish gives high contrast at the eyepiece, it is more important than many people think). Absolutely no TDE was evident (TDE kills contrast and gives star tests with “hair” around the edge). Our automated interferometer came back with a Strehl ratio of .931 (many large optics come with papers claiming Strehls of .989, but when we test them they are really in the .7 or .8s). We had just completed a vertical test stand that tests the mirrors lying flat on their backs, so that Strehl number is as real as it gets.
We took a bunch of pictures for our club’s upcoming book “The Great Optical Swindle”, which will certainly knock “Pride and Prejudice and Zombies” off of the New York Times’ Bestsellers list.
The secondary mirror was almost 1/9 th wave (1/8.8), also very good.
Owner’s Manuals
The owner’s manuals came in three parts; The D18 scope, the Mirror Cell and a GOTO Start Up Guide.
The D18 scope manual was pretty basic. It tells how to set up the scope, common maintenance, a Tips & Tricks section and a section on how to initially install the primary mirror upon arrival. With very few pictures, the manual looks to me to be a bit of a work in progress. The information is certainly helpful, but over all, it is not up to the production level of the rest of the telescope.
The Mirror Cell Manual was pretty good. It had quite a few pictures and explanations of the theory of how the cell works. The problem is that unless you were putting in a different mirror, I don’t see how any average user is ever going to use any of this information. I almost think that it is just a disguised installation manual for when you buy a Webster mirror cell separately, and they tossed it in to make it seem like you were getting more manuals.
The GOTO manual is a quick start guide to the operation of the ArgoNavis and ServoCat. It is a nice crash course on how to run the telescope’s computer your first night out. Two of my own scopes use the Argo/Servo combo so none of the information was new to me. I tried to follow the guide as if I was a first time user and it was right on the money. It also had all of the D18’s settings if the Argo ever had to be completely reinitialized (say the internal coin cell failed or you installed new firmware); nice touch. The GOTO manual is not a replacement for the full manuals that come with the ArgoNavis and ServoCat, but it does exactly what it is supposed to.
Actual Use
Because Webster was waiting for the ServoCat to arrive before I needed to return the scope, I actually had quite a few nights to get out and use it.
I usually observe by “lying” on my ladder. This is a very comfortable position for me. This scope was different because I did not need a ladder at all. Even at the zenith, the scope only had a 68” eyepiece height to the center of the focuser (Webster’s web site says 69”, so they are somehow cheating themselves out of an inch). After an hour of observing the first night, what I really wanted was a chair. I did not have a true observing chair, so I sat on the rungs of a ladder. The next time I observed, I borrowed a proper CatsPerch chair and was quite comfortable. You are going to want a chair too, trust me.

The complete scope weighed only 92 lbs on my scale. Even so, I noted that the scope was as stable as any other conventional truss Dob. It moved through the sky with a balanced, buttery smoothness that stopped the moment you wanted it to. There was no perceivable “breakaway” stiction when you first move the scope from it standing at rest. There was no backlash or worry that the scope would tip if moved quickly. Tracking at high power was a pleasure. My concerns about the stability of such a lightweight scope were unfounded; it was as stable as any other well made truss Dob.
I used eyepieces from the 4.8mm Nagler to the monster 31mm Nagler and never did I need to use a counterweight. The scope simply stayed put. With my most “neutral” weight eyepiece, the 13mm Ethos, I would say that the scope was just a little ass heavy. Using the heavy Denkmeire II binoviewers with a pair of 22mm Panoptics installed, the scope still held balance until it was down to about 15 degrees above the horizon. At that point the scope had met its match and exhibited a slow, downward creep. I know, you guys are going to say I’m being picky, and that no one observes at 15 degrees (some truss Dobs don’t even go down to 15 degrees), but I just report what I find. It’s up to you to decide if it maters to you.
With the Paracorr coma corrector in use, there was really no coma evident. Of course, I don’t use cheap eyepieces, but neither, I suspect, would anyone buying a scope of this caliber. Objects “snapped” nicely into focus and background sky was dark and contrasty (the spell check does not like that word). You could realistically get away without the Paracorr when using smaller eyepieces below 13mm, but you will certainly require it above 17mm. The Denkmeier binoviewers did not require the Paracorr at all.
At this point in a review, most reviewers describe a long, tedious list of objects they observed with the scope. I never do that, as I assume you already know what The Veil in Cygnus and The Ring Nebula’s central star looks like, and even if you didn’t, my written descriptions would never do them justice. Maybe one day if I review a 40” telescope, descriptions of my observations would be of some interest; but then again, probably not.

Summation
Here we have Webster’s return to building small Dobsonian telescopes (for quite a while they only made 22 to 40 inch models).
There are some things you are going to really enjoy:
1. The scope assembles very fast.
2. The movement, stability and balance of the scope are superb. Freedom from counterweights alone may be worth the price of admission.
3. The scope is very lightweight. It weighs about the same as the Obsession 18” Ultra Compact (Although it sure does not pack up into one big crate the way the 18UC does!). In fact, it weighs about the same as the 14” Starstructure aluminum telescope, and is 40 pounds lighter than the Zhumell 16” scope.
4. Jim Webster’s CAD (Computer Aided Design) work has brought the D18’s eyepiece height down to 68” at zenith. This is even lower than the shorter focal length Starmaster 18”FX f/3.7.
5. Great mirror cell.
6. Really great optics. Zambuto optics are unmatched in high quality consistency.
And of course, some things you will not like:
1. You are going to want to add some lightweight baffling to the Mirror Cell and to the UTA in order to squeeze every last bit of performance out of this telescope.
2. You may want to add a fan guard.
3. The price. I can not believe the price of a quality telescope nowadays. Crazy!
4. The owner’s manual could certainly be better.
5. No pole bags or secondary mirror covers are included.
All said, the scope is a solid piece of engineering.
David Smith, you will not be disappointed with your purchase.
Dave Bonandrini
8/06/09
Addendum 6/13/2010
Michael from Starstructure sent me an email stating that his 14" telescope that you can put a Mallincam on weighs 91 pounds (because he made it stronger), and that his "standard visual" 14 inch scope weighs 81 pounds. Understandably, he felt that this needed to be addressed immediately.
Just to be sure I got all of my facts straight, I called Webster and asked if they had any unlisted models specifically for Mallincam use. They said that all of their models were already engineered "plenty stiff" for their many Mallincam users.
I hope that clears up any confusion.
-DB
Framework of My Reviews (or why I don’t do more reviews)
You will be temped to skip this section and continue on to the “meat” of the review, but please read this as it gives an important framework to my reviewing process:
You would think that any telescope manufacturer wanting to sell some product would go out of their way to get one of their telescopes reviewed. Whether the review is positive or negative, any publicity is good publicity as far as I can tell. Apparently, this idea is not shared by anyone but me, because getting a scope to review nowadays is near impossible.
I get emails all the time asking “Dave, why have you not reviewed the SexyScope 16 inch??? You are missing out on one of the best deals in astronomy today!!!!” Or “Are you ever going to review the EuroBox 12? I guess there is no one in the USA who owns one.”, or something along those lines.
First, someone would have to send me one. I’m certainly not going to buy every scope I review (in fact, the least biased reviews are done by reviewers who DO NOT own the scope. Obviously, an owner has a vested interest in giving a good review, as he would not want to ruin its resale value, or have his wife read that all that money went into a flawed “toy”).
Second, an honest review is best done when the scope is chosen at random. If a company knows they are sending me a scope for review, they would be fools to not have cherry picked the very best optic. I like getting a random scope in a sealed box, just like the reader would.
The local Sky-Watcher dealer would not give me one of the new 12” Dobs to review because “I might not give it a good review”. That seemed odd to me. What if I gave it a great review? Certainly that would be good for business. Maybe I’m the only one who can see that?
Yes, I have been called “nitpicky”, and yes, I acknowledge that my reviews are long and detailed. These telescopes are not inexpensive; so I certainly will point out every flaw I see. I am not constrained by the 1000 word reviews seen in the glossy magazines, so I try to cover everything in great detail.
I call Webster Telescopes every now and then to ask for a scope to review. They always say “We don’t have any to lend out. Every scope we have is custom ordered and already sold”. I had heard that they were starting to produce a few extra scopes in each size so that they have a few scopes in stock. I called for one of the “In stock” 18 inch scopes to review and they said I could not take one, no reason given.
Online, I had offered to examine anyone’s Webster scope before they take delivery (any except the C28, as I had reviewed that scope a few years back). I got an email from David Smith, asking if I would check out his D18 before it was shipped. I said that I would thoroughly run it through the wringer and report back. This is that report.
First Impressions
The first thing you notice about the D18 is how small it is. It looks to be about the size of a 15” telescope. The eyepiece height is lower than many 15” scopes. It still looks like a Webster, with light wood and black hardware, but everything is on a much smaller scale. The scope has a simpler, more streamlined, look to it than the larger Webster scopes do.
The other thing you notice right away is that the scope weighs very little. When I first lifted the wheel barrel handles, I asked “Is the mirror already in here?” Indeed it was.
A concern when a telescope gets too lightweight is stability; as many owners of ultra light telescopes have learned. I made a mental note to pay particular attention to this as I rolled it up into my van.
Rolling It Out
The scope rolls out on two 10” pneumatic tires. The handles are 60” long, but the scope is so light, they could even be shorter and I’m sure nobody would complain. The last time I reviewed the C28, the handles were black. Now they are gloss white, supposedly to keep people from tripping over them in the dark (seems logical). No matter what color your handles are, you should put them far and away where no one can trip on them.
A nice feature I noticed right away was that the knobs (really just eye-bolts) to secure the handles to the Rocker Box, were made of metal. Too many times on other scopes, I see plastic knobs that have shattered leaving just the metal insert and no way to remove them (If this happens to you, lock down some “Vise-Grips” and crank CCW. Replace with an all metal eye-bolt). If you have never owned a large Dob before, the knobs are the first things that get knocked into doorframes or the sides of vehicles.
Webster offers an option where the wheels stay on the Rocker Box all the time and just the handles come off. A member of our local club bought one of these telescopes. He had liked this feature at first, but latter found that the wheels were often in the way; especially the GOTO clearance radius or engaging/disengaging of the motor drive. With this in mind, I’d recommend a telescope where the wheels come off and can be stored out of the way, no matter what brand you buy.
The scope is actually light enough that any Michigan raised (and fed) man could just lift and carry the Rocker Box and Mirror Box separately and not even use the wheels. I guess this fact could come in handy should you ever get a flat tire.
Besides the times I took the scope out to a dark site for viewing, I left the scope fully assembled and just rolled it in and out of my garage.
Setting It Up
To set up the scope you:
1. Remove the wheels.
2. Place the four truss pairs into their sockets.
3. Drop on the UTA.
4. Snug down the knobs (no need to tighten them too much, said the manual).
Including collimation, this took exactly 2 minutes and 55 seconds. It helped that the collimation was almost dead on, but if this was my everyday scope, I’m sure I could assemble and collimate it in less that two minutes.
Collimation of this scope at f/4 was not any harder or different than my own 18” f/5 telescope. If I read one more online “expert” claiming that fast telescopes are difficult to collimate, I will drive to their house and show them how it is done – then put their public humiliation on YouTube. Folks, if you have never owned a sub f/4 Dob, DO NOT make a knee-jerk post about how hard it is. You are doing a disservice to our astronomy community, and flaunting your ignorance on the matter.
I used a Glatter laser BLUG to get everything aligned. Then I used a Catseye autocollimator to double check. The mirror comes already center spotted with a Catseye triangle, a nice touch.
There are no springs on either the Primary or Secondary mirror mounts, so collimation was solid.
No tools of any kind were required to set up the scope.
Mirror Box
The mirror box is the “center of the universe” on a truss Dobsonian telescope.
Here it was made of EuroPly with amazingly precise Dovetail Joints. As with other Webster scopes, these are clearly machine made, as no hand cut dovetails could ever be so tightly matched. Dovetails are the strongest wood joint there is, and it is nice to see them on a commercial product other than high end kitchen drawers and English furniture.
The box was finished with satin epoxy. The Webster owner’s manual says to wax the entire telescope with Turtle Wax paste every year. The mirror box was already waxed and felt smooth to the touch.
The inside of the box was painted flat black and had gussets running the full length of the corners.
The light baffle at the front of the Mirror box was finished in black. Black is definitely the proper color for a light baffle. I agree with the Webster web site; I've seen too many telescopes where the light baffle is glossy, light colored wood, or even painted with glossy white paint. Put those scope designs in the "What the hell were they thinking?" file. You never want stray, scattered light reflecting back into the eyepiece.
The mirror box cover was secured with Velcro. Unlike the last time I tried one (on the C28), this one had just the right amount of material and was easy to remove in nightly use (I guess they took my advice that the old ones had too strong of a grip). One good thing about round mirror covers is they can’t fall in and scratch the mirror like square ones can. Kreige used to joke that that’s why manhole covers were round. The knob in the middle is the same knob used on the UTA clamps and the mirror cell. If you ever lost or damaged a knob, you could use it as an emergency spare.
One thing I felt was missing was a rear light baffle. Not all of us are lucky enough to do all of our observing under dark skies. Sometimes light reflects off the ground and up into the scope, especially if you are forced to set up on concrete (heaven forbid!). Webster claims that they did use them for a short time, but they slowed down the cooling more than they liked. I suggest they make one that is removable; maybe with magnets to hold it to the back of the cell?
Control Stalk
One thing I had never seen before on any Webster Telescope was a control stalk. On all the scopes from them I had seen, the ArgoNavis was up on the UTA. I guess that they thought that there was not enough room to keep it up on top of this scope.
The Stalk had nice integration and did not look like a Frankenstein bolt on. All of the cables ran up the inside of the stalk, rather than being wrapped along the outside. This gave it a clean look.
The stalk is made of anodized aluminum, 1.5” in diameter. It can be removed if one wanted with a knob on the clamp, but I can’t see any reason to ever take it off (unless you were adding more wires or shipping the scope).
Altitude Bearings and Encoders
The Altitude bearings were made of lightweight cast aluminum that had been anodized flat black. Casting them out of aluminum probably shaves 15 pounds off of the weight of the scope compared to the plywood Altitude Bearings used by most other brands. They were covered with black Formica as a bearing surface.
The Altitude Encoder for the ArgoNavis actually has its shaft embedded inside the bearing itself at the true center of the bearing, so it will never need to be re-centered or adjusted. A small hex setscrew holds it in place.
The encoder is mounted on the non-focuser side, opposite the conventional placement seen on other brands. This keeps it away from ladders and observers. More sound advice for you ATMs (Amateur Telescope Makers) out there, keep encoder hardware away from the busy side of the scope.
The encoder arm is slot mounted, so you don’t have to remember to loosen a knob before you transport the scope. On most truss Dobs, the arm is pinned and will break the encoder if you hit a hard bump in transport without releasing it.
The encoders were Webster’s new Heavy Duty 10,000 step encoders. The encoder body is beefed up and the connector pins are enclosed (thus protected from bending or breaking off). These appear to be a real step forward as far as durability goes. I will certainly buy these for my own scope next time I break a pin off an encoder.
Mirror Cell
One of the main features that Webster is famous for is its Mirror Cell. They came out with the first commercially available Cable Sling, Spherical Bearing Mirror Cell. It is both very compact and very low profile, which in turn, allows for such a small Mirror box. I found the cell to be very open to air flow. The main frame of the cell is tubular steel. The welded joints look clean, with no splatter evident.
The D18 was using an 18 point cell. Each triangle is 1/3" thick aluminum with a stainless bearing bolted to each corner, giving 3/8" of clearance for air to travel beneath the triangle and across the rear mirror surface. This is much more clearance than most Dobs that only give you 1/16” of clearance by using furniture floor protector pads stuck to the triangles. A stainless steel stud runs through each triangle and into a spherical bearing that is pressed into a 3/8" thick steel bar. (A spherical bearing is a type of joint that allows free movement in any direction. The bearing is lined with Teflon to keep things moving smoothly.) This bar in turn, has a larger spherical bearing set in its center that receives the collimation knob, used to adjust the aiming of the primary mirror. Every single moving part of the Mirror cell floats around on these bearings. The joints move so smoothly that it takes maybe 10g of force to move them. I do not exaggerate when I state that you can blow on these parts and get them to smoothly move!
The collimation adjustment of the primary mirror takes place using 2 large knobs that spin on some finely threaded stainless rods. The cutting of the threads was well done, as the knobs had a very precise feel. These large knobs would be easy to use with gloves on, a tip other manufacturers should note. The traditional third knob is not installed and is not needed. By not using the third knob, the telescope will never become so far out of adjustment that some eyepieces will not come to focus. This is a great idea, because every seasoned Dob owner knows the situation where one night, some of his eyepieces no longer come to focus, and then all three knobs have to be spun in or out an equal number of turns to get back into the focus range “sweet spot”. This is one of those “Why did no one else ever think of this?” moments.
The support triangles are kept in alignment with a thin stainless steel wire. I usually see this alignment done with a wide plastic ring. The wire allows much more airflow, another nice touch; as some cell designs are so restrictive to airflow that the mirror never reaches equilibrium the entire night.
The cell is bolted to the Mirror Box with 10 stainless steel, flush head bolts. I like to see stainless steel, because many manufacturers use zinc plated bolts that rust over time and stain the scope. These stainless steel bolts probably add all of ten dollars to the cost of the scope. I can’t see why every manufacturer does not use them.
The cell is designed to always leave the mirror installed, both for transport and washing. This removes the risk of damaging the optic by needlessly handling it at the beginning and end of each night (especially at the end of the night when you are tired).
The cell really seems like the most secure place to store the mirror. There is a sad picture on the Webster Telescopes forums of a C28 scope that flipped upside-down during a storm while the owner was at work. Some wires got yanked out, but the 28” mirror was unharmed! I might have soiled myself had that been my scope.
Fan
On the back of the mirror cell hangs a single beefy fan. At 5” it was larger than a standard computer “muffin” fan, and was made by Rotron. It was good up to about 350X magnification, at which point I could start seeing vibrations in the image and shut it off. Cool down took about an hour with such a thin mirror and large fan running, but your mileage will vary depending on the speed that your nighttime temperature drops.
The fan came fully wired and plugged into the electrical control panel with a switch to turn it on. Many people are surprised that the fans that came with their scope (like Obsession) arrive with just bare wires hanging from them. No plugs or switches or anyway to hook them up. The same control panel had switches for the ArgoNavis/ServoCat and the Dew Heater system.
No fan guard was supplied to protect your fingers from the blades.
Rocker Box
The most notable feature of the Rocker Box was that it is covered in black road case covering. You have seen this material on professional speakers and monitors at concerts. The covering is scratch and rip proof. This is a great idea, because if there is any part of a Dob that gets beat up in a hurry, it’s the Rocker Box. In the dark, people always kick the Rocker Box or bang it with a chair or ladder. Not that many people are going to be using a ladder with this scope, but children will need a stepstool at zenith.
The Rocker Box had already been routed out and wired for all of the ServoCat GOTO system motors, but the system had not been delivered yet, so it was full of empty holes.
Speaking of wires, the floor of the Rocker Box had so many wires bundled and stapled down that it looks like the inside of one of those old mainframe computers. By removing all those wires you are used to seeing hanging all over the outside of a Dobsonian telescope, and concentrating them all on the floor of the Rocker Box, it just looks insane. Because the D18’s Rocker Box is so small to begin with, it makes it look even more insane.
All of the moving wires are incased in plastic loom, to keep them from abrading as they travel up and down with the Mirror Box, another nice touch.
The bottom of the Rocker Box is completely covered with Glassboard.
Ground Board
The Ground Board was made of plywood and had a XLR connector (like you see on pro microphones) for the power connection on one of the feet. This connection went to a cable with a “cigarette lighter” plug on the other end. The plug held a 10 amp fuse and had a red LED light to indicate power. I ran this to my usual Marine Deep Cycle battery.
Remember that lead batteries (yes, even "sealed" or gel cell batteries) can discharge corrosive gasses while being used or charged. Never keep a battery mounted in your Mirror box or Rocker box, unless you are in a hurry to get your mirror recoated. I have a home alarm control box that was destroyed when the gel cell battery decided to release corrosive stuff all over it. Don’t think that it can’t happen to you.
Webster had made a point in the past to say that they only make round Ground Boards. It is surprising how many triangular Ground Boards are out there. It may save a little weight, but if you ever want to add a GOTO system, you have to buy and install a whole new Ground Board.
The central pivot the scope turns on is a 3 /4” thick shaft of machined stainless steel; pretty beefy for an 18” telescope. The pivot turned within a bronze bushing. It was well matched with no perceivable play at all.
Trusses
The aluminum trusses were anodized flat black, and had a very nice finished appearance compared to the bare aluminum with the blue printing running down the sides you see on most truss Dobs. The Trusses were all capped to keep out mud wasps and to further the finished look.
The trusses slide into the aluminum clamps very smoothly. The clamps open just enough to accept the truss ends, without them flopping around. The trusses live their lives as pairs, so you have four units to carry around rather than eight individual poles. Each pair folds flat for transport; rather than being a permanently welded triangle.
Each truss pair locks positively into a V-Slot receiver on the UTA (Upper Tube Assembly). There is no slippage at lower elevations like you see on some other friction only clamp designs. In fact, the scope held collimation from zenith to 0 degrees using an autocollimator to verify.
Webster does not supply any truss bag; they suggest you get one from Astrosystems if you feel you want one. I’ve never bagged my own anodized trusses on my 30” scope and they still look pretty good (anodizing is tough stuff), but I think I had forgotten than my trusses used to look THIS good. I’d suggest you get the bag.
UTA
The first thing you notice on the UTA is the FeatherTouch, two speed focuser. If you have never tried a FeatherTouch focuser, there is almost no way to describe just how smooth it moves. One knob turns at the normal “speed” and the other at a super fine 10:1 ratio. The FeatherTouch is a standard feature on all Webster Telescopes.
The inside of the UTA is a rare sight in the Big Dob world, as it is totally flat black (Most truss scopes use shiny, crinkle finish Kydex or ABS plastic that scatters light in all directions). This certainly added to the contrast I saw at the eyepiece. The paint finish is so rough and flat that it actually seems to collect dust and debris. I saw the same dust collecting phenomenon inside the mirror box too.
The scope was equipped with a secondary dew heater. I could see the ambient temperature probe and red indicator LED light sticking out of the secondary holder. The probe compares the night air temperature to the secondary mirror temperature and keeps the mirror temperature one degree above the ambient temperature - thus preventing dew from forming on the optics. That way, the heater is only heating when necessary. This preserves good views by keeping the heat usage to a minimum. I moved the red LED to the other side of the spider, so it would not shine red light towards the focuser. This should have already been done at the factory.
The secondary mirror spider was a four vane type. The vanes had anti-vibration pads installed on them.
Looking through the empty focuser I could just barely see over the top of the UTA and into the night sky. A lightweight baffle should be placed opposite the focuser to block this source of stray light.
A Telrad finderscope is another standard feature. It was installed and reasonably calibrated. It was running on its own set of batteries and was not connected to the telescope’s power supply. In reality, a set of Telrad batteries lasts for years before needing replacement, but it would be nice if Webster could just run off of the 12V power supply like everything else.
Light Shroud
The light shroud was another rarity in the world of Truss Dobs, because it actually fits the scope. The shroud was made of Rip-Stop Nylon, and hugged the scope body using a drawstring at the top and Velcro straps at the bottom. The Velcro runs through the Altitude Bearings, keeping even this difficult to secure section free from stray light.
The shroud repelled dew rather than absorbing it and becoming heavy. You see many “stretchy” materials used in shroud manufacture that absorb water and cause the scope to become out of balance.
Optics
The supplied primary optic was made by Carl Zambuto. If your astronomy club tests optics, then you already know the reputation that precedes the Zambuto name. Our club has tested plenty of poorly made mirrors by the big names, but we have never seen a Zambuto that was anything less than excellent. Generally, the larger the optic, the more likely it has TDE (Turned Down Edge) or astigmatism, or both. Probably 60% of the commercial optics larger than 16” that we have tested, have TDE.
What interested me was that this 18” f/4 mirror was the fastest (lowest focal ratio) Zambuto mirror I had ever heard of. The faster the mirror, the more difficult it becomes to manufacture accurately. I was anxious to get this mirror both out into the night sky and onto the test bench.
The back of the mirror was completely polished, so you could look through the rear of the mirror and see the aluminum coating on the front side. Most mirrors I have ever seen have the rear surface ground down to 200 grit, so they have a frosted look. This clear polish gave the mirror a surreal, gemlike appearance.
On the test bench, the primary had a polish to die for; textbook smooth (smooth polish gives high contrast at the eyepiece, it is more important than many people think). Absolutely no TDE was evident (TDE kills contrast and gives star tests with “hair” around the edge). Our automated interferometer came back with a Strehl ratio of .931 (many large optics come with papers claiming Strehls of .989, but when we test them they are really in the .7 or .8s). We had just completed a vertical test stand that tests the mirrors lying flat on their backs, so that Strehl number is as real as it gets.
We took a bunch of pictures for our club’s upcoming book “The Great Optical Swindle”, which will certainly knock “Pride and Prejudice and Zombies” off of the New York Times’ Bestsellers list.
The secondary mirror was almost 1/9 th wave (1/8.8), also very good.
Owner’s Manuals
The owner’s manuals came in three parts; The D18 scope, the Mirror Cell and a GOTO Start Up Guide.
The D18 scope manual was pretty basic. It tells how to set up the scope, common maintenance, a Tips & Tricks section and a section on how to initially install the primary mirror upon arrival. With very few pictures, the manual looks to me to be a bit of a work in progress. The information is certainly helpful, but over all, it is not up to the production level of the rest of the telescope.
The Mirror Cell Manual was pretty good. It had quite a few pictures and explanations of the theory of how the cell works. The problem is that unless you were putting in a different mirror, I don’t see how any average user is ever going to use any of this information. I almost think that it is just a disguised installation manual for when you buy a Webster mirror cell separately, and they tossed it in to make it seem like you were getting more manuals.
The GOTO manual is a quick start guide to the operation of the ArgoNavis and ServoCat. It is a nice crash course on how to run the telescope’s computer your first night out. Two of my own scopes use the Argo/Servo combo so none of the information was new to me. I tried to follow the guide as if I was a first time user and it was right on the money. It also had all of the D18’s settings if the Argo ever had to be completely reinitialized (say the internal coin cell failed or you installed new firmware); nice touch. The GOTO manual is not a replacement for the full manuals that come with the ArgoNavis and ServoCat, but it does exactly what it is supposed to.
Actual Use
Because Webster was waiting for the ServoCat to arrive before I needed to return the scope, I actually had quite a few nights to get out and use it.
I usually observe by “lying” on my ladder. This is a very comfortable position for me. This scope was different because I did not need a ladder at all. Even at the zenith, the scope only had a 68” eyepiece height to the center of the focuser (Webster’s web site says 69”, so they are somehow cheating themselves out of an inch). After an hour of observing the first night, what I really wanted was a chair. I did not have a true observing chair, so I sat on the rungs of a ladder. The next time I observed, I borrowed a proper CatsPerch chair and was quite comfortable. You are going to want a chair too, trust me.
The complete scope weighed only 92 lbs on my scale. Even so, I noted that the scope was as stable as any other conventional truss Dob. It moved through the sky with a balanced, buttery smoothness that stopped the moment you wanted it to. There was no perceivable “breakaway” stiction when you first move the scope from it standing at rest. There was no backlash or worry that the scope would tip if moved quickly. Tracking at high power was a pleasure. My concerns about the stability of such a lightweight scope were unfounded; it was as stable as any other well made truss Dob.
I used eyepieces from the 4.8mm Nagler to the monster 31mm Nagler and never did I need to use a counterweight. The scope simply stayed put. With my most “neutral” weight eyepiece, the 13mm Ethos, I would say that the scope was just a little ass heavy. Using the heavy Denkmeire II binoviewers with a pair of 22mm Panoptics installed, the scope still held balance until it was down to about 15 degrees above the horizon. At that point the scope had met its match and exhibited a slow, downward creep. I know, you guys are going to say I’m being picky, and that no one observes at 15 degrees (some truss Dobs don’t even go down to 15 degrees), but I just report what I find. It’s up to you to decide if it maters to you.
With the Paracorr coma corrector in use, there was really no coma evident. Of course, I don’t use cheap eyepieces, but neither, I suspect, would anyone buying a scope of this caliber. Objects “snapped” nicely into focus and background sky was dark and contrasty (the spell check does not like that word). You could realistically get away without the Paracorr when using smaller eyepieces below 13mm, but you will certainly require it above 17mm. The Denkmeier binoviewers did not require the Paracorr at all.
At this point in a review, most reviewers describe a long, tedious list of objects they observed with the scope. I never do that, as I assume you already know what The Veil in Cygnus and The Ring Nebula’s central star looks like, and even if you didn’t, my written descriptions would never do them justice. Maybe one day if I review a 40” telescope, descriptions of my observations would be of some interest; but then again, probably not.
Summation
Here we have Webster’s return to building small Dobsonian telescopes (for quite a while they only made 22 to 40 inch models).
There are some things you are going to really enjoy:
1. The scope assembles very fast.
2. The movement, stability and balance of the scope are superb. Freedom from counterweights alone may be worth the price of admission.
3. The scope is very lightweight. It weighs about the same as the Obsession 18” Ultra Compact (Although it sure does not pack up into one big crate the way the 18UC does!). In fact, it weighs about the same as the 14” Starstructure aluminum telescope, and is 40 pounds lighter than the Zhumell 16” scope.
4. Jim Webster’s CAD (Computer Aided Design) work has brought the D18’s eyepiece height down to 68” at zenith. This is even lower than the shorter focal length Starmaster 18”FX f/3.7.
5. Great mirror cell.
6. Really great optics. Zambuto optics are unmatched in high quality consistency.
And of course, some things you will not like:
1. You are going to want to add some lightweight baffling to the Mirror Cell and to the UTA in order to squeeze every last bit of performance out of this telescope.
2. You may want to add a fan guard.
3. The price. I can not believe the price of a quality telescope nowadays. Crazy!
4. The owner’s manual could certainly be better.
5. No pole bags or secondary mirror covers are included.
All said, the scope is a solid piece of engineering.
David Smith, you will not be disappointed with your purchase.
Dave Bonandrini
8/06/09
Addendum 6/13/2010
Michael from Starstructure sent me an email stating that his 14" telescope that you can put a Mallincam on weighs 91 pounds (because he made it stronger), and that his "standard visual" 14 inch scope weighs 81 pounds. Understandably, he felt that this needed to be addressed immediately.
Just to be sure I got all of my facts straight, I called Webster and asked if they had any unlisted models specifically for Mallincam use. They said that all of their models were already engineered "plenty stiff" for their many Mallincam users.
I hope that clears up any confusion.
-DB
Funding Member
