Reviews & Articles
Image of the day

About Astromart
My Account
New to Astromart?
Register an account...Need Help?
Powerbox Shootout: WandererBox Plus v3 vs Pegasus Powerbox Advanced
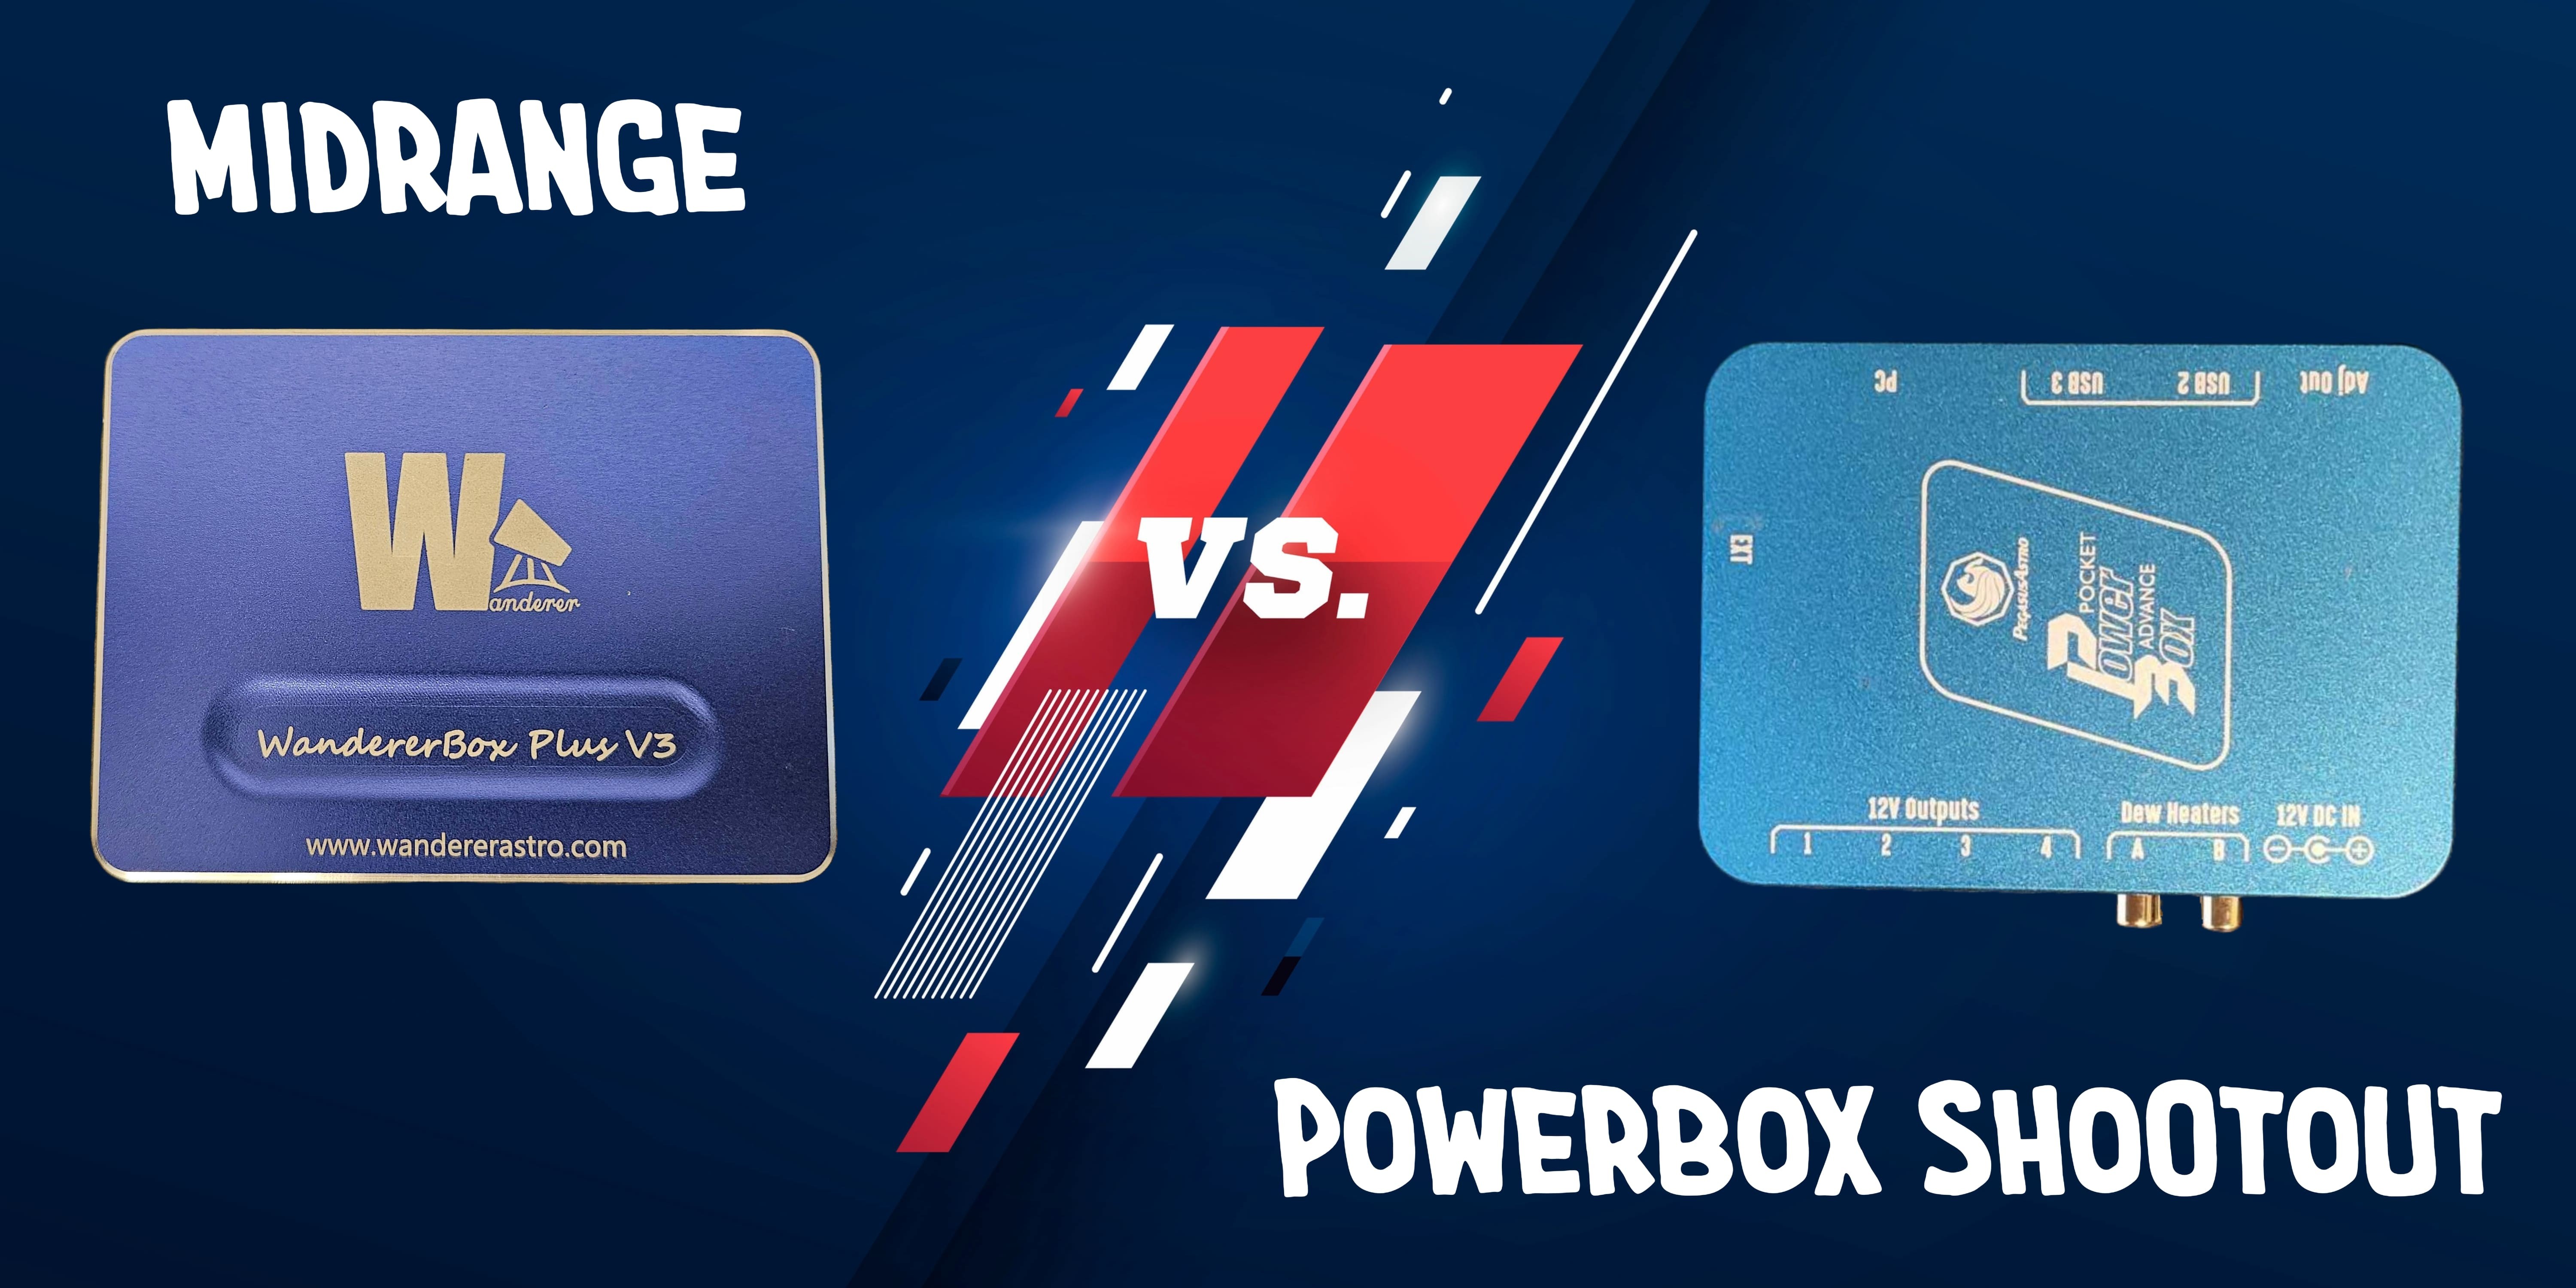
Budget Powerbox Shootout & In Depth Dive into the WandererBox Plus v3
If you’re on Windows or a similar platform, chances are you have had to think about how you are going to power your devices - especially as your setup becomes more complex via the addition of powerful peripherals like rotators, microfocusers, electronic focusers, flat panels, and more. Not only do many of these devices require a 12v power source, but USB ports become limited on most small Mini PCs as well. There are astrophotography focused “Mini” PCs that have 12v and dew control integrated into them, but for today, we will not discuss products that require you to refinance your home to purchase.
So today, we will discuss complete solutions that cover all of the needs for a normal astrophotography setup. Let’s talk about POWER!

purpose of this review is not to elevate one product over the other, or even make anyone look bad. That said, I do find the $300 price point to have a clear winner. Sorry Pegasus, but the Pocket Powerbox Advanced (PPBA/PPBA2) is just not it.
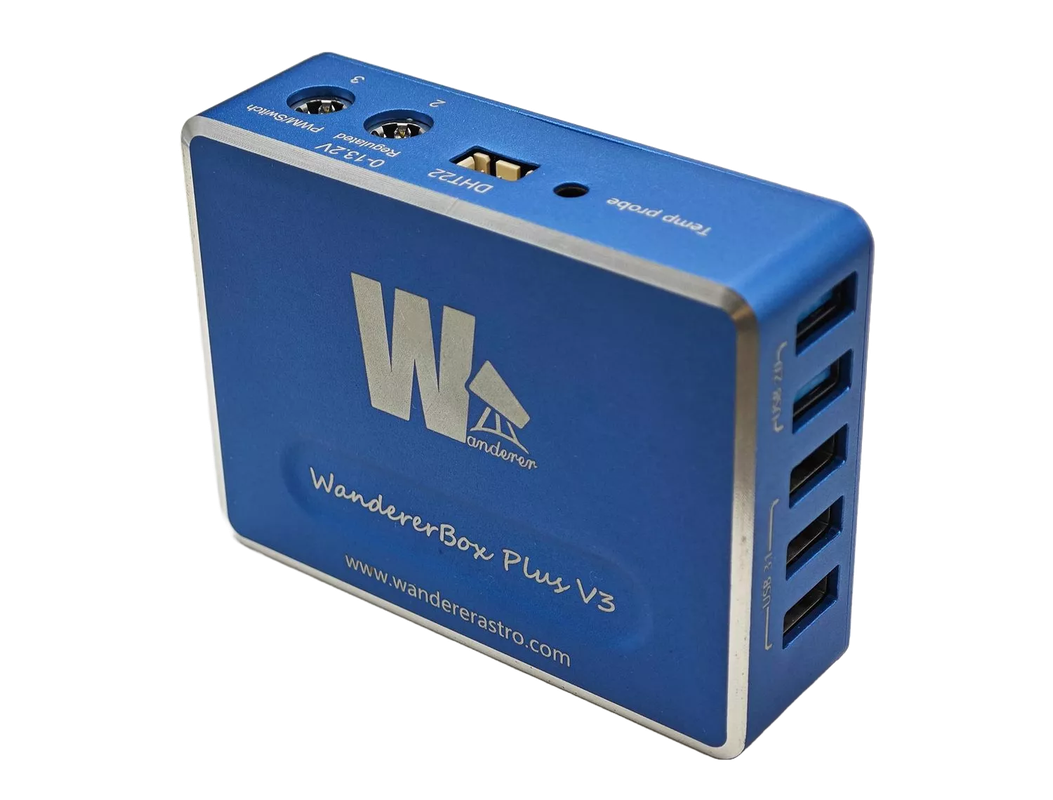
Wandererbox Plus v3
A fully-featured Power Solution for Astrophotography
As you probably know, there are multiple strategies and varying devices to help tackle the issue of powering your peripherals.
- Basic 12v Power Distribution Hubs
- Basic USB Hubs / Powered USB Hubs
- Basic Dew Heater Control Boxes
- 12v & USB Hub (No Dew heater control)
- 12v & Dew Control Hub (No USB)
Various brands have products that meet one, or two of these features, but in order to get 12v, Powered USB hub, and Dew Heater control from a single device, then you typically need to spend around $300.
All of the aforementioned products have their place in the market, but having a singular hub that can manage all of your devices is truly a game-changer, and while piecemealing your setup can definitely be less expensive, I can assure you the quality of life is just not the same.
If you can afford to spend the money, then it is truly a no-brainer. Astrophotography is a painfully complex hobby, and affordable products that can help simplify your imaging or post-processing are worth their weight in gold.
Let’s look at what you get for your money…
What’s In the Box?
Included with WandererPro v3 are most of the essentials that you will need, but unsurprisingly, not everything. You will need to supply your own 12V10A power supply, as well as all of your power cables.
- Wanderer Plus v3
- Two 5521 to 5525 adapters
- One RCA to 5521 adapter
- DHT22 Temperature and Humidity Probe
- DS18B20 Temperature Probe
- USB-B to USB-A High Speed USB 3.1 Cable
- Synta/Mini Vixen Dovetail
Ports & Control
This is primarily going to be the main section that makes Wanderer stand out from the Pegasus PPBA2, and much of the contrast boils down to the level of control that you are afforded at the $300 price point. Simply put: you are getting more for your money with WandererBox.
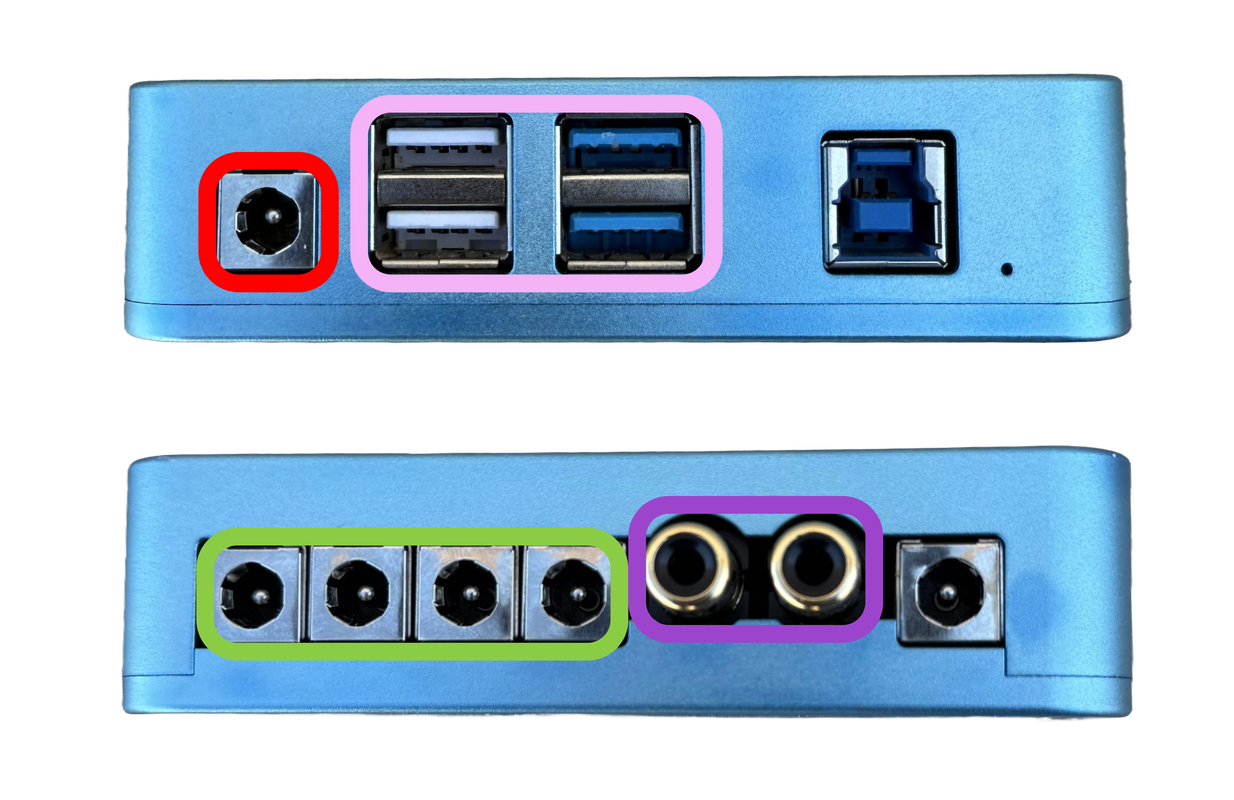
Ports
The WandererBox Plus v3 includes:
- 1 “Always On” Port – Designed exclusively for powering your MiniPC.
- 1 5525 DC In – Supports up to 10A.
- 1 12V PWM/Switch –
- Primarily for auto-dew control but can function as a standard switch.
- PWM mode must be enabled for auto-dew control.
- RCA dew heaters are supported (adapter included).
- 1 Adjustable DC Switch (0-13.2V) –
- Designed to meet the needs of cooled deep-space cameras requiring stable voltage.
- Most cameras support up to 15V, so setting this to maximum output is typically optimal.
- 3 12V Switches –
- No individual control for ports 4-6 (all on or all off).
- Five USB Ports:
- Two USB 3.2
- Three USB 2.0
- Both are necessary for different peripherals.
- Environmental Sensors:
- DS18B20 Temperature Sensor
- DHT22 Temperature & Humidity Sensor
- Both are required for auto-dew control.
- USB-B 3.2 for PC Connectivity
At first glance, you might think the PPBA2 has similar features. But when you start adding more peripherals, you will quickly run into its limitations—limitations I personally find unacceptable at this price point. Let’s break that down.
PPBA2: The Problem With Ports
Before we get into the issue, it helps to visualize how PPBA2 is structured.
Each of the four colored portions of the diagram are on their own “blocks,” and are controlled via Unity software as one discreet block—each block can only be turned on or off as a unit. And here lies one of its most frustrating design flaws:
🚨 There is no dedicated PC port. The Ultimate Powerbox has one, but not its lower-priced alternative.
Why Does That Matter?
Because each block is either fully on or fully off. Unless you power your MiniPC separately, you’re forced to power it from either the green (12v Power Rail) or the red block (Adj Out).
Most of the time, this isn’t a problem. But the moment a device fails to connect properly, you’ll see the issue:
🚫 You cannot cycle power to an individual device without also shutting down your MiniPC.
If your flat panel, rotator, or any other device malfunctions, your only option is to turn off the entire block—MiniPC included. And if your MiniPC shuts off… well, now you have to physically turn it back on, which is a real problem if you’re running remotely.
Why Not Use the Adjustable Port for the MiniPC?
You could use the adjustable voltage output to power your MiniPC instead.
But then your deep-space camera may not receive stable voltage.
- Cooled cameras (QHY, ZWO, Atik, PlayerOne, Moravian, etc.) require constant, stable voltage.
- If the voltage fluctuates, UVLO (under-voltage lockout) triggers, potentially causing cooling failures or even camera shutdowns.
- The adjustable output is likely intended for your cooled camera first.
So, you have to pick your poison:
✔️ Stable camera voltage but no way to cycle your MiniPC separately.
✔️ MiniPC on the adjustable port but risk unstable camera power.
Why are we dealing with a problem this trivial to solve?
WandererBox Fixes This Issue
With WandererBox, you get:
✅ A dedicated "Always On" port for your MiniPC – no risk of shutdowns.
✅ A separate adjustable voltage switch for your cooled camera – ensuring stable operation.
✅ Independent control over more power outputs – allowing you to cycle individual devices without affecting your PC.
When you’re deep into astrophotography, connection issues WILL happen. And when they do, having proper power control can mean the difference between troubleshooting for 30 seconds or losing an entire imaging session.
Now, I get that this might sound like a long-winded way of saying, “It has an extra port,” but trust me—not all ports are created equal. That one additional port completely transforms the user experience for me.
Of course, if you’re not using a cooled astronomy camera or multiple peripherals, you might not run into these issues. But if you’re spending over $300 on a power management solution, why settle for something that only meets today’s needs? Your setup may evolve, and when it does, you’ll be glad you chose a system that grows with you.
Software
After testing nearly every all-in-one power solution available to astronomers, one thing became painfully clear—software is just as important as hardware. This is where the WandererBox truly stands out.
Empire is Wanderer’s dedicated standalone software, and it’s in a league of its own. Unlike DIY solutions, it comes standard with an integrated ASCOM driver, ensuring seamless compatibility with NINA, SGP, MaximDL, SharpCap, and more. Much like Unity, Empire serves as a central hub for all Wanderer products, meaning a single download covers all devices and their drivers at once—no extra setup required.

Despite its powerful capabilities, Empire is refreshingly simple. The interface is intuitive, easy to navigate, and largely self-explanatory. If you’ve ever used other power management software, you’ll feel right at home.

One nice feature is the ability to custom-name your devices within Empire, which automatically carries over into NINA. This makes equipment management far easier, especially when using NINA’s Advanced Sequencer. With Empire, you can even automate WandererBox connections, ensuring that all switches and settings are accessible within seconds.

For those who like to fine-tune their setup, Empire allows you to customize your own dew heater logic. You can convert your dew heaters into traditional switches, giving you unparalleled control within NINA’s sequencer. (Note: This is only recommended for dew heaters with built-in temperature regulation—see the Auto Dew section for details)

Key Features of Empire:
- Switch Control – Manage power to all connected devices.
- Auto Dew Heater Settings – Optimize dew prevention with intelligent data-driven automation.
- Power Monitor – Keep track of voltage and power usage in real time.
- Environmental Sensor Monitor – Monitor temperature, humidity, and other key conditions.
Beyond simple device management, Empire is your go-to tool for configuring your WandererBox, performing firmware updates, backing up your data & much more. As we’ll discuss in the next section, Empire is not just software that you tolerate, but truly a sensibly-built product with a positive user experience in mind.
Why is Empire More User-Friendly Than Unity?
Most people don’t spend much time thinking about the software that runs their power boxes. You configure it once, name your ports, and then forget about it. The reality is that for the majority of your imaging sessions, you’re not even interacting with the power box software—you’re working within your imaging software, like NINA. But, that’s actually where my next major gripe begins.
Although both Pegasus and Wanderer utilize a similar method to connect to their respective devices, the way Unity handles connecting to NINA is notably more frustrating.
In theory, connecting through Unity is simple:
- Click the “Gear” icon in NINA’s equipment page.
- Unity opens, and automatically detects available devices and makes them accessible to NINA.
- You select the device.
- From that point on, NINA remembers your selections.
Sounds easy, right? Well, not so fast.

This only holds true until the next update.
Every single time Unity or your device firmware gets updated, NINA “forgets” your settings—meaning you have to manually reassign all your devices again.
If you’re only using one device, it’s a minor annoyance. But if you’re using Unity for multiple Pegasus devices—you’ll have to go through this process for every single one, making it an unnecessarily frustrating experience..
Now, is it hard to go back into NINA and “point” it to the right devices? No.
But is it a needless time-waster that happens over and over again? Yes.
And given that Pegasus releases updates frequently, you’ll find yourself repeating this process way more often than you’d like.
How WandererBox Differs
With Empire, this constant reconnection problem doesn’t exist. Apart from clicking “Connect” in NINA, Empire has true 1-click operation, even after software/firmware updates. You never have to “point” or connect to a device within NINA or Empire. Empire will automatically detect and connect to compatible devices without any additional user input.
That might sound like a small feature on paper, but when you’re using these devices day in and day out, the difference is night and day. Empire simply requires less hands-on management, making it a frictionless experience, especially when updates are involved.In stark contrast to Unity, you will never need to “point” NINA to a Wanderer device. Watch the GIF below to see how easily Empire handles connecting to WandererBox directly after an update. Simply click “Connect” and you’re done.

Frankly, unless Unity makes some major improvements, I have no reason to go back. There’s a reason why I had to use Falcon v2 for example images—I got rid of my Pegasus Powerboxes.
Standby for a Bonus
Arguably my favorite “hidden” feature of WandererBox is its completely automated standby mode. In a stroke of brilliance, Wanderer realized that if your PC isn’t drawing power, your peripherals don’t need to stay on either—saving both power and time.
What does that mean for you?
No more manually turning off your cooled cameras (and stopping those fans that love to run 24/7 🫠). No more worrying about shutting down devices in NINA’s sequencer. When you turn off your PC, everything else powers down too. And when you turn your PC back on? Your entire setup comes back to life automatically.
If you’re imaging on battery power, this feature is an absolute game-changer. Not only is it ultra-convenient, but it also makes your setup far more power-efficient and eco-friendly.
It’s a thing of beauty, really.
The Doctrine of Dew Control
Dew control is another area WandererBox is in a league of its own. Unlike other solutions, the WandererBox utilizes two separate temperature sensors, offering a more precise approach. While the simplified method used by Pegasus Astro’s PPBA2 may seem convenient, it comes with a significant drawback—operating dew heaters without critical feedback on their actual temperature. But, how do other products differ?
Pegasus Powerbox Dew Control
Most competing power boxes, including the PPBA2, rely on a single DHT22 environmental sensor for automatic dew control. This sensor measures ambient humidity, calculates the dew point, and activates the dew heaters when the temperature approaches it. The approach is straightforward and easy to implement, but it has one glaring issue:
Unless you monitor the actual heat output of your dew heaters, you have no way of knowing how hot they are getting. This can lead to serious consequences:
- Optical Degradation: Excessive heat can soften image sharpness, and in extreme cases, permanently damage telescope optics.
- Thermal Expansion Issues: Lenses and mirrors are sensitive to temperature changes. Uneven heating can introduce optical aberrations and misalignment.
- Local Air Turbulence: Overheating your optics can cause internal convection currents, effectively degrading image quality.
- Coating Damage: Prolonged exposure to high heat can compromise the coatings on your optics.
- Battery Drain: If you're running on a battery, unnecessary heat output shortens your available imaging time.
These risks can all be mitigated by incorporating a second temperature probe to directly measure the heat output of your dew heaters—something the WandererBox Plus v3 does right out of the box. This fundamental difference in dew heater strategy cannot be overstated.
The Safe Approach: WandererBox Plus v3
Does this mean the PPBA2 can’t be used safely? Of course it can be done safely. However, simply switching it on and hoping it doesn’t overheat your optics is a risky approach. Without proper testing and monitoring, you’re relying on guesswork to protect expensive equipment—an unsettling thought, isn’t it?
The WandererBox Plus v3 includes two high-quality environmental sensors:
- DHT22 Temperature & Humidity Sensor (for ambient conditions)
- DS18B20 Temperature Probe (for direct heater monitoring)
While not explicitly stated in the manual, the best practice is to place the temperature probe between the telescope and dew heater, while the DHT22 sensor monitors ambient conditions. This setup allows the WandererBox to intelligently regulate heater power, ensuring your optics are protected from both excessive heat and condensation—without wasting energy.
By implementing this more advanced strategy, the WandererBox Plus v3 provides a safer and more efficient approach to dew control—one that truly respects the delicate balance required for optimal astrophotography.
Auto Dew Control: Precision & Safety
With auto-dew control enabled, the system continuously monitors ambient temperature and adjusts the dew heater’s modulates voltage to maintain the predefined temperature difference set in Empire. This simple yet effective method eliminates the risk of overheating your optics—no guesswork, no uncertainty. It is objectively safer and more accurate. Full stop.

In this example, Empire dynamically adjusts the duty cycle to keep the probe precisely 15 degrees above the dew point. This level of control ensures that your dew strap operates efficiently, regardless of its brand, and completely removes any concern about setting PWM duty cycle values too high.
At present, this is the most ideal dew control strategy available. And that’s not just for the WandererBox—it applies to every power box on the market today. Every other auto-dew control system I have tested involves some level of compromise. I’ll explain why in the Pegasus section.
Constant Temperature Mode
This mode is manual, and if selected, will keep the dew heaters at a predefined temperature all of the time using only the BS18B20 Temperature Sensor, which is measured directly under the dew strap–ensuring that overheating does not occur.
Manual Mode
This mode functions similarly to how most other power boxes operate: the user sets a fixed duty cycle (percentage-based power output) for the dew straps. However, unlike auto-dew control, this method does not measure the actual temperature at the dew strap, meaning there is no built-in safeguard against overheating.
Unlike Pegasus’ implementation, where power is only applied when the dew point is reached, the WandererBox supplies power continuously in Manual Mode. This means there’s an increased risk of cooking your optics or mirror if not properly tested and monitored.
If you choose to use this method, a temperature-controlled dew heater is highly recommended to avoid potential damage.
With these options, the WandererBox Plus v3 offers both industry-leading automated control and flexibility for manual operation, while keeping temperature regulation and equipment safety at the forefront.
Electronics Protection
Before diving into this section, I want to be upfront—I’m not an electrical engineer. I’m not going to pretend otherwise. But here’s what I can confidently say: Wanderer has been designing and manufacturing astrophotography equipment for years, and I have yet to see a single "Wanderer destroyed my telescope" post.
From the ground up, WandererBoxes were designed with equipment protection as the highest priority—not just to power your gear, but to safeguard it under extreme conditions. It’s built to withstand harsh environments, and in my own experience living in a desert climate, it has never let me down.
Built-in Protection Features:
- Electrophoresis Protection
- Short Circuit Protection
- Overcurrent Protection
- Electrostatic Protection
If reliability and equipment safety are your top concerns, WandererBox delivers.
What I don’t like (and some wins for PPBA2)
I’ll be honest—no power box is perfect. That said, for $299, the WandererBox Plus v3 gets closer to perfection than anything else on the market. But here are a few areas where improvements could be made:
- The power switch uses a 5525 DC IN connector instead of the more common 5521.
- This usually requires an adapter, but Wanderer includes two 5521 Female to 5525 Male adapters in the box.
- No built-in RCA jack.
- This was a deliberate design choice by Wanderer to allow the port to function as a switch.
- Personally, I would have preferred an RCA jack over needing an RCA to 5521 adapter.
- However, an RCA-to-5521 adapter is included.
- PPBA2 has two RCA jacks for Auto-Dew Control, which can be convenient if using a guide scope.
- WandererBox supports multiple dew heaters via a 5521-to-RCA splitter cable, though no such splitter is included.
- Alternatively, the WandererBox Pro supports up to three dew heaters if more ports are needed.
- No individual power control for USB ports.
- It would be nice to be able to cycle individual ports rather than turning everything off at once.
- A few extra 5521 power adapters would be a nice inclusion.
- They’re inexpensive but would be a thoughtful addition for beginners.
That’s really it—a short list of minor drawbacks.
Final Thoughts
I have plenty more details I could share, but this review is already long enough. If you have any questions, feel free to reach out—I’ll provide the most accurate information I can.
And if you’re wondering whether I’m just biased against Pegasus, that couldn’t be further from the truth. I actually love their team and respect their work immensely. But at the end of the day, I genuinely believe Wanderer offers a better overall experience—and at a lower price.
If you’d like to learn more about WandererBox Plus v3, you can visit their website or purchase from one of their global retailers.
Funding Member
