Reviews & Articles
Image of the day
About Astromart
My Account
New to Astromart?
Register an account...Need Help?
Collimation of Laser Collimators

[ARTICLEIMGR="1"]Well, after all the interest I decided to write an article about collimation of laser collimators themselves. This is a bit boring and drawn out so I hope you will bear with me. With any luck at the end all will understand how to check and collimate their lasers.
First a word of caution, this is not an easy job at times and can be time consuming and difficult. But, it can be done by anyone if you take your time and be thorough.
The first step is to determine if your laser is in collimation. This is accomplished by following these steps.
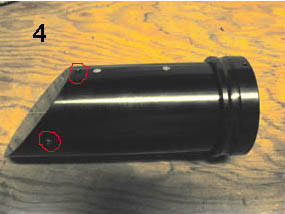
I have provided a picture that shows where the collimation screws are located on three different lasers.
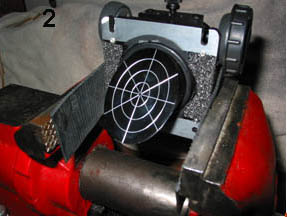 A bench set up is shown using an old focuser for the mount. Hopefully it will help to explain the process more clearly.
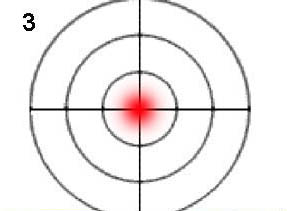
I have also shown a target to use for doing the collimation. I will post a copy of the target for printing as well.
You need a mount for the laser. An old focuser and a vice work great, but a vice and a piece of 90° angle material such as aluminum or plastic will work fine too. Mount the focuser or 90° piece in the vice as shown in my picture. Place the laser in the mount and turn it on and turn it toward a wall 15-20 feet away. Place a target on the wall with tape or thumbtacks with the cross hair on the laser dot as shown in the picture.
 Mark the barrel of the laser so that you have a reference point for the start. Now rotate the laser in the mount by 45° and mark the target with a pencil where the dot now strikes it. Repeat this process until you complete a 360° rotation. You will now have a graph of the movement of the laser on the target. If the laser has moved has made a pattern of less than ¼” in diameter then it should be fine. You could still get it closer by collimation, but it is probably not necessary. If it is larger then it should be adjusted.
Now comes the fun part! Take your time and do small adjustments on one screw at a time. It is very important that only one be adjusted so that you may undo your adjustment easily if you move it the wrong way.
Try to reposition the target so the cross hair falls about in the center of the deviation. If the circle made by the dot is ½” in diameter then place the cross hair ¼” toward the center of the circle of dots you made on the target using the laser dot for a reference. Remember that the dot is now in the original starting point for the test. So you know where the target needs to be placed by looking at the circle of dots you made. Now you should have a starting point.
 Mark the laser barrel so that you have a reference point and rotate the laser 90° and check it’s position. Mark it with a pencil at each of these points. A new color will help distinguish between these and the old marks. Repeat until you are back to the starting point. You should now be able to see a pattern in the movement of the laser around the cross hair. The trick is to adjust the screws until the dot stays in the same spot all the way around the rotation. Remember that when you adjust a screw the center point will change. So you should note that the circle is getting smaller with each adjustment.
With the laser in the start position, rotate it 180° and check it’s position. If it has moved from the original spot then adjust the screw that is now facing up by a small amount, 1/8 turn to start. Did it move back toward the original point or further away? If it moved toward it then you went the right direction. If not go back ¼ turn, which will give you 1/8 turn in the opposite direction. Did this give you the proper movement? If so then rotate it back to the start position. Is it now staying closer to the same spot when you rotate it from top to 180°? The dot should be moving less if the adjustment was correct. When the dot has moved in the right direction by ½ the distance of deviation it is time to check it again. If it is, then rotate it though the 360° and see if it has improved by making a smaller circle. If yes, then we move to step 2 if not then we go back to the original screw that was adjusted and turn it back to the original position. This is why we adjust only one screw at a time.
 Step 2 would be to place the laser in the start position and rotate it 90° this time, check the dot and then rotate 180° back. This is checking the other axis of the laser. Again we would adjust the one screw and check for improvement. The same steps as before are used. When the dot has moved in the right direction by ½ the distance of deviation it is time to check it again by rotating the laser 360° and check the circle it makes.
Again, remember that adjustments change where the dot will fall on the target, so it will always move off the cross hair, so the center is always changing. This is what gets most people into trouble is trying to center the dot on the cross hair instead of trying to make the circle get smaller. Once you have made adjustments, then you can move the target to again center the cross hair on the dot. This cross hair is to give a reference for the movement of the dot only. If you get the adjustment right the dot will stay within ¼” of the cross hair when rotated 360° @15-20 feet distance. Closer is even better of course. The other thing is to realize that when you rotate the laser you should press it against the focuser or end of the angle piece so that it stays in the same relative position at each point. This constant pressure should be applied when looking at the target and check the dot’s position. Some one helping by being next to the target is a big bonus. If you must walk over to the target, make sure the dot stays put when you release laser. Use a piece of tape or the set screws on the focuser to hold it if needed, but be sure that they do not effect the position of the dot when you use them.
 As I said in the beginning, this is a bit boring and tedious and should be done when you have time and can devote an hour or two if necessary. The closer it is to begin with the easier the job. You can always come back after a break and begin again, so don’t get frustrated and give up. Make note of any adjustment made each time so that you can reverse them if they make things worse. Make small adjustments and remember that you are only trying to move the dot ½ the distance of the deviation not the whole distance.
I hope this helps everyone and that you don’t burn me at the stake for my long-winded approach. Also, the author takes no responsibility for errors made by the operator! (GRIN)
Let me know how you make out. I am interested in whether I have made this clear and easy to understand. Ask questions by private mail if you need extra information.
Floyd Blue
President,
Kern Astronomical Society

First a word of caution, this is not an easy job at times and can be time consuming and difficult. But, it can be done by anyone if you take your time and be thorough.
The first step is to determine if your laser is in collimation. This is accomplished by following these steps.
I have provided a picture that shows where the collimation screws are located on three different lasers.
A bench set up is shown using an old focuser for the mount. Hopefully it will help to explain the process more clearly.I have also shown a target to use for doing the collimation. I will post a copy of the target for printing as well.
You need a mount for the laser. An old focuser and a vice work great, but a vice and a piece of 90° angle material such as aluminum or plastic will work fine too. Mount the focuser or 90° piece in the vice as shown in my picture. Place the laser in the mount and turn it on and turn it toward a wall 15-20 feet away. Place a target on the wall with tape or thumbtacks with the cross hair on the laser dot as shown in the picture.
Mark the barrel of the laser so that you have a reference point for the start. Now rotate the laser in the mount by 45° and mark the target with a pencil where the dot now strikes it. Repeat this process until you complete a 360° rotation. You will now have a graph of the movement of the laser on the target. If the laser has moved has made a pattern of less than ¼” in diameter then it should be fine. You could still get it closer by collimation, but it is probably not necessary. If it is larger then it should be adjusted.Now comes the fun part! Take your time and do small adjustments on one screw at a time. It is very important that only one be adjusted so that you may undo your adjustment easily if you move it the wrong way.
Try to reposition the target so the cross hair falls about in the center of the deviation. If the circle made by the dot is ½” in diameter then place the cross hair ¼” toward the center of the circle of dots you made on the target using the laser dot for a reference. Remember that the dot is now in the original starting point for the test. So you know where the target needs to be placed by looking at the circle of dots you made. Now you should have a starting point.
Mark the laser barrel so that you have a reference point and rotate the laser 90° and check it’s position. Mark it with a pencil at each of these points. A new color will help distinguish between these and the old marks. Repeat until you are back to the starting point. You should now be able to see a pattern in the movement of the laser around the cross hair. The trick is to adjust the screws until the dot stays in the same spot all the way around the rotation. Remember that when you adjust a screw the center point will change. So you should note that the circle is getting smaller with each adjustment.With the laser in the start position, rotate it 180° and check it’s position. If it has moved from the original spot then adjust the screw that is now facing up by a small amount, 1/8 turn to start. Did it move back toward the original point or further away? If it moved toward it then you went the right direction. If not go back ¼ turn, which will give you 1/8 turn in the opposite direction. Did this give you the proper movement? If so then rotate it back to the start position. Is it now staying closer to the same spot when you rotate it from top to 180°? The dot should be moving less if the adjustment was correct. When the dot has moved in the right direction by ½ the distance of deviation it is time to check it again. If it is, then rotate it though the 360° and see if it has improved by making a smaller circle. If yes, then we move to step 2 if not then we go back to the original screw that was adjusted and turn it back to the original position. This is why we adjust only one screw at a time.
Step 2 would be to place the laser in the start position and rotate it 90° this time, check the dot and then rotate 180° back. This is checking the other axis of the laser. Again we would adjust the one screw and check for improvement. The same steps as before are used. When the dot has moved in the right direction by ½ the distance of deviation it is time to check it again by rotating the laser 360° and check the circle it makes.Again, remember that adjustments change where the dot will fall on the target, so it will always move off the cross hair, so the center is always changing. This is what gets most people into trouble is trying to center the dot on the cross hair instead of trying to make the circle get smaller. Once you have made adjustments, then you can move the target to again center the cross hair on the dot. This cross hair is to give a reference for the movement of the dot only. If you get the adjustment right the dot will stay within ¼” of the cross hair when rotated 360° @15-20 feet distance. Closer is even better of course. The other thing is to realize that when you rotate the laser you should press it against the focuser or end of the angle piece so that it stays in the same relative position at each point. This constant pressure should be applied when looking at the target and check the dot’s position. Some one helping by being next to the target is a big bonus. If you must walk over to the target, make sure the dot stays put when you release laser. Use a piece of tape or the set screws on the focuser to hold it if needed, but be sure that they do not effect the position of the dot when you use them.
As I said in the beginning, this is a bit boring and tedious and should be done when you have time and can devote an hour or two if necessary. The closer it is to begin with the easier the job. You can always come back after a break and begin again, so don’t get frustrated and give up. Make note of any adjustment made each time so that you can reverse them if they make things worse. Make small adjustments and remember that you are only trying to move the dot ½ the distance of the deviation not the whole distance.I hope this helps everyone and that you don’t burn me at the stake for my long-winded approach. Also, the author takes no responsibility for errors made by the operator! (GRIN)
Let me know how you make out. I am interested in whether I have made this clear and easy to understand. Ask questions by private mail if you need extra information.
Floyd Blue
President,
Kern Astronomical Society
Funding Member
