The Aries SAFIX
[ARTICLEIMGL="1"]Most active amateur astronomers have heard of the Chromacor, the device produced by Valery Deryuzhin at Aries Optical in the Ukraine that purportedly turns an achromatic refractor (especially an inexpensive Chinese achromatic refractor) into an APO analog. This device, I’m told by achro fans, works very well, pretty much doing what it’s advertised to do, amazingly enough. There are a couple of catches (there always are): the scope’s owner needs to be able to quantify the amount of spherical aberration present in the objective and order the proper Chromacor for the situation (overcorrected or undercorrected or null), and the scope and Chromacor need to be properly collimated with each-other. But neither of these prerequisites is a big problem for someone who can follow instructions and who knows a little about scopes. The Chromacor has been somewhat controversial, yes, but this has more to do with personalities and amateur astronomy politics, in my opinion, than with any shortcomings in the Aries product.
But I’m not really the person who should be talking about Chromacors, since I don’t have much interest in refractors, and am certainly not an expert when it comes to them. I own a nice little Short Tube 80 and that is it. I thought the idea of the Chromacor was somewhat interesting, though, since I am always intrigued by innovative, inexpensive solutions for equipment needs and problems. But I certainly didn’t go out and get a Chinese achromat and Chromacorr to play with. Didn’t need an Aries doo-dad. But then I heard about the SAFIX.
Spherical aberration is something that troubles amateur astronomers no matter which design of scope they use. In any telescope, if the objective, primary mirror, or combination of lenses and mirrors yields a final image that is too much like what is produced by a spherical mirror or lens, you’ve got Big Problems in River City. All rays of light will not come to focus at the same point, meaning your images are not and never will be sharp. This is the Hubble disease, and it affects more amateur telescopes than most of us would like to admit. In the past, spherical aberration was something that just had to be lived with. Unless you could refigure the mirror or objective or have it replaced by the manufacturer, you were stuck. Admittedly, spherical aberration is more harmful for high-power planetary viewing than it is for the deep sky observer, but, as was grimly evident in the pre-servicing-mission HST images, SA, spherical aberration, can ruin any high-power view.
Does your scope suffer from SA? Only you can determine the true facts of the case. And the way to do it is with star-testing, observing the appearance of the diffraction rings produced by a slightly out of focus star on both “sides” of focus, inside and outside. If your scope is free or nearly free of spherical aberration, the rings will look identical on either side of focus. Simple enough. In practice though, things can be a little more complicated. Seeing and scope cool-down must be good before a star-test can be attempted, and, if your scope is not perfect, determining just how imperfect it is can get a little hairy. Patterns produced by obstructed and unobstructed scopes will look different, and there will also be differences in what the star’s rings look on either side of focus depending on whether your system is overcorrected (outer zones of the mirror have a longer focus) or undercorrected (outer zones have a shorter focus).
Luckily, the basics of star-testing can be learned easily enough. If you’re fortunate, there will be an experienced amateur (what we used to call an “advanced amateur”) in your club who can show you the ropes in hands-on fashion. If there’s nobody like that around, the next best thing is a book, Dick Suiter’s Star Testing Astronomical Telescopes (Willman-Bell, ISBN 943396-44-1). This is a great book, and every amateur should have a copy, even if it does get a little deep in places. But a quick look at the first couple of chapters, a little staring at unfocused stars with your scope, and perhaps a few afternoons playing with Cor Berevoets’ Aberrator, a freeware program that simulates star-test optical programs on your PC (http://aberrator.astronomy.net/index.html), and you should be star-testing with the best of ‘em.
But so what? You learn to test your scope. You learn to identify and quantify spherical aberration. Your scope has it. What have you accomplished other than to make yourself unhappy and in the market for a replacement for the telescope that you used to think was good? Until recently, there wasn’t anything you could do, other than, as above, exchange, replace or refigure. Again, until recently. Not long ago, Valery announced that Aries planned to follow-up the Chromacor with something called the “SAFIX.” It would be similar to the Chromacor, but instead of removing color, this device would remove spherical aberration! “SAFIX,” “Spherical Aberration FIX,” get it? That made me sit up and take notice.
I think my telescopes, all eleven of them, are pretty good optically, though none is in the “premium” class. But I’m not a rose-colored glasses kind of guy. I know that all of them display at least a little under or over correction. Or, to put it bluntly, none of them is optically perfect, and all have some degree of SA. But what if I could magically remove all that nasty spherical aberration? And how about all the really problematical scopes out there? How about those 15-20 year-old SCTs still floating around? The Powerstars and LX5s and LX6es that can be had for a song? Something that could potentially bring those 80s Meade and Celestron OTAs that suffer from Halleyitis (that is, significant amounts of spherical aberration) back to life? Sign me up!
Some time went by and I didn’t hear much more about the SAFIX, but then Valery contacted me earlier this year and asked if I’d like to evaluate one. “Sure,” said I. And it wasn’t long before I had this supposed miracle-worker in hand, shipped from Aries’ U.S. dealer, Astrobuffet. Unfortunately weather, seeing and my schedule conspired to keep me from using the device very seriously for a while. I don’t know what’s with the seeing down here lately. Here in the heart of Possum Swamp on the hot and muggy Gulf Coast, the seeing can be rock solid for extended periods. But that has not been the case of late. Oh, it’s humid enough, and there are plenty of mosquitoes, but the air has been quite unsettled at higher altitudes, apparently. But with Mars on its way, I knew lots of folks would be very interested in this gadget, so I kept after it, hauling the Ultima 8 and Nexstar 11 out at every opportunity until I had accumulated enough data and experience on the SAFIX to give you an educated idea of its effectiveness.
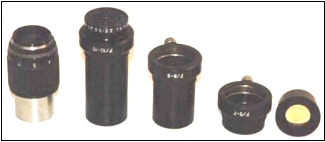
What did I find inside the box from Astrobuffet? As shown in the photo up top, in addition to the SAFIX
, there were extension tubes and a Ronchi tester—more on the latter two items in a moment. Basically, I was impressed. When it comes to scopes, eyepieces and other equipment, what counts is how well something performs optically. But, let’s face it, most amateurs—including me--want their hard-earned astro-goodies to look cool. Sure, that 35 Panoptic is a hell of a performer, but isn’t at least part of the fun impressing your brother and sister amateurs with how awesome it looks? I was a little uneasy about this facet of the SAFIX until I’d had a chance to see one for myself. There wasn’t much scuttlebutt about the SAFIX on the ‘net. But I did hear a couple of depressing rumors that indicated that the SAFIX looked “rough” or even “homemade.” Forget these rumors. That’s all they are and they are dead wrong. This Ukrainian-made device is very professionally done. It is attractive and easily equal to comparably-priced gear from the U.S., Japan or Western Europe when it comes to fit and finish. You’ll be proud to show it off.
 How does this thing work? As far as fitting to the scope, the SAFIX works very simply. You use it just like a barlow. It goes in your focuser, and you put your eyepieces in the SAFIX
(see Plate 2). But there’s one big difference between this thing and a barlow: the barrel is adjustable. It rotates and has a graduated scale marked 1 - 5 on both sides of zero; allowing you to adjust/apply for over or under correction. It’s a little like a zoom eyepiece in its construction.
This barrel adjustment works so smoothly that I was concerned about accidentally moving it off the “sweet spot,” the proper setting for a particular scope’s degree of over/under-correction, in the course of observing, and wondered if maybe a positive-detent type of adjustment would have been better. In practice, this was not a problem, however. I never accidentally moved the SAFIX off its chosen setting. Again, the feel is great. It was fun just to twist the barrel adjustment back and forth to feel the buttery smooth action.
Actually, the SAFIX differs from a barlow in one other regard. Eyepieces aren’t inserted directly into it, but into barrels that screw into the SAFIX body. These barrels come in different lengths for different focal ratios (longer focal ratio telescopes require longer barrels). Aries includes barrels for f/5-7, f/8-9, and f/10-15 in the basic package. I noted that the unit I received did not come with the 10-15 barrel, and contacted Valery. I was concerned since I’d be testing the SAFIX mainly on f/10 SCTs. He told me that unless my scope was really “bad,” the f/8-9 barrel should work fine, and indeed it did.
For SCT users, Aries suggests that you may want to use the SAFIX(which, if I haven’t mentioned it before, is a 1.25” device) in a 1.25” diagonal in order to keep your scope near its optimum-design focal length. But I don’t like 1.25” diagonals. I hate ‘em as a matter of fact. Unless I’m using lightweight 1.25” plossls, my eyepieces just never seem secure, especially in the stock Chinese diagonals that Meade and Celestron ship with their scopes these days. So I chose to use the SAFIX in a 2” diagonal plugged into the EyeOpener on the C11 or an Intes 2” visual back on the C8. I did compare results with the SAFIX in a 1.25” setup, and didn’t notice any difference.
Looks good, but how easy is it set-up? To adjust for your scope’s particular SA “profile?” I was a little daunted at the thought of trying to figure this thing out. Make that scared. I’ve read Suiter’s book, but the nuances of star testing and optical quality leave my head spinning (before the first shot of Rebel Yell, even!). I needn’t have worried. It just wasn’t that bad or hard. I devoted an evening to getting the feel for adjusting the SAFIX, but you’re probably smarter and have sharper eyes than I do and will probably have it nicely tuned-in in 10 or 15 minutes. “Tune” is a good word to describe the SAFIX’s operation. Think of adjusting it as being analogous to tuning your guitar.
Yes, before you can enjoy the benefits of the SAFIX you have to “tune up,” calibrate it for your scope’s degree of spherical aberration. There are two ways of doing this. One is via the star test. Adjust until the outer ring looks the same on both sides of focus. Another way of looking at this, especially the pattern produced by an SCT, is that you should adjust the SAFIX until the outer ring of the diffraction pattern is equally “fuzzy” on both sides of focus. You don’t want sharp on one side and fuzzy on the other.
Star test not your cup of tea? There’s an alternative. You can purchase a Ronchi grating from Aries (75 US$ if purchased with your SAFIX. This isn’t just a piece of plastic grating material, it is a nicely-made and housed glass Ronchi tester. It’s installed in an eyepiece-like barrel, and takes the place of an eyepiece in the SAFIX. It works simply and easily: adjust focus until the characteristic bands-on-illuminated-disk appear—you will normally place the Ronchi inside focus to achieve this--and adjust SAFIX until band are straight. With a normal grating, you often have to use a green or yellow filter in order to make the bands easy to see, but the SAFIX tester is already tinted yellow so there’s no need for a filter.
Which method worked best? Generally speaking, I preferred the star test. It wasn’t hard, and seemed more precise to me. But on nights when the seeing wasn’t quite what it could have been, the Ronchi came in very handy. While good seeing is critical for successful adjustment, no matter which method you use, I found that I could often adjust the SAFIX accurately under less-than optimum seeing conditions with the Ronchi. Under the same conditions, the star test method just didn’t cut it—I couldn’t figure out exactly what was going on with the bouncing, boiling diffraction pattern. I would suspect that for many people the Ronchi may be the preferred means of adjustment. Telescope cool-down is critical for both methods. A telescope’s degree of spherical aberration will change as the scope cools. However you choose to adjust the SAFIX, once you find the proper setting, you obviously don’t have to do the calibration again unless you change scopes. Now that I think about it, during scope cool-down you actually may want to tweak the SAFIX setting a bit for best images, resetting it to your normal value once the mirror assumes its “real” shape. I haven’t tried this, but can’t think of any reason why it shouldn’t work, and it would be a nice side-benefit of the SAFIX.
My experiences, real-life experiences, with the SAFIX in the field? I tested mainly on Jupiter, which is the most “critical” object in the sky—lots of low contrast detail. I started out with the Nexstar 11. The SAFIX did make a difference, but it was only adjusted a short distance off zero. This is NOT a criticism of the SAFIX, but a testament to the good quality of Celestron’s optics at the moment. Let me add right here, that just about ANY SCT will have some degree of spherical aberration. Period. Why? An SCT can only be perfectly corrected for spherical aberration at one spacing of the mirrors. Move the primary mirror (to focus) and the scope MUST become either over or under-corrected. Unless you’re lucky enough to have a situation where all your eyepieces come to focus very near this optimum mirror-spacing, which is where an image at the focal plane of a 35mm camera attached to the scope with a standard T adapter (whatever “standard” is) is in focus, you will not be perfectly corrected.
But my NS11 does star test pretty well, no matter how you slice it. Now, my beloved Ultima 8? Well, that was a somewhat different story. I’ve always thought its optics are danged good. But, no, they are not perfect, or at least not as good SA-wise as those on the NS11. And my use of a 2” visual back/adapter and 2 inch accessories probably doesn’t help, either. The SAFIX definitely improved my views of Jupe in this scope. Noticeably better. It simply made “good” “better.” It seemed, especially, to help when seeing was not so hot. I’m not really sure why that should be, but it was what I observed. But the SAFIX improved the images this scope delivered anytime. Yes, I could normally see four or five belts without the SAFIX, but with it in place I was seeing more detail in the belts, their complex edges, festoons, and more. It seemed to make subtle color contrasts more noticeable, too. It also allowed me to use higher powers. As I mentioned above, the seeing hasn’t really been that great this year, but when it was reasonable the U8 took 400x plus with aplomb—with the SAFIX riding on the rear cell, that is.
Oh, the SAFIX seemed to work equally well with any of the eyepieces I used, from a Nagler to a Chinese Plossl. Naturally, the better the eyepiece the better the image, but that’s the case with or without the SAFIX, of course. Images didn’t look dimmer with the SAFIX in place, but it did seem to impart a slightly warm, yellowish tint to Jupiter. I did not find this objectionable, however.
While the SAFIX looks like a barlow, it ain’t a barlow. It’s nothing like one, optically. And some scopes will have problems reaching focus with it in place. In this regard, don’t think “barlow,” think “binoviewer.” The SAFIX moves the focus-point in, and your scope must be able to accommodate this change. Any SCT or moving-mirror-focusing MCT is home free. There’s a big focus change when you insert the SAFIX, but nothing your scope won’t handle. Newtonians? I suspect that you’ll have problems depending on your scope’s focuser/optical setup. It would definitely NOT reach focus with my Short Tube 80 refractor. But I’d guess that many refractors will have the requisite focus-travel. These problems are easy enough to cure, just as you would if you wanted to use a binoviewer—shorten tube, move mirror up tube, go to a low profile focuser, etc.
Do you need a SAFIX? That depends. If you’re mainly a deep sky observer using medium powers and 2 inch accessories, probably not. If, however, you are at least moderately interested in the planets—or high power viewing in general--and want to wring every last bit of performance out of your scope, I think you should consider it. This thing works and will help almost any scope. Naturally, the more SA your scope has, the more FIX this will apply. At over 450 dollars in the U.S. without the Ronchi attachment, the SAFIX is not cheap, but compared to the prices that many amateurs are willing—nay, EAGER—to pay for top-of-the-line eyepieces these days, it is not bad, either. Actually, depending on your scope and observing interests, this might do more for you than that groovy new Nagler Type XXI. It is well-designed, well-made and is definitely something you can keep and use for the rest of your observing career. You never know when that Halley-vintage C8 or 2080 will arrive on your doorstep, and, based on my testing I think this little thing can turn the Great Red Spot in one of these sad, old scopes from, “I think I see it” to “OH YEAH!”
Any criticisms? The SAFIX appears to work as advertised, so there isn’t a whole lot to criticize. I do note that the review unit I received did not include any instructions at all. A good instruction manual will be critical for many folks to get the most out of the SAFIX—underline that, CRITICAL--and I hope they supply a really well-written one with normal production models. Bottom Line? The Aries SAFIX is a quality piece of gear. I recommend it.
But I’m not really the person who should be talking about Chromacors, since I don’t have much interest in refractors, and am certainly not an expert when it comes to them. I own a nice little Short Tube 80 and that is it. I thought the idea of the Chromacor was somewhat interesting, though, since I am always intrigued by innovative, inexpensive solutions for equipment needs and problems. But I certainly didn’t go out and get a Chinese achromat and Chromacorr to play with. Didn’t need an Aries doo-dad. But then I heard about the SAFIX.
Spherical aberration is something that troubles amateur astronomers no matter which design of scope they use. In any telescope, if the objective, primary mirror, or combination of lenses and mirrors yields a final image that is too much like what is produced by a spherical mirror or lens, you’ve got Big Problems in River City. All rays of light will not come to focus at the same point, meaning your images are not and never will be sharp. This is the Hubble disease, and it affects more amateur telescopes than most of us would like to admit. In the past, spherical aberration was something that just had to be lived with. Unless you could refigure the mirror or objective or have it replaced by the manufacturer, you were stuck. Admittedly, spherical aberration is more harmful for high-power planetary viewing than it is for the deep sky observer, but, as was grimly evident in the pre-servicing-mission HST images, SA, spherical aberration, can ruin any high-power view.
Does your scope suffer from SA? Only you can determine the true facts of the case. And the way to do it is with star-testing, observing the appearance of the diffraction rings produced by a slightly out of focus star on both “sides” of focus, inside and outside. If your scope is free or nearly free of spherical aberration, the rings will look identical on either side of focus. Simple enough. In practice though, things can be a little more complicated. Seeing and scope cool-down must be good before a star-test can be attempted, and, if your scope is not perfect, determining just how imperfect it is can get a little hairy. Patterns produced by obstructed and unobstructed scopes will look different, and there will also be differences in what the star’s rings look on either side of focus depending on whether your system is overcorrected (outer zones of the mirror have a longer focus) or undercorrected (outer zones have a shorter focus).
Luckily, the basics of star-testing can be learned easily enough. If you’re fortunate, there will be an experienced amateur (what we used to call an “advanced amateur”) in your club who can show you the ropes in hands-on fashion. If there’s nobody like that around, the next best thing is a book, Dick Suiter’s Star Testing Astronomical Telescopes (Willman-Bell, ISBN 943396-44-1). This is a great book, and every amateur should have a copy, even if it does get a little deep in places. But a quick look at the first couple of chapters, a little staring at unfocused stars with your scope, and perhaps a few afternoons playing with Cor Berevoets’ Aberrator, a freeware program that simulates star-test optical programs on your PC (http://aberrator.astronomy.net/index.html), and you should be star-testing with the best of ‘em.
But so what? You learn to test your scope. You learn to identify and quantify spherical aberration. Your scope has it. What have you accomplished other than to make yourself unhappy and in the market for a replacement for the telescope that you used to think was good? Until recently, there wasn’t anything you could do, other than, as above, exchange, replace or refigure. Again, until recently. Not long ago, Valery announced that Aries planned to follow-up the Chromacor with something called the “SAFIX.” It would be similar to the Chromacor, but instead of removing color, this device would remove spherical aberration! “SAFIX,” “Spherical Aberration FIX,” get it? That made me sit up and take notice.
I think my telescopes, all eleven of them, are pretty good optically, though none is in the “premium” class. But I’m not a rose-colored glasses kind of guy. I know that all of them display at least a little under or over correction. Or, to put it bluntly, none of them is optically perfect, and all have some degree of SA. But what if I could magically remove all that nasty spherical aberration? And how about all the really problematical scopes out there? How about those 15-20 year-old SCTs still floating around? The Powerstars and LX5s and LX6es that can be had for a song? Something that could potentially bring those 80s Meade and Celestron OTAs that suffer from Halleyitis (that is, significant amounts of spherical aberration) back to life? Sign me up!
Some time went by and I didn’t hear much more about the SAFIX, but then Valery contacted me earlier this year and asked if I’d like to evaluate one. “Sure,” said I. And it wasn’t long before I had this supposed miracle-worker in hand, shipped from Aries’ U.S. dealer, Astrobuffet. Unfortunately weather, seeing and my schedule conspired to keep me from using the device very seriously for a while. I don’t know what’s with the seeing down here lately. Here in the heart of Possum Swamp on the hot and muggy Gulf Coast, the seeing can be rock solid for extended periods. But that has not been the case of late. Oh, it’s humid enough, and there are plenty of mosquitoes, but the air has been quite unsettled at higher altitudes, apparently. But with Mars on its way, I knew lots of folks would be very interested in this gadget, so I kept after it, hauling the Ultima 8 and Nexstar 11 out at every opportunity until I had accumulated enough data and experience on the SAFIX to give you an educated idea of its effectiveness.
What did I find inside the box from Astrobuffet? As shown in the photo up top, in addition to the SAFIX
, there were extension tubes and a Ronchi tester—more on the latter two items in a moment. Basically, I was impressed. When it comes to scopes, eyepieces and other equipment, what counts is how well something performs optically. But, let’s face it, most amateurs—including me--want their hard-earned astro-goodies to look cool. Sure, that 35 Panoptic is a hell of a performer, but isn’t at least part of the fun impressing your brother and sister amateurs with how awesome it looks? I was a little uneasy about this facet of the SAFIX until I’d had a chance to see one for myself. There wasn’t much scuttlebutt about the SAFIX on the ‘net. But I did hear a couple of depressing rumors that indicated that the SAFIX looked “rough” or even “homemade.” Forget these rumors. That’s all they are and they are dead wrong. This Ukrainian-made device is very professionally done. It is attractive and easily equal to comparably-priced gear from the U.S., Japan or Western Europe when it comes to fit and finish. You’ll be proud to show it off.
How does this thing work? As far as fitting to the scope, the SAFIX works very simply. You use it just like a barlow. It goes in your focuser, and you put your eyepieces in the SAFIX (see Plate 2). But there’s one big difference between this thing and a barlow: the barrel is adjustable. It rotates and has a graduated scale marked 1 - 5 on both sides of zero; allowing you to adjust/apply for over or under correction. It’s a little like a zoom eyepiece in its construction.
This barrel adjustment works so smoothly that I was concerned about accidentally moving it off the “sweet spot,” the proper setting for a particular scope’s degree of over/under-correction, in the course of observing, and wondered if maybe a positive-detent type of adjustment would have been better. In practice, this was not a problem, however. I never accidentally moved the SAFIX off its chosen setting. Again, the feel is great. It was fun just to twist the barrel adjustment back and forth to feel the buttery smooth action.
Actually, the SAFIX differs from a barlow in one other regard. Eyepieces aren’t inserted directly into it, but into barrels that screw into the SAFIX body. These barrels come in different lengths for different focal ratios (longer focal ratio telescopes require longer barrels). Aries includes barrels for f/5-7, f/8-9, and f/10-15 in the basic package. I noted that the unit I received did not come with the 10-15 barrel, and contacted Valery. I was concerned since I’d be testing the SAFIX mainly on f/10 SCTs. He told me that unless my scope was really “bad,” the f/8-9 barrel should work fine, and indeed it did.
For SCT users, Aries suggests that you may want to use the SAFIX(which, if I haven’t mentioned it before, is a 1.25” device) in a 1.25” diagonal in order to keep your scope near its optimum-design focal length. But I don’t like 1.25” diagonals. I hate ‘em as a matter of fact. Unless I’m using lightweight 1.25” plossls, my eyepieces just never seem secure, especially in the stock Chinese diagonals that Meade and Celestron ship with their scopes these days. So I chose to use the SAFIX in a 2” diagonal plugged into the EyeOpener on the C11 or an Intes 2” visual back on the C8. I did compare results with the SAFIX in a 1.25” setup, and didn’t notice any difference.
Looks good, but how easy is it set-up? To adjust for your scope’s particular SA “profile?” I was a little daunted at the thought of trying to figure this thing out. Make that scared. I’ve read Suiter’s book, but the nuances of star testing and optical quality leave my head spinning (before the first shot of Rebel Yell, even!). I needn’t have worried. It just wasn’t that bad or hard. I devoted an evening to getting the feel for adjusting the SAFIX, but you’re probably smarter and have sharper eyes than I do and will probably have it nicely tuned-in in 10 or 15 minutes. “Tune” is a good word to describe the SAFIX’s operation. Think of adjusting it as being analogous to tuning your guitar.
Yes, before you can enjoy the benefits of the SAFIX you have to “tune up,” calibrate it for your scope’s degree of spherical aberration. There are two ways of doing this. One is via the star test. Adjust until the outer ring looks the same on both sides of focus. Another way of looking at this, especially the pattern produced by an SCT, is that you should adjust the SAFIX until the outer ring of the diffraction pattern is equally “fuzzy” on both sides of focus. You don’t want sharp on one side and fuzzy on the other.
Star test not your cup of tea? There’s an alternative. You can purchase a Ronchi grating from Aries (75 US$ if purchased with your SAFIX. This isn’t just a piece of plastic grating material, it is a nicely-made and housed glass Ronchi tester. It’s installed in an eyepiece-like barrel, and takes the place of an eyepiece in the SAFIX. It works simply and easily: adjust focus until the characteristic bands-on-illuminated-disk appear—you will normally place the Ronchi inside focus to achieve this--and adjust SAFIX until band are straight. With a normal grating, you often have to use a green or yellow filter in order to make the bands easy to see, but the SAFIX tester is already tinted yellow so there’s no need for a filter.
Which method worked best? Generally speaking, I preferred the star test. It wasn’t hard, and seemed more precise to me. But on nights when the seeing wasn’t quite what it could have been, the Ronchi came in very handy. While good seeing is critical for successful adjustment, no matter which method you use, I found that I could often adjust the SAFIX accurately under less-than optimum seeing conditions with the Ronchi. Under the same conditions, the star test method just didn’t cut it—I couldn’t figure out exactly what was going on with the bouncing, boiling diffraction pattern. I would suspect that for many people the Ronchi may be the preferred means of adjustment. Telescope cool-down is critical for both methods. A telescope’s degree of spherical aberration will change as the scope cools. However you choose to adjust the SAFIX, once you find the proper setting, you obviously don’t have to do the calibration again unless you change scopes. Now that I think about it, during scope cool-down you actually may want to tweak the SAFIX setting a bit for best images, resetting it to your normal value once the mirror assumes its “real” shape. I haven’t tried this, but can’t think of any reason why it shouldn’t work, and it would be a nice side-benefit of the SAFIX.
My experiences, real-life experiences, with the SAFIX in the field? I tested mainly on Jupiter, which is the most “critical” object in the sky—lots of low contrast detail. I started out with the Nexstar 11. The SAFIX did make a difference, but it was only adjusted a short distance off zero. This is NOT a criticism of the SAFIX, but a testament to the good quality of Celestron’s optics at the moment. Let me add right here, that just about ANY SCT will have some degree of spherical aberration. Period. Why? An SCT can only be perfectly corrected for spherical aberration at one spacing of the mirrors. Move the primary mirror (to focus) and the scope MUST become either over or under-corrected. Unless you’re lucky enough to have a situation where all your eyepieces come to focus very near this optimum mirror-spacing, which is where an image at the focal plane of a 35mm camera attached to the scope with a standard T adapter (whatever “standard” is) is in focus, you will not be perfectly corrected.
But my NS11 does star test pretty well, no matter how you slice it. Now, my beloved Ultima 8? Well, that was a somewhat different story. I’ve always thought its optics are danged good. But, no, they are not perfect, or at least not as good SA-wise as those on the NS11. And my use of a 2” visual back/adapter and 2 inch accessories probably doesn’t help, either. The SAFIX definitely improved my views of Jupe in this scope. Noticeably better. It simply made “good” “better.” It seemed, especially, to help when seeing was not so hot. I’m not really sure why that should be, but it was what I observed. But the SAFIX improved the images this scope delivered anytime. Yes, I could normally see four or five belts without the SAFIX, but with it in place I was seeing more detail in the belts, their complex edges, festoons, and more. It seemed to make subtle color contrasts more noticeable, too. It also allowed me to use higher powers. As I mentioned above, the seeing hasn’t really been that great this year, but when it was reasonable the U8 took 400x plus with aplomb—with the SAFIX riding on the rear cell, that is.
Oh, the SAFIX seemed to work equally well with any of the eyepieces I used, from a Nagler to a Chinese Plossl. Naturally, the better the eyepiece the better the image, but that’s the case with or without the SAFIX, of course. Images didn’t look dimmer with the SAFIX in place, but it did seem to impart a slightly warm, yellowish tint to Jupiter. I did not find this objectionable, however.
While the SAFIX looks like a barlow, it ain’t a barlow. It’s nothing like one, optically. And some scopes will have problems reaching focus with it in place. In this regard, don’t think “barlow,” think “binoviewer.” The SAFIX moves the focus-point in, and your scope must be able to accommodate this change. Any SCT or moving-mirror-focusing MCT is home free. There’s a big focus change when you insert the SAFIX, but nothing your scope won’t handle. Newtonians? I suspect that you’ll have problems depending on your scope’s focuser/optical setup. It would definitely NOT reach focus with my Short Tube 80 refractor. But I’d guess that many refractors will have the requisite focus-travel. These problems are easy enough to cure, just as you would if you wanted to use a binoviewer—shorten tube, move mirror up tube, go to a low profile focuser, etc.
Do you need a SAFIX? That depends. If you’re mainly a deep sky observer using medium powers and 2 inch accessories, probably not. If, however, you are at least moderately interested in the planets—or high power viewing in general--and want to wring every last bit of performance out of your scope, I think you should consider it. This thing works and will help almost any scope. Naturally, the more SA your scope has, the more FIX this will apply. At over 450 dollars in the U.S. without the Ronchi attachment, the SAFIX is not cheap, but compared to the prices that many amateurs are willing—nay, EAGER—to pay for top-of-the-line eyepieces these days, it is not bad, either. Actually, depending on your scope and observing interests, this might do more for you than that groovy new Nagler Type XXI. It is well-designed, well-made and is definitely something you can keep and use for the rest of your observing career. You never know when that Halley-vintage C8 or 2080 will arrive on your doorstep, and, based on my testing I think this little thing can turn the Great Red Spot in one of these sad, old scopes from, “I think I see it” to “OH YEAH!”
Any criticisms? The SAFIX appears to work as advertised, so there isn’t a whole lot to criticize. I do note that the review unit I received did not include any instructions at all. A good instruction manual will be critical for many folks to get the most out of the SAFIX—underline that, CRITICAL--and I hope they supply a really well-written one with normal production models. Bottom Line? The Aries SAFIX is a quality piece of gear. I recommend it.
Funding Member
